What are the specifications of the Raspberry Pi Zero W?
Before we can decide if a Raspberry Pi Zero W is suitable for our Raspberry Pi project, it is helpful to know the specifications.
Before we can decide if a Raspberry Pi Zero W is suitable for our Raspberry Pi project, it is helpful to know the specifications.
When you want to build a microsite, jQuery can help you simplify client side interactivity. If you build your website with WordPress, then you will be able to use jQuery in the custom theme that you are building.
Since you will base your site interactivity on jQuery, you may write JavaScript codes that throw the following error:
Uncaught ReferenceError: jQuery / $ is not defined.
In some cases, the error may appear randomly, making it hard to detect.
So how can we prevent our JavaScript codes from throwing a “Uncaught ReferenceError: jQuery / $ is not defined”?
If you want to direct someone to a web page without saying a word, then you can use QR codes to do so.
For example, your QR code reader will direct your phone’s browser to visit our home page when you scan the following QR Code:

Given that, you can use QR codes to send HTTP requests to an endpoint of your HTTP server. In addition, you can embed data that you wish to send to the endpoint in the QR codes.
With this in mind, let’s look at how we can use pycrypto, python-qrcode and Flask-RESTPlus to create QR codes that can send encrypted data to an endpoint.
Previously, I discussed how to use Flask-APScheduler in your Python 3 Flask application to run multiple tasks in parallel, from a single HTTP request.
When we run jobs as discussed in that post, jobs are ran once by the underlying ApScheduler instance. In addition, our Flask endpoint return the HTTP response back to the HTTP client as soon as the jobs are scheduled.
If we do not want the HTTP client to know the outcome of the jobs within that HTTP call, then we are good. But what if we want to include any errors that the jobs encounter in the same HTTP response?
In such a situation, we will need a mechanism to wait for the one-off jobs to complete execution before returning that response.
Given that in mind, this post shows how we can use threading.Condition to wait for several Flask-APScheduler one-off jobs to complete execution.
When you wish to encrypt and decrypt data in your Python 3 application, you can take a look at pycrypto.
Given that, let us look at how we can encrypt and decrypt data in Python 3 using pycrpto.
Previously, I talked about how to use Flask-APScheduler in your Python 3 Flask application to run multiple tasks in parallel, from a single HTTP request.
If you wish to run long running tasks triggered by an HTTP request, then that post will help you do so.
However, what if you want to run jobs periodically without blocking your Flask HTTP server from serving HTTP requests?
In this case, you will want to run an interval task with Flask-APScheduler.
Given that, let’s look at how we can use Flask-APScheduler to create an interval task within your Python 3 Flask application.
If you have a Raspberry Pi 2, 3 or 4, then you can install the official Ubuntu 19.10 server.
Since Ubuntu is a popular Linux distro for servers, you may want to install it on your Raspberry Pi server.
Given that, let’s look at how we can install Ubuntu 19.10 server on your Raspberry Pi.
As I had mentioned in how to host multiple websites from home, a typical network architecture looks like the following:
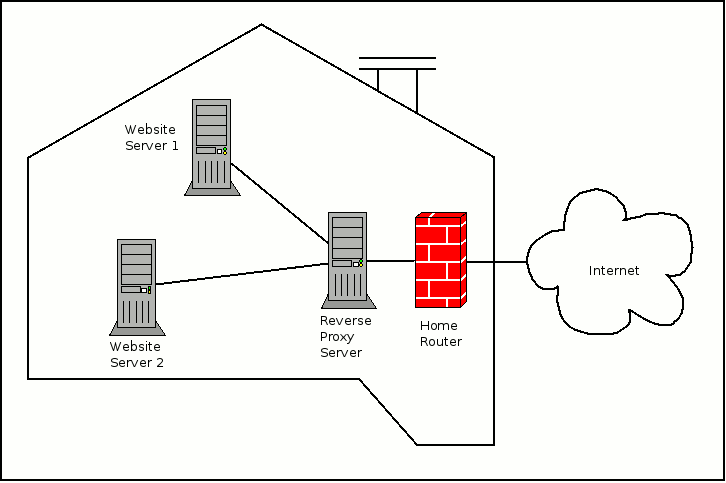 In such a case, we will need our router to hold a public IP address and perform port forwarding for our home servers.
However, there can be cases where we do not have the environment to put our server on the internet.
In such a situation, you will find ngrok useful. Since ngrok accepts traffic on a public address and relays that traffic through to the ngrok process running on your machine, you can put your server on the internet easily.
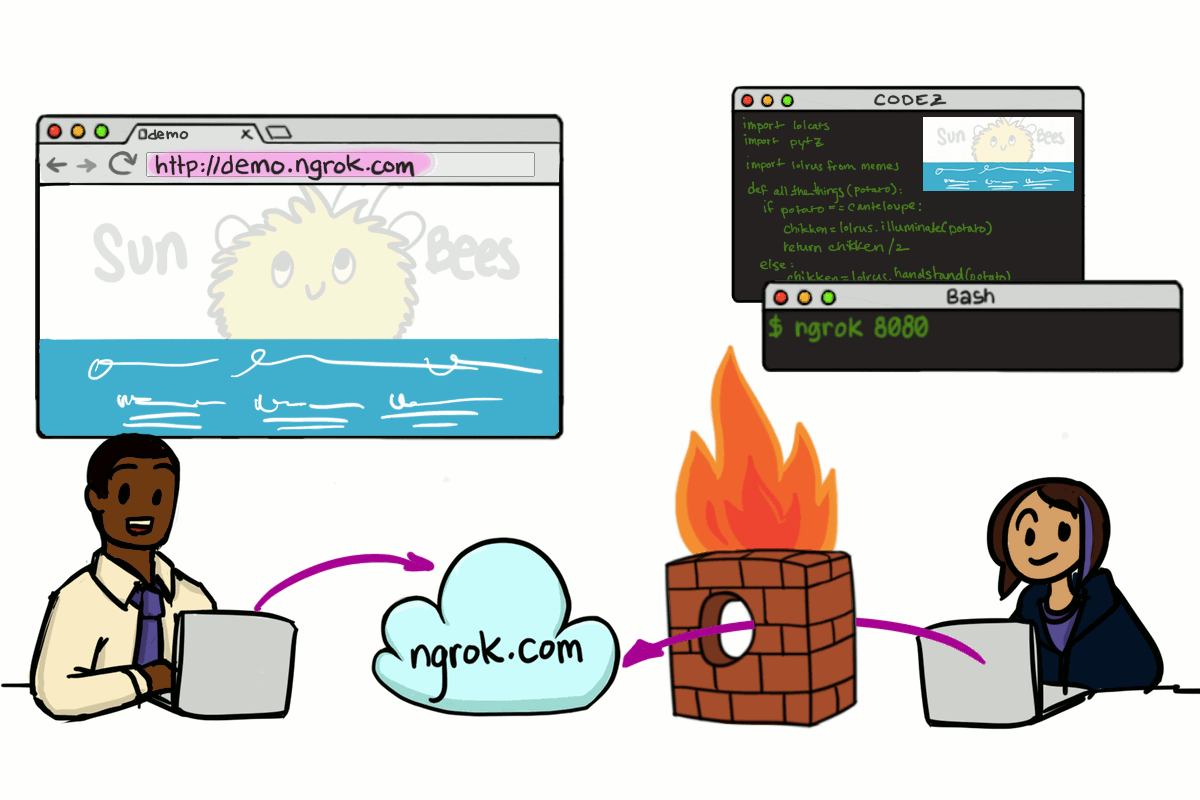
Given that, let’s look at how you can put your Raspberry Pi server on the internet with ngrok.
When you want to turn your unused Raspberry Pi into a security camera, you can take a look at motionEyeOS.
So what is motionEyeOS? In short, motionEyeOS is a Linux distribution that turns your single board computer into a video surveillance system. Therefore, it is convenient to setup a Raspberry Pi security camera with motionEyeOS.
Given these points, let us look at how we can setup a Raspberry Pi security camera with motionEyeOS.

© 2010 - 2023 Techcoil.com: All Rights Reserved / Disclaimer
Follow us