How to host multiple websites from home
A website is a collection of related web pages, including multimedia content, that people can access anytime from anywhere of the Internet.
A website facilities the exchange of information between multiple parties. For instance, when you read the content of this page, I would have, hopefully, share the information of how to host multiple websites from home.
With the proliferation of single-board computers, it is now inexpensive to deploy computing devices to serve web applications from home. If you do not switch off your Internet modem at home, you may want the option of accessing some of these devices when you are away from home.
For example, here are some web applications / websites that you may host from home:
- WordPress on Raspberry Pi 3 with Raspbian Stretch Lite, nginx, MariaDB and PHP 7 as the LEMP stack
- Static website on Raspberry Pi 3
- Raspberry Pi 3 Go Git Service
- Taiga project management system on Raspberry Pi 3
- Raspberry Pi 3 CCTV camera
- Raspberry Pi Zero W CCTV camera
- Codiad Web IDE on my Raspberry Pi 3
- ProjectSend on your Raspberry Pi 3 for sharing files
This post documents some procedures that we can follow in order to host multiple websites from home.
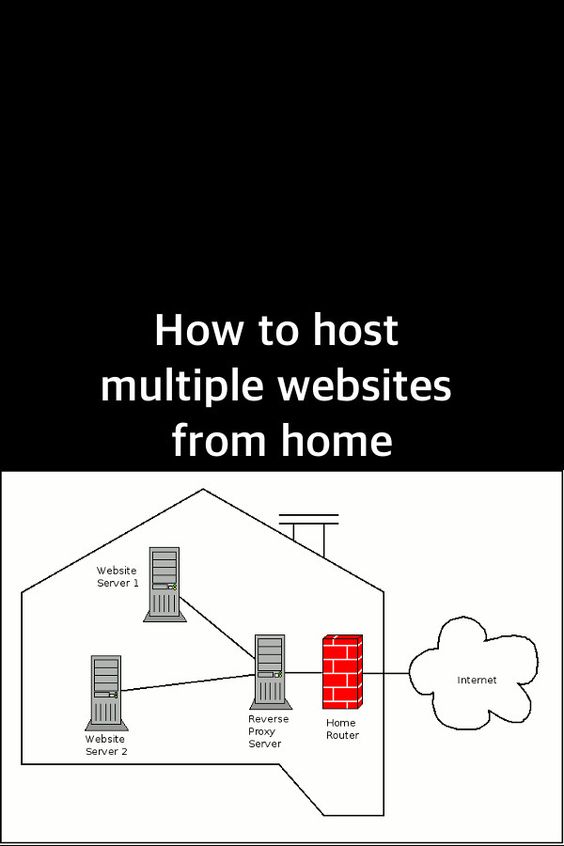
Typical network architecture for hosting multiple websites from home
The following is a typical network architecture for hosting multiple websites from home:
As shown above, the home router has a connection to the Internet.
In addition, the reverse proxy server and all upstream servers (for eg, Website Server 1 and Website Server 2) are all connected the private network that the home router maintains.
Whenever a HTTP request is received by the home router, the home router sends it to the reverse proxy server for processing.
Setting up a reverse proxy server
When we subscribe to an Internet subscription, the Internet Service provider usually provide us with one public IP address. In order to host multiple websites with that IP address, we will need a reverse proxy server.
Therefore, setup a reverse proxy server to handle the HTTP requests made to different domain names.
Since Raspberry Pi 3 is quite affordable, we can setup a reverse proxy server with Nginx, Raspbian and Raspberry Pi 3.
Creating network address translation rules to map port 80 and 443 of router's public IP address to reverse proxy server's private IP address
To allow for multiple devices to access the internet, most of us probably have a router sitting behind the modem given by our Internet Service Provider. Most of the home routers available in the market allow the creation of network address translation rules to map certain ports of the router's public IP address to a private IP address.
If you own a Linksys EA7500 Max-Stream AC1900 router, this is how you can create the network address translation rules to map port 80 and 443 of router's public IP address to reverse proxy server's private IP address.
After you had configured your router as such, all network traffic received at port 80 and 443 of the public IP address will be handled by your reverse proxy server. Given that, your reverse proxy server can then dispatch HTTP requests for different websites / web applications to the corresponding upstream server.
Allocating one domain name for each website
A domain name is usually an easy-to-remember name that maps to hard-to-remember IP addresses for the web client to contact a web server.
One effective way will be to use one domain name for each website. For example, I could allocate cctv1.techcoil.com for a Raspberry Pi 3 CCTV camera, cctv2.techcoil.com for a Raspberry Pi Zero W CCTV camera and pymvp.techcoil.com for my Python Flask Minimal Viable Product.
Setup dynamic DNS to make sure each of your domain points to your home public IP address even when it changes
When your public IP address of your home router constantly change, you will need to setup dynamic DNS to map each of your domain to the new public IP address. If you get your domain from Namecheap, this is how you can get a Raspberry Pi 3 to use Namecheap dynamic DNS to update your domain when your home’s public IP address changes.
If your public IP address of your home router do not change when you do not switch it off, you can ignore this step.
Creating a virtual host entry for each website on the reverse proxy server
A virtual host entry is a set of configurations for the reverse proxy server to serve several name-based websites with a single IP address.
To serve multiple websites, we will create one set of virtual host entry for each of the domain name.
A sample virtual host entry on Nginx (taken from the Raspberry Pi 3 CCTV guide) looks like the following:
server {
    listen 80;
    server_name  cctv.adomainname.com;

    location / {
        proxy_pass http://192.168.0.107;
    }
}
The set of configurations tells the nginx server to delegate HTTP requests received at port 80 which are directed at the cctv.adomainname.com domain to the upstream server located at 192.168.0.107.
The nginx server will forward the HTTP responses that it receives from the upstream server located at 192.168.0.107 back to the senders who send the HTTP requests.
Typically, we keep each set of configurations for each domain in a separate configuration file inside the nginx configuration directory. On Raspbian, we can place the configurations files inside the /etc/nginx/sites-enabled directory.
Also, I would typically name the configuration file with the domain name and append .conf to the end of the filename. For instance, I will put the above sample configurations inside the /etc/nginx/sites-enabled/cctv.adomainname.com.conf file.
Configuring a domain name service to point all our domains to our router's public IP address
Once we had setup our reverse proxy server and configured our router to relay all the network traffic received on port 80 and port 443 to the reverse proxy server, the next task is to configure a domain name service to point all our domains to our router's public IP address.
If you happen to use DigitalOcean for your website, you can use DigitalOcean's domain name service to map all your domains for the websites to your router's public IP address. This is how you can create a sub domain and point it to an IP address in Digital Ocean control panel.
If you had gotten your domain name from Namecheap, this is how to map your public IP address to your domain name.
When the DNS configurations take effect, HTTP clients accessing your domains will be directed to your reverse proxy server.
Using Let's Encrypt to generate SSL certificates for each domain on the reverse proxy server
Like other websites on the internet, we would want the websites that we host at home to be secured. Luckily for the world, Let's Encrypt was created to give everyone free SSL/TLS Certificates which are certified by a certificate authority that most browsers trust out of the box.
Installing Certbot on reverse proxy server
The issuance of Let’s Encrypt certificates is automated by software participating in the ACME protocol. Certbot is one such client that can help us get free browser-trusted SSL/TLS certificates from Let's Encrypt. You can find the instructions to install Certbot based on the operating system that your reverse proxy server runs.
In case you have a Raspberry Pi reverse proxy server running Raspbian Stretch Lite, this is how you can install Certbot on Raspbian Stretch Lite.
You will only need to install Certbot on your reverse proxy server once.
Configuring Nginx to demonstrate control over your domain
For each of your domain, you will need to demonstrate control over your domain.
For the purpose of this guide, let's use the Nginx configurations that we had mentioned earlier.
In order to demonstrate that we have control over cctv.adomainname.com, we will add the following block inside the Nginx configuration file for that domain:
location ~ /.well-known {
    allow all;
}
After we had done so, the Nginx configuration file will look like this:
server {
    listen 80;
    server_name  cctv.adomainname.com;

    root /var/www/cctv.adomainname.com;

    location ~ /.well-known {
         allow all;
    }

    location / {
        proxy_pass http://192.168.0.107;
    }
}
When you had edited the Nginx configuration file, restart your Nginx server.
Noticed that we had added the root directive to a directory on the reverse proxy server as well. This is needed for the ACME challenges to be served by the reverse proxy server. The ACME challenges are files that will be created by Certbot when it contacts Let's Encrypt servers to issue the SSL certificate.
Using Certbot to get Let's Encrypt to issue the browser-trusted SSL certificate for our domain
Once you had allowed access to the /.well-known url, run the following command to generate the SSL certificate for your domain:
sudo certbot certonly -a webroot --webroot-path=/var/www/cctv.adomainname.com -d cctv.adomainname.com
When the command runs for the very first time on your machine, it will ask for an email address to notify when the SSL certificate is going to expire and an agreement to Let's Encrypt Terms of Service.
Once you had given the necessary responses, Certbot will create the SSL artefacts inside the /etc/letsencrypt/live/cctv.adomainname.com directory. Inside /etc/letsencrypt/live/cctv.adomainname.com, you will find cert.pem, chain.pem, fullchain.pem and privkey.pem. The files inside /etc/letsencrypt/live/cctv.adomainname.com directory are symbolic links for facilitating certificate renewal without changing your server side configurations.
Generating a strong Diffie-Hellman group
The next ingredient for our Nginx to serve HTTPS traffic is a strong Diffie-Hellman group. Run the following command to precompute a strong Diffie-Hellman group for your web application to use for exchanging cryptographic keys with its clients:
sudo openssl dhparam -out /etc/ssl/certs/dhparam.pem 2048
You can reuse the same Diffie-Hellman group for all your domains.
Configuring Nginx to serve your domain over SSL
Once you have the necessary SSL certificate artefacts for your domain, you can then edit the Nginx configurations to serve your web application over SSL.
Given that, the following is a sample configuration to serve your domain over SSL:
# Redirect HTTP requests to HTTPS
server {
    listen 80;
    server_name  cctv.adomainname.com;
    return 301 https://$host$request_uri;
}

# For ssl
server {
    ssl on;
    ssl_certificate /etc/letsencrypt/live/cctv.adomainname.com/fullchain.pem;
    ssl_certificate_key /etc/letsencrypt/live/cctv.adomainname.com/privkey.pem;
    ssl_protocols TLSv1 TLSv1.1 TLSv1.2;
    ssl_prefer_server_ciphers on;
    ssl_dhparam /etc/ssl/certs/dhparam.pem;
    ssl_ciphers 'ECDHE-RSA-AES128-GCM-SHA256:ECDHE-ECDSA-AES128-GCM-SHA256:ECDHE-RSA-AES256-GCM-SHA384:ECDHE-ECDSA-AES256-GCM-SHA384:DHE-RSA-AES128-GCM-SHA256:DHE-DSS-AES128-GCM-SHA256:kEDH+AESGCM:ECDHE-RSA-AES128-SHA256:ECDHE-ECDSA-AES128-SHA256:ECDHE-RSA-AES128-SHA:ECDHE-ECDSA-AES128-SHA:ECDHE-RSA-AES256-SHA384:ECDHE-ECDSA-AES256-SHA384:ECDHE-RSA-AES256-SHA:ECDHE-ECDSA-AES256-SHA:DHE-RSA-AES128-SHA256:DHE-RSA-AES128-SHA:DHE-DSS-AES128-SHA256:DHE-RSA-AES256-SHA256:DHE-DSS-AES256-SHA:DHE-RSA-AES256-SHA:AES128-GCM-SHA256:AES256-GCM-SHA384:AES128-SHA256:AES256-SHA256:AES128-SHA:AES256-SHA:AES:CAMELLIA:DES-CBC3-SHA:!aNULL:!eNULL:!EXPORT:!DES:!RC4:!MD5:!PSK:!aECDH:!EDH-DSS-DES-CBC3-SHA:!EDH-RSA-DES-CBC3-SHA:!KRB5-DES-CBC3-SHA';
    ssl_session_timeout 1d;
    ssl_session_cache shared:SSL:50m;
    ssl_stapling on;
    ssl_stapling_verify on;
    add_header Strict-Transport-Security max-age=15768000;

    default_type  application/octet-stream;

    listen 443;
    server_name  cctv.adomainname.com;

    root /var/www/cctv.adomainname.com;

    location ~ /.well-known {
        allow all;
    }

    location / {
        proxy_pass http://192.168.0.107;
    }
}