Setting up your own Raspberry Pi 3 git server with Go Git Service (Gogs) and Raspbian Stretch Lite
When Microsoft bought Github, some developers who had trusted GitHub with their code, are considering ditching it. In case you have the same thought, you may want to consider hosting your own Git server. After all, that is the best approach to ensure that your code repository stays under your control.
In view of hosting your own code repository, you may want to setup a Raspberry Pi 3 Git server. Together with Go Git Service and Raspbian Stretch Lite, you can get a Git server with decent performance.
Given these points, this post discusses how you can setup your own Git server on a Raspberry Pi 3 with Go Git Service (Gogs) and Raspbian Stretch Lite.
Recommended hardware list to build your Raspberry Pi 3 Git server
In case you need some reference on what you can buy for this Raspberry Pi 3 project, the following is a list of hardware recommendations for you:
- CanaKit Raspberry Pi 3 with 2.5A Micro USB Power Supply or CanaKit Raspberry Pi 3 B+ (B Plus) with 2.5A Power Supply (UL Listed)
- Raspberry Pi 2/3 official case Black/Grey or Raspberry Pi 2/3 official case Red/White
- Sandisk Ultra 64GB Micro SDXC UHS-I Card with Adapter - 100MB/s U1 A1
- AmazonBasics RJ45 Cat-6 Ethernet Patch Cable - 3 Feet (0.9 Meters)
Setting up Raspbian Stretch Lite with SSH server enabled on your microSD card
After you had gathered all the necessary hardware, proceed to setup Raspbian Stretch Lite with SSH server enabled on your microSD card. Once you had done so, you will be able to SSH into your Raspbian Stretch Lite to perform further configurations.
Assembling the hardware for the Raspberry Pi 3
After you had prepared the microSD card with Raspbian Stretch Lite as the operating system, remove the microSD card from your SD card reader and insert it to the microSD card slot on the Raspberry Pi 3 board. After that, proceed to assemble the Raspberry Pi 3 board to the Official Raspberry Pi case.
Starting the Raspbian Stretch Lite operating system
When you had assembled the Raspberry Pi 3 board with the Official Raspberry Pi case, you are ready to start the Raspbian Stretch Lite operating system. In order to do so, first connect one end of the RJ45 cable to the RJ45 port on the Raspberry Pi 3 board and the other end of the cable to one of the switch port of your home router. After that, connect the micro USB power supply to the Raspberry Pi 3 board and a wall socket. Lastly, turn on the power socket to supply power to the Raspberry Pi 3 board.
Changing default password, Locale and Timezone of your Raspbian Stretch Lite
There are a few configurations that you should perform on the first run of your Raspbian Stretch Lite. With this in mind, proceed to change the default password, Locale and Timezone of your Raspbian Stretch Lite.
Installing Git on Raspbian Stretch Lite
Once you had completed the configurations on the first run of your Raspbian Stretch Lite, proceed to install Git. In order to install Git, you have to run the following command:
sudo apt-get update
sudo apt-get install git -y
Downloading a copy of Go Git Service for your Raspberry Pi 3
After you had installed Git, you can proceed to download a copy of Go Git Service. At this time, the latest version of Gogs is 0.11.53 and available on Go Git Service download page. Given these points, run the following commands to download a copy of Go Git Service onto your Raspberry Pi 3:
cd /opt
sudo wget https://dl.gogs.io/0.11.53/gogs_0.11.53_raspi2_armv6.zip
sudo unzip gogs_0.11.53_raspi2_armv6.zip
sudo rm gogs_0.11.53_raspi2_armv6.zip
After the commands complete, you will find the artefacts for running Go Git Service in the /opt/gogs directory.
Creating the system user account that will run Go Git Service
Once you had downloaded Go Git Service, the next step is to create a system user account that will run Go Git Service.
In order to do so, run the following command:
sudo adduser --disabled-login --gecos 'Go Git Service' git
After the command completes, you will have a system user account that:
- is named as
git. - cannot be used for logging into Raspbian Stretch Lite.
- has a home directory at
/home/git.
Making git the owner of /opt/gogs
In order to enable git user account to run Go Git Service, you will need to make it the owner of the /opt/gogs directory. With this in mind, run the following command to make git user account the owner of the /opt/gogs directory:
sudo chown -R git:git /opt/gogs
Using systemctl to run Go Git Service
Once you had made the git user owner of the /opt/gogs directory, proceed to configure systemctl for running Go Git Service. Firstly, use a text editor to open up /opt/gogs/scripts/systemd/gogs.service:
sudo nano /opt/gogs/scripts/systemd/gogs.service
Once the editor loads the file, change the contents of /opt/gogs/scripts/systemd/gogs.service to look like the following:
[Unit]
Description=Gogs
After=syslog.target
After=network.target
#After=mariadb.service mysqld.service postgresql.service memcached.service redis.service

[Service]
# Modify these two values and uncomment them if you have
# repos with lots of files and get an HTTP error 500 because
# of that
###
#LimitMEMLOCK=infinity
#LimitNOFILE=65535
Type=simple
User=git
Group=git
WorkingDirectory=/home/git/gogs
ExecStart=/opt/gogs/gogs web
Restart=always
Environment=USER=git HOME=/home/git

[Install]
WantedBy=multi-user.target
After making changes to /opt/gogs/scripts/systemd/gogs.service, type 'Ctrl-X' followed by 'Y' to save your changes.
Following that, create the /home/git/gogs directory to serve as the working directory for Go Git Service:
sudo -H -u git mkdir /home/git/gogs
After you had created the working directory, get systemctl to run Go Git Service by running the following command:
sudo systemctl enable /opt/gogs/scripts/systemd/gogs.service
As a result of that, symbolic links are created in the /etc/systemd/system/multi-user.target.wants and /etc/systemd/system directories. These new symbolic links will link to /opt/gogs/scripts/systemd/gogs.service.
When systemctl is ready to run your Go Git Service, run the following command to start Go Git Service:
sudo systemctl start gogs.service
After the command complete, verify whether Go Git Service had started successfully by running the following command:
sudo systemctl status gogs.service
At this point, you should see output similar to the following if Go Git Service was started successfully:
● gogs.service - Gogs
   Loaded: loaded (/opt/gogs/scripts/systemd/gogs.service; enabled; vendor preset: enabled)
   Active: active (running) since Wed 2018-06-06 00:12:45 +08; 2s ago
 Main PID: 15658 (gogs)
   CGroup: /system.slice/gogs.service
           └─15658 /opt/gogs/gogs web

Jun 06 00:12:45 raspberrypi gogs[15658]: 2018/06/06 00:12:45 [TRACE] Log path: /opt/gogs/log
Jun 06 00:12:45 raspberrypi gogs[15658]: 2018/06/06 00:12:45 [TRACE] Build Time: 2018-05-17 02:54:34 UTC
Jun 06 00:12:45 raspberrypi gogs[15658]: 2018/06/06 00:12:45 [TRACE] Build Git Hash: 91441c3fb29d8ead645d8fffa4658d749d5b3fc3
Jun 06 00:12:45 raspberrypi gogs[15658]: 2018/06/06 00:12:45 [TRACE] Log Mode: Console (Trace)
Jun 06 00:12:45 raspberrypi gogs[15658]: 2018/06/06 00:12:45 [ INFO] Gogs 0.11.53.0603
Jun 06 00:12:45 raspberrypi gogs[15658]: 2018/06/06 00:12:45 [ INFO] Cache Service Enabled
Jun 06 00:12:45 raspberrypi gogs[15658]: 2018/06/06 00:12:45 [ INFO] Session Service Enabled
Jun 06 00:12:45 raspberrypi gogs[15658]: 2018/06/06 00:12:45 [ INFO] SQLite3 Supported
Jun 06 00:12:45 raspberrypi gogs[15658]: 2018/06/06 00:12:45 [ INFO] Run Mode: Development
Jun 06 00:12:47 raspberrypi gogs[15658]: 2018/06/06 00:12:47 [ INFO] Listen: http://0.0.0.0:3000
Triggering the installation process for Go Git Service
After you are able get systemctl to run Go Git Service, the final step is to trigger the installation process of Go Git Service.
In order to do so, you have to access your Go Git Service with your browser via port 3000 of the IP address of your Raspberry 3. As an example, if the IP address of your Raspberry 3 is 192.168.1.115, you will access Go Git Service via http://192.168.1.115:3000.
After you had done so, you will see a web page that asks for some initial software configurations. As an example, you can refer to the following screenshots to fill in the initial software configurations:
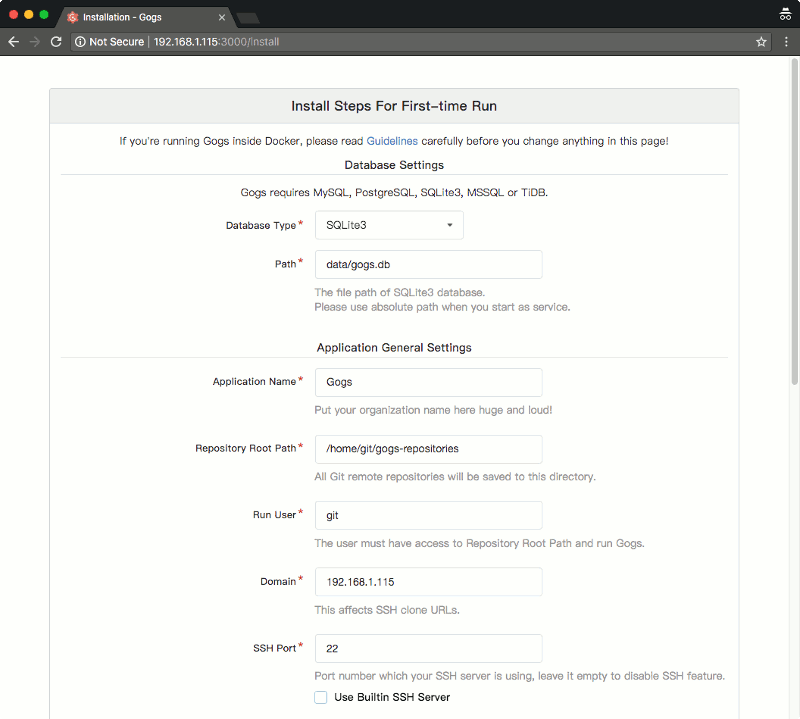
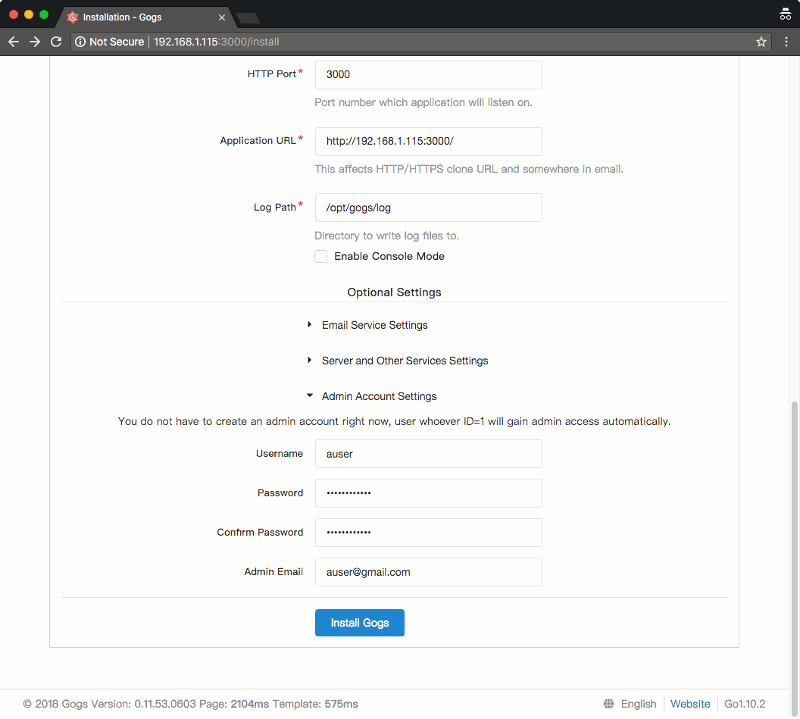
After you had filled in the software configurations for your Raspberry Pi 3 Go Git Service, click the Install Gogs button.
Once Go Git Service had initialized itself, you will be able to see a screen similar to the following:
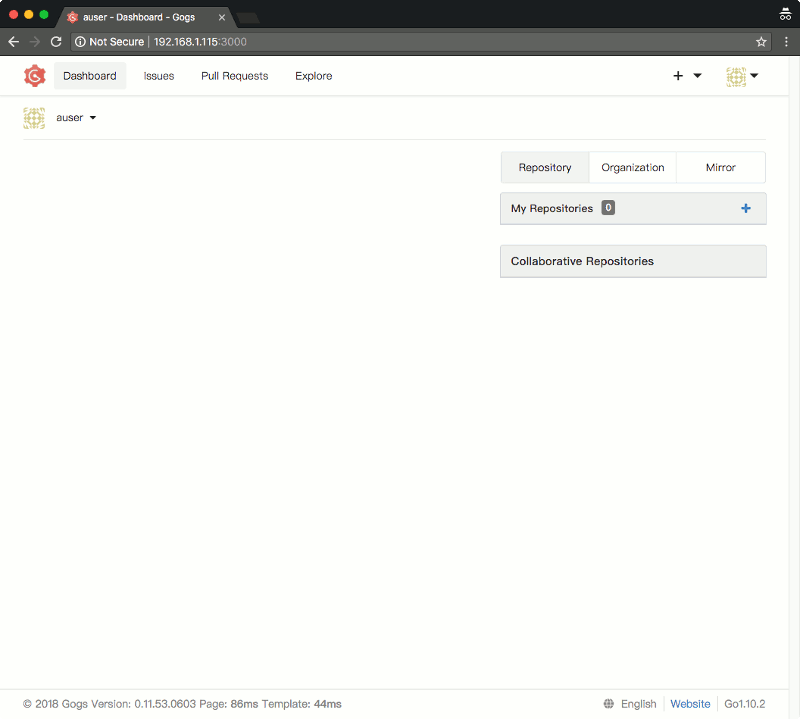
At this point, you will be able to keep your codes with your Raspberry Pi 3 Go Git Service and be sure that your code repository stays under your control.
Buy the Raspberry Pi 3 hardware to build your own Go Git Service
If you do not have the Raspberry Pi 3 hardware mentioned in this post yet, you may want to purchase them from Amazon. Simply click on the button below to add the Raspberry Pi 3 hardware to your cart. You may remove anything that you already have or replace some of the hardware with other hardware.