How to install Ubuntu 19.10 server on your Raspberry Pi
If you have a Raspberry Pi 2, 3 or 4, then you can install the official Ubuntu 19.10 server.
Since Ubuntu is a popular Linux distro for servers, you may want to install it on your Raspberry Pi server.
Given that, let's look at how we can install Ubuntu 19.10 server on your Raspberry Pi.
Recommended hardware for your Raspberry Pi Ubuntu 19.10 server
In case you have not gotten your Pi yet, you may want to get the following hardware:
- CanaKit Raspberry Pi 4 Basic Kit 4GB
- SanDisk 128GB Extreme microSDXC UHS-I Memory Card with Adapter
- Raspberry Pi 4B aluminium heatsink armor case with dual fans or one of the Raspberry Pi 4B cases with cooling mechanisms
- Gigabit Ethernet Cable
In addition, if your computer do not have a sd card writer, you will need to get one.
Downloading a copy of Ubuntu 19.10 server
After you had gathered the hardware for your Raspberry Pi server, go to Ubuntu download page for Raspberry Pi.
Once you get to the download page, click on one of the buttons to download the image that is applicable for your Raspberry Pi.
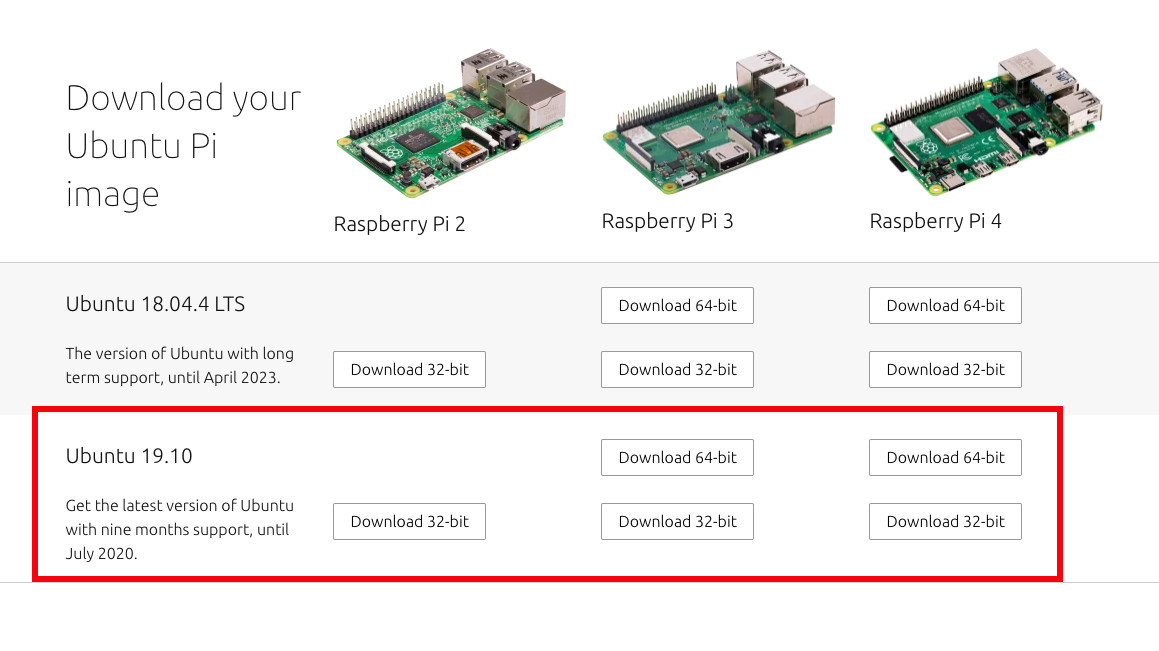
When you do so, you will be prompted to save the image file onto your computer.
Installing the Ubuntu 19.10 server image onto your microSD card
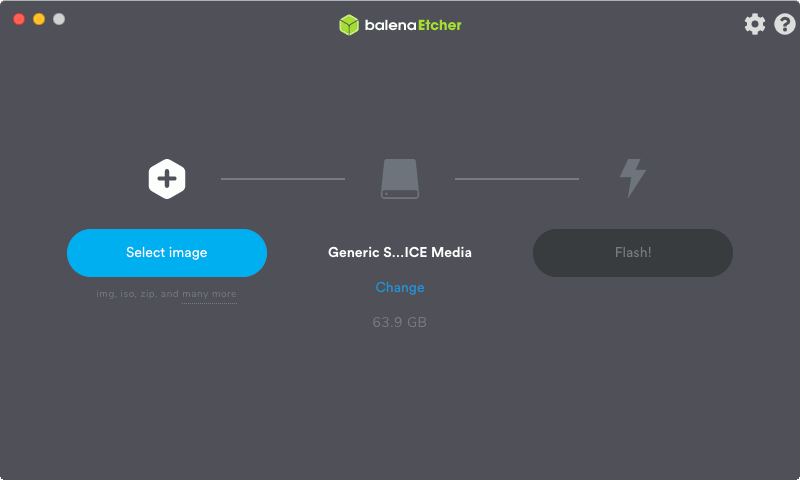
After you had downloaded the Ubuntu 19.10 server image, insert your microSD card into the SD card writer of your computer.
When your computer detects your card, start balenaEtcher and use it to flash the contents of the .xz file onto your microSD card:
Booting your Ubuntu 19.10 server on your Raspberry Pi
Once the image flashing is completed, remove the microSD card from your computer and insert it into your Raspberry Pi SD card slot.
After that, connect the power adapter to your Raspberry Pi and Ethernet cable to your Raspberry Pi. When you had done so, turn on the switch for the power adapter.
Finding the IP address of your Raspberry Pi
When your Raspberry Pi boots with Ubuntu 19.10 server, it will get an IP address from your router. Therefore you can get the IP address of your Raspberry Pi from your router DHCP records.
Alternatively, you can use a computer connected to the same network to find the IP address. Given that, start a terminal program on your computer and enter the following command:
ping ubuntu
When you do so, you should find output similar to the following:
PING ubuntu (192.168.1.116): 56 data bytes
64 bytes from 192.168.1.116: icmp_seq=0 ttl=64 time=0.983 ms
64 bytes from 192.168.1.116: icmp_seq=1 ttl=64 time=1.992 ms
64 bytes from 192.168.1.116: icmp_seq=2 ttl=64 time=2.105 ms
Given this output, we can deduce that our Raspberry Pi is holding 192.168.1.116 as the IP address to communicate in the network.
Connecting to your Raspberry Pi Ubuntu 19.10 server via SSH
After getting the IP address, you can then use the SSH command to get into your Ubuntu 19.10 server:
ssh ubuntu@192.168.1.116
When prompted for the password, type the default password, ubuntu. After you had done so, your Ubuntu 19.10 server will prompt you to change your password. Therefore, enter ubuntu again followed by your favourite password twice.
When you had changed your password successfully, Ubuntu 19.10 will kick you out. Therefore, use the SSH command to get into your Ubuntu 19.10 server again:
ssh ubuntu@192.168.1.116
Updating your Ubuntu 19.10 server on your Raspberry Pi
If you wish to update your Ubuntu 19.10 server on your Raspberry Pi, then you can run the following commands:
sudo apt-get update
sudo apt-get upgrade -y
sudo shutdown -r now
After a while, SSH back to your Ubuntu 19.10 to continue with the rest of the configurations.
Changing the timezone on your Ubuntu 19.10 server
If you want to change the timezone on your Ubuntu 19.10 server, there are several steps to follow.
First, get the name of your timezone that Ubuntu will recognize. For example, if I want to set my timezone to Singapore, I can run the following command to get the name of the Singapore timezone:
timedatectl list-timezones | grep Singapore
When my Ubuntu ran that command, it returned Asia/Singapore as the name.
Given that, I can then set Singapore's timezone as the timezone for my Raspberry Pi with the following command:
Asia/Singapore
Changing the hostname of your Ubuntu 19.10 server
When you have multiple Raspberry Pi running Ubuntu, you may want to change the hostname of your Ubuntu 19.10 server.
Given that, open up /etc/hostname with nano:
sudo nano /etc/hostname
When nano loads up, change the contents of /etc/hostname to reflect the hostname that you like to give to your Raspberry Pi.
After you had changed the contents, press Ctrl-X, Y and Enter to save the changes.
In order to get your Ubuntu 19.10 server to take the new hostname, reboot the system with the following command:
sudo shutdown -r now