How to put your Raspberry Pi server on the internet with ngrok
As I had mentioned in how to host multiple websites from home, a typical network architecture looks like the following:
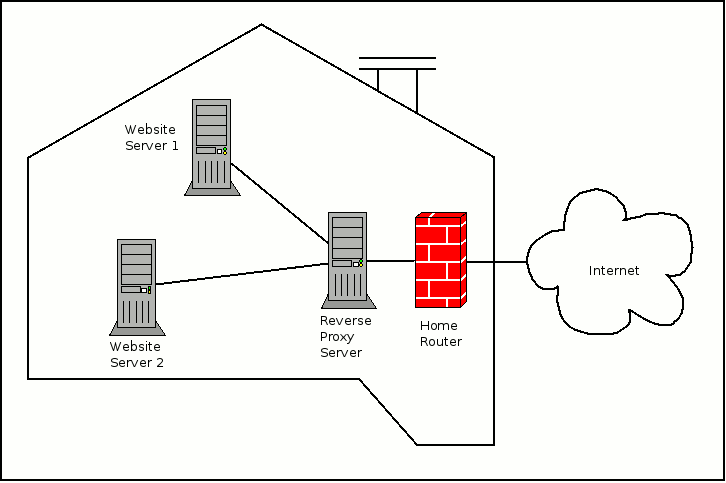 In such a case, we will need our router to hold a public IP address and perform port forwarding for our home servers.
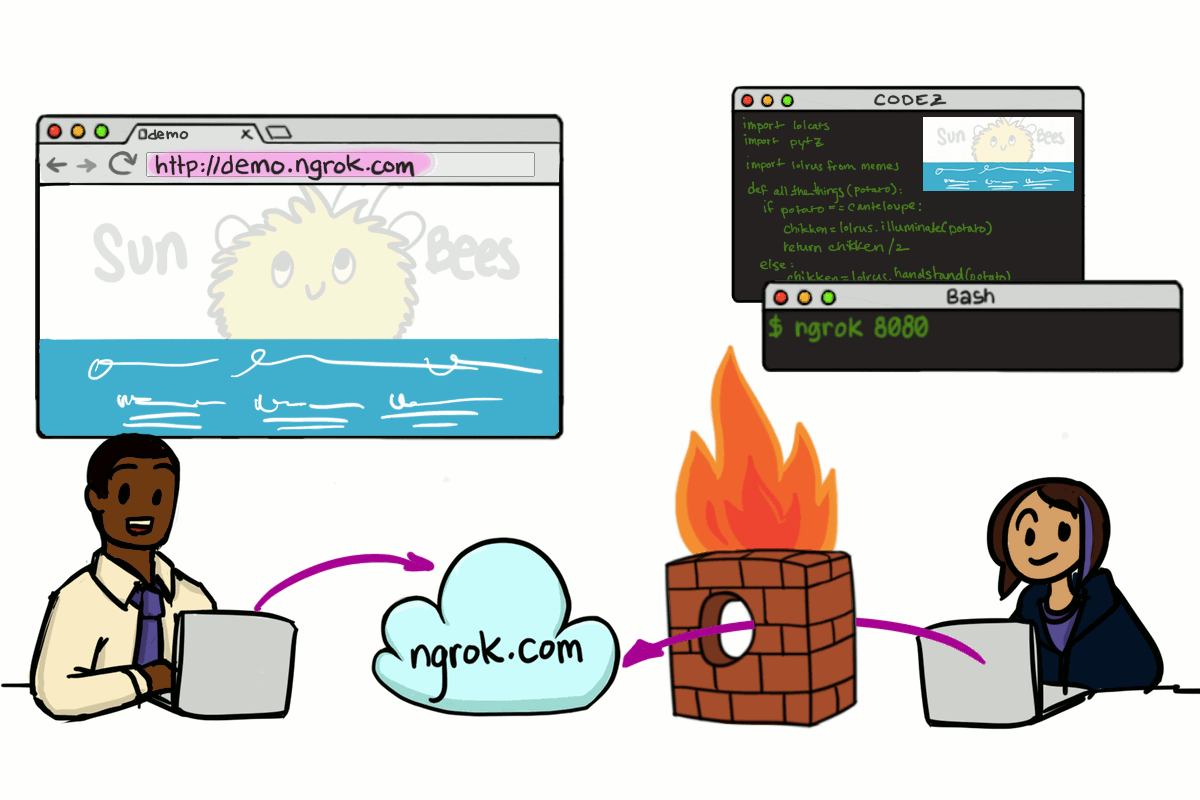
However, there can be cases where we do not have the environment to put our server on the internet.
In such a situation, you will find ngrok useful. Since ngrok accepts traffic on a public address and relays that traffic through to the ngrok process running on your machine, you can put your server on the internet easily.
Given that, let's look at how you can put your Raspberry Pi server on the internet with ngrok.
Create an account with ngrok
First of all, you will need an account with ngrok so that your Raspberry Pi is able to identify itself with ngrok. Therefore, proceed to create an account with ngrok.
Setup your Raspberry Pi server
Once you have an account with ngrok, you are ready to use ngrok to put your Raspberry Pi server on the internet.
If you have not done so, then you may want to setup your Raspbery Pi server. For example, you can setup Raspbian Buster Lite on your Raspberry Pi as the operating system to run your server applications.
For the purpose of this tutorial, let's assume that we want to host a static website on our Raspberry Pi and make it available on the Internet with ngrok.
In order to keep things simple, we will make use of the default Nginx configurations to serve some static content from the /var/www/html/ directory.
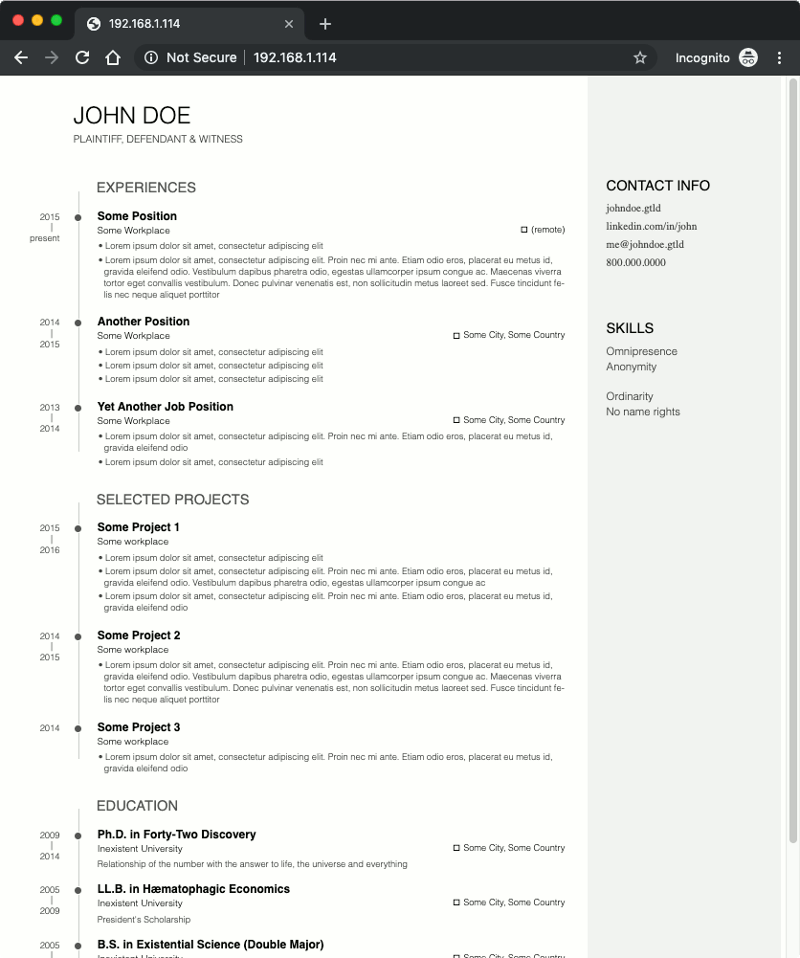
For example, if your Raspberry Pi IP is 192.168.1.114, you should be able to retrieve /var/www/html/index.html via http://192.168.1.114/ on your web browser.
Downloading the ngrok client program on your Raspberry Pi
When you have a HTTP server listening for incoming HTTP requests on your Raspberry Pi, you can install the ngrok client.
In order to do so, run the following command on a terminal program on your Raspberry Pi:
cd ~
wget https://bin.equinox.io/c/4VmDzA7iaHb/ngrok-stable-linux-arm.tgz
tar -xvzf ngrok-stable-linux-arm.tgz
When the above command completes, you can verify your download with the following command:
./ngrok help
If ngrok client had downloaded successfully, then you should find instructions on how to use the ngrok client in the output.
Authenticate your Raspberry Pi with ngrok
At this point in time, you are ready to authenticate your Raspberry Pi with ngrok.
In order to do so, login to the ngrok dashboard. When you have logged in successfully, navigate to the Auth page to get your Tunnel Authtoken.
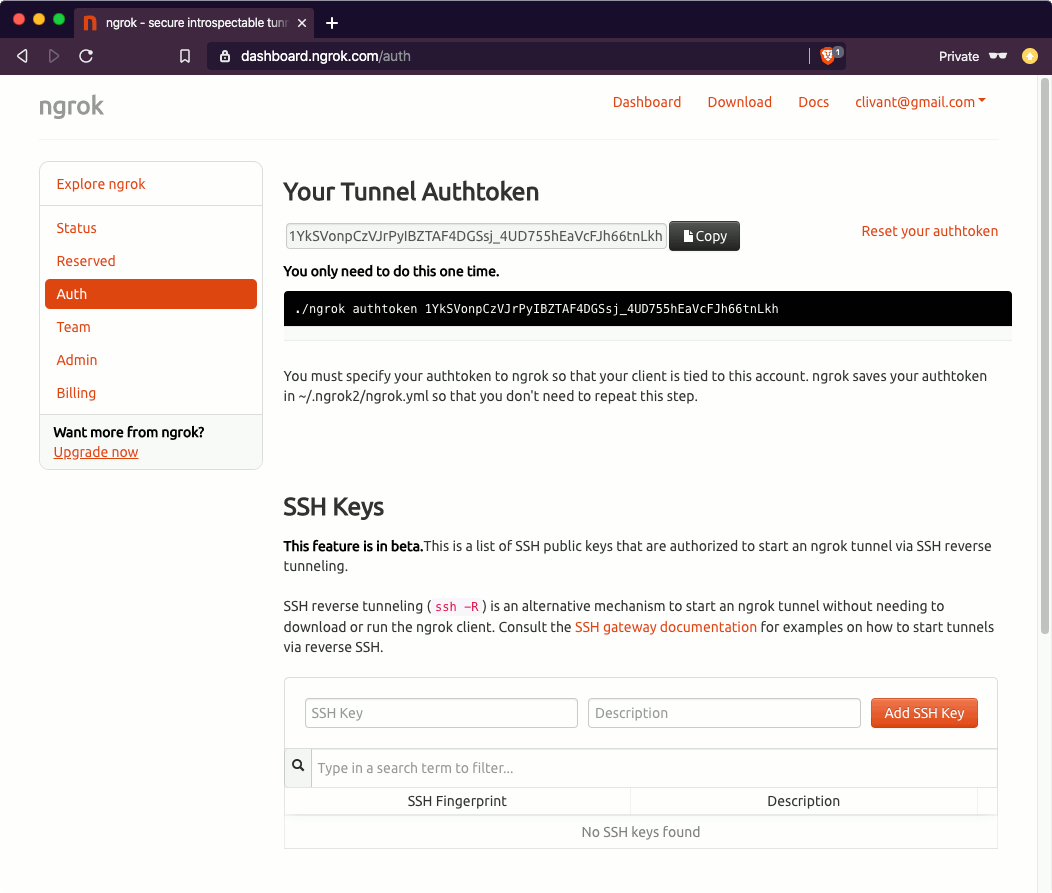
As shown above, the Auth page will show the command to authenticate your Raspberry Pi with ngrok:
./ngrok authtoken 1YkSVonpCzVJrPyIBZTAF4DGSsj_4UD755hEaVcFJh66tnLkh
When the command completes, you should see an output similar to the following:
Authtoken saved to configuration file: /home/pi/.ngrok2/ngrok.yml
Running the ngrok client program to put your Raspberry Pi server on the internet
At this point in time, you will be able to put your Raspberry Pi server on the internet by running the following command:
./ngrok https -bind-tls=true 80
When you do so, the terminal will produce an output similar to the following:
ngrok by @inconshreveable                                       (Ctrl+C to quit)

Session Status                online
Account                       youremailaddress@gmail.com (Plan: Free)
Version                       2.3.35
Region                        United States (us)
Web Interface                 http://127.0.0.1:4040
Forwarding                    https://5114a8e6.ngrok.io -> http://localhost:80

Connections                   ttl     opn     rt1     rt5     p50     p90
                              0       0       0.00    0.00    0.00    0.00
Accessing your Raspberry Pi server application with the allocated ngrok domain name
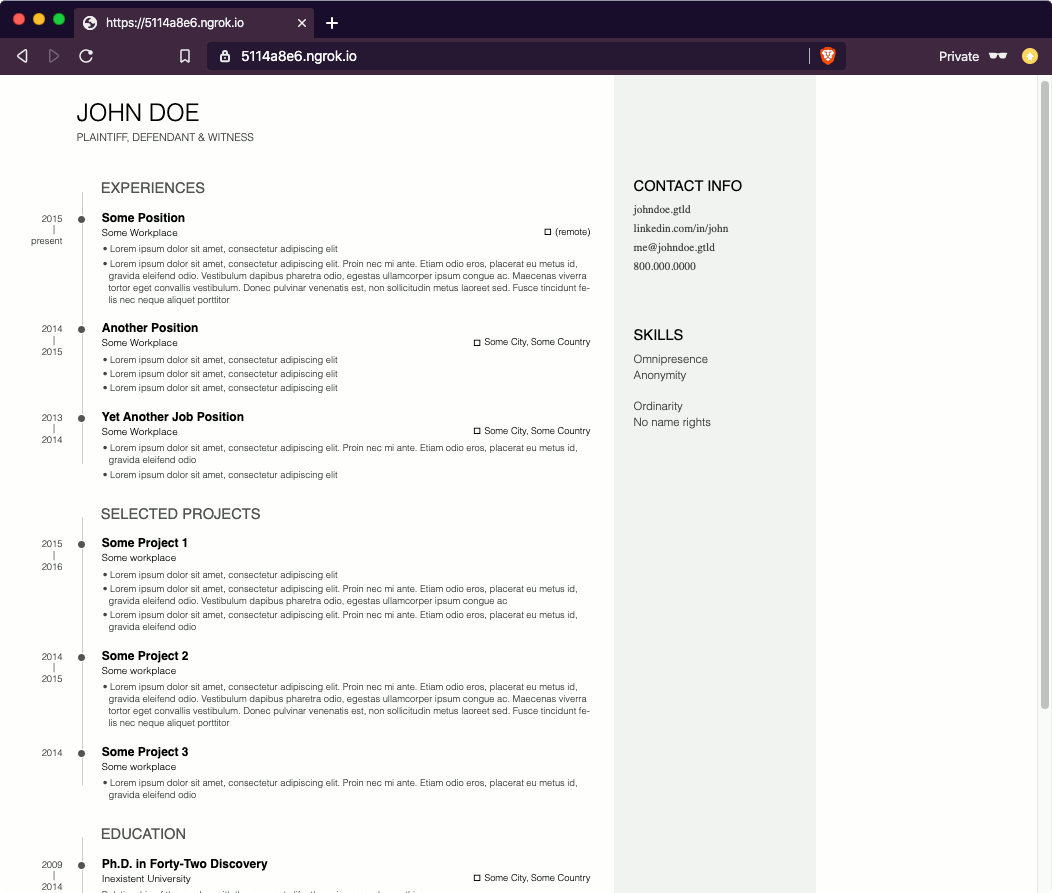
Once you see the output, you can then access your Raspberry Pi server with the ngrok URL stated. For example, when I access https://5114a8e6.ngrok.io, I was able to see the web page that was served by my Raspberry Pi:
In addition to the command line output, you can also find the URL in the status page of your ngrok dashboard.
Running ngrok client as a daemon
If you want ngrok to put your Raspberry Pi server on the internet on boot, then you will need to run it as a daemon.
In order to do so, we need to:
- edit our
ngrok.ymlfile - create a system unit file for our ngrok client.
- register the system unit file with
systemdand run the ngrok client as a daemon.
Editing ngrok.yml
First, use nano to edit the ngrok.yml file that our ngrok client had created for us earlier:
sudo nano ~/.ngrok2/ngrok.yml
When nano starts, add the following content after the authtoken row:
tunnels:
  nginx-server:
    proto: http
    addr: 80
    bind-tls: true
    console_ui: false
After you had made the changes, press Ctrl-X, Y and Enter6 to save the file.
Creating a system unit file for our ngrok client
Next, use nano to create a system unit file for our ngrok client:
sudo nano /etc/systemd/system/ngrok-client.service
When the nano starts, copy the following directives into the editor:
[Unit]
Description=ngrok client
After=network.target

[Service]
ExecStart=/home/pi/ngrok start --all -config /home/pi/.ngrok2/ngrok.yml
Restart=on-abort

[Install]
WantedBy=multi-user.target
After you had copied the directives to the editor, press Ctrl-X, Y and Enter to save the changes.
Registering the system unit file with systemd and running the ngrok client as a daemon
Once you had created the system unit file, run the following commands to run the ngrok client as a daemon:
sudo systemctl daemon-reload
sudo systemctl enable ngrok-client
sudo systemctl start ngrok-client
After you have registered ngrok client to run as a daemon, you can check if it is running successfully with the following command:
systemctl status ngrok-client.service
If your ngrok client is able to run successfully, then you should find output similar to the following:
● ngrok-client.service - ngrok client
   Loaded: loaded (/etc/systemd/system/ngrok-client.service; enabled; vendor preset: enabled)
   Active: active (running) since Mon 2020-03-09 17:43:55 +08; 8min ago
 Main PID: 8888 (ngrok)
    Tasks: 13 (limit: 4915)
   Memory: 5.9M
   CGroup: /system.slice/ngrok-client.service
           └─8888 /home/pi/ngrok start --all -config /home/pi/.ngrok2/ngrok.yml

Mar 09 19:43:55 raspberrypi systemd[1]: Started ngrok client.
Given that, you can then head on to your ngrok status page to find the URL to access your Raspberry Pi server.
