Tag archive for: Internet of things

How to use your Raspberry Pi for Python development

Since its inception, the Raspberry Pi had progressed by leaps and bounds. Indeed, one of the reasons why we want to get a Raspberry Pi is its versatility. Apart from the huge selection of hardware, there are many Python libraries for you to build Raspberry Pi applications.

If you want to build something out of a Raspberry Pi, then you will benefit from setting up one for Python development.

Even if you do not build Raspberry Pi projects for a living, setting up a Raspberry Pi Python developer machine can be useful. For example, you may be a Solutions Engineer who build proof of concepts for demo purposes. In this case, you can build your demos with Python and run them on your Raspberry Pi.

If you are thinking of using Raspberry Pi for Python development, then this post is a reference for you.

Why get a Raspberry Pi?

If you are in the computer technology industry, then you most probably have heard about the Raspberry Pi.

When a Raspberry Pi was first launched in 2012, there were limited USD 35 alternatives for Raspberry Pi. Therefore, buying a Raspberry Pi is a no-brainer to get started with Internet of things (IoT) projects. A Raspberry Pi would be an affordable ticket to the world of IoT.

However, as newer single board computers get into the market, it becomes harder to make a buying decision. Especially if you habitually practice delay gratification, you may face quite a bit of procrastination in getting a Raspberry Pi.

So why should you get a Raspberry Pi?

In case you are deciding whether to buy a Raspberry Pi, here are some reasons for you to get one.

An easy way to install Raspberry Pi OS – using Raspberry Pi Imager

Once got an microSD card for your Raspberry Pi in your mailbox, you can install an operating system to run it.

Typically, we download a Raspberry Pi image and use one of the imaging software to write it to our microSD card.

When the Raspberry Pi Imager came into the picture, the download step is consolidated into a single workflow.

Given that, this is how you can use the Raspberry Pi Imager to install Raspberry Pi OS.

How to show the temperature and humidity of your room on a Heltec WiFi Kit 32 attached to a DHT11 / DHT22 sensor

When you have a DHT11 / DHT22 sensor, you can measure the temperature and humidity of your room. If you attach the sensor to a Heltec WiFi Kit 32 development board, you will be able to put up the readings on a 0.96 Inch OLED screen.

Given these points, let’s look at how we can show the temperature and humidity readings of your room on a Heltec WiFi Kit 32 development board attached to a DHTXX sensor.

Why get a Wio Terminal for your next IoT project?

If you have 30 USD and is looking for a microcontroller, then you will want to consider the Wio Terminal.

Since Seeed Studio had kindly sent me one for free, I got to picture my 30 bucks alongside the box:

Wio Terminal front of box with 30 USD

Although 30 bucks is not a lot of money, it is good to know what the Wio Terminal is capable of before buying. When we do so, we can prevent adding on to that electronics stockpile which is collecting dust in the house.

Given these points., let’s look at why you will want get a Wio Terminal for your next IoT project.

How to put your Raspberry Pi server on the internet with ngrok

As I had mentioned in how to host multiple websites from home, a typical network architecture looks like the following:
Home network architecture 
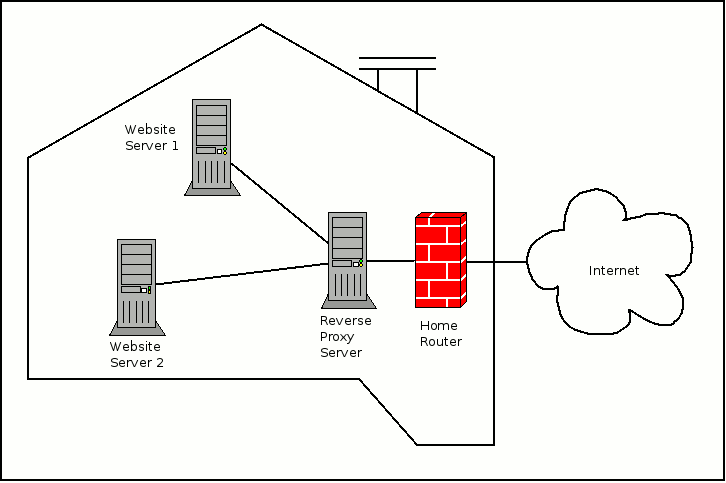
In such a case, we will need our router to hold a public IP address and perform port forwarding for our home servers.

However, there can be cases where we do not have the environment to put our server on the internet.

In such a situation, you will find ngrok useful. Since ngrok accepts traffic on a public address and relays that traffic through to the ngrok process running on your machine, you can put your server on the internet easily.
ngrok demo diagram

Given that, let’s look at how you can put your Raspberry Pi server on the internet with ngrok.