Raspberry Pi ideas

Pi4B Pi3B Pi3b+ and PiZeroWs on table

A Raspberry Pi is one of the things that you should consider getting if you are a computer programmer.

Just bought a Raspberry Pi but not sure what to do with it? If that is the case, you had come to the right place. On this page, you will find plenty of ideas on how to use your Raspberry Pi.

By following the ideas here, you will understand your Raspberry Pi and the Linux operating system better. In addition, you will be able to setup your Raspberry Pi to serve some interesting use cases at home.

For example, you will find instructions on how to setup a CCTV for surveillance, Web IDE to help you code everywhere you go, project management platform for tracking your project statuses and etc.

Helpful GPIO Pinout resources that you can reference while connecting sensors to your Raspberry Pi 3

Undeniably, the GPIO (general-purpose input/output) pins along the top edge of your Raspberry Pi 3 board is what makes it so useful for IOT projects. In case you are curious, this is how the GPIO pins looks like on a Raspberry Pi 3 B+:

GPIO pins of a Raspberry Pi 3 B+

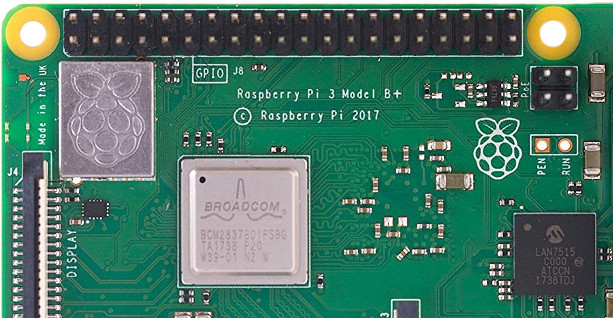
Although there is the word GPIO on the circuit board that indicates what those pins are, there is no indication on what each individual pin does.

So how do you know which pins to connect your sensors to? Thankfully, there are several good resources that you can reference while connecting sensors to your Raspberry Pi 3 board.

In case you need it, here are some helpful GPIO resources that you can reference when you are connecting sensors to your Raspberry Pi 3 board.

How to read temperature and humidity from a DHT11 sensor that is connected to a Raspberry Pi 3

I had always wanted to measure the temperature and humidity of the environment where my herbs are grown at.

Since I had a few pieces of Raspberry Pi 3 lying around the house, I decided to use one of them to measure the temperature and humidity of the area of the house where my herbs are.

An additional sensor is required to measure the temperature and humidity of the environment. Therefore, I went to AliExpress and got a DHT11 sensor. By connecting a DHT11 sensor to my Raspberry Pi 3, I can give it the ability to read the temperature and humidity of its environment.

Given these points, I created this post to show how to read temperature and humidity from a DHT11 sensor that is connected to a Raspberry Pi 3.

In order for us to check the temperature and humidity from the DHT11 sensor, we will build a simple Flask application that returns the temperature and humidity values as HTTP responses to HTTP clients.

Building a Raspberry Pi 3 prototype camera that takes a picture at the press of a button

A fun way to test your Raspberry Pi Camera on your Raspberry Pi 3 is to build a prototype that takes a picture at the press of a button. Through such an activity, we will be able to experience:

  • connecting a button to the GPIO ports on a Raspberry Pi.
  • setting up a camera through the CSI interface of a Raspberry Pi.
  • preparing an operating system, such as Raspbian Stretch Lite , for running Raspberry Pi projects.
  • coding a Python 3 script that interacts with the GPIO port and camera on a Raspberry Pi.
  • running a Python 3 script when Raspberry Pi powers on.

Given these points, this post shows how you can build a Raspberry Pi 3 prototype camera that takes a picture at the press of a button.

How to enable Raspberry Pi camera on Raspbian Stretch Lite

Previously, I had written two posts on how you can connect the Raspberry Pi Camera Module to Raspberry Pi 2/3 and Raspberry Pi Zero W:

When you install Raspbian Stretch Lite on your Raspberry Pi, you will need to enable the Raspberry Pi camera before you can use it.

In case you need a reference, this post will show you how to enable Raspberry Pi camera on Raspbian Stretch Lite.

Comparing the 0.67x wide angle lens and the Fisheye lens on a Raspberry Pi CCTV

Raspberry Pi Zero W with magnetic adapter ring 0.67x wide angle lens and fisheye lens on wooden floor

Recently, I found a pack of Camera Lens Kit for mobile phones. Inside that pack, there is one 0.67x wide angle lens and one Fisheye lens.

Given that, I had created the following posts to show how you can put them onto your Raspberry Pi Zero W CCTV:

In case you want to see the effect of those lens before getting a pack to turn your Raspberry Pi Zero W CCTV or Raspberry Pi 3 CCTV into wide angle security cameras, read this post to compare the effects of 0.67x wide angle lens and Fisheye on a Raspberry Pi CCTV.

How to turn your Raspberry Pi Zero W CCTV into a wide angle security camera

When Raspberry Pi Zero W appeared in the market, I immediately got one and setup a Raspberry Pi Zero W security camera with motionEyeOS. In addition to taking half the size of a credit card, a Raspberry Pi Zero W comes with Wi-Fi inbuilt. Therefore, it is ideal for building a security camera that connects to your Wi-Fi network.

Previously, I wrote about how to make your Raspberry Pi Zero W camera see an ultra-wide view through a Fisheye lens.

Since the pack of Camera Lens Kits for mobile phones includes a 0.67x wide angle lens, I decided to use it to turn my other Raspberry Pi Zero W CCTV into a wide angle security camera.

If you need a reference, read this to find out how you can turn your Raspberry Pi Zero W CCTV into a wide angle security camera.

How to configure motionEye to only capture video if there are movements in particular sections of the surveillance area

Undeniably, Calin Crisan had created one of the best way for us to build a Raspberry Pi security camera. In addition to the ease of setup via motionEyeOS, the motionEye web-based frontend is also easy to use.

Since a Raspberry Pi security camera is used for surveillance, we will want it to record videos of things that happened when we were not looking.

However, recording footages of the surveillance area when there were no motion being detected is wasteful. Moreover, it is hard to get to the video recording of a stranger moving your flower pot when there are too many redundant video clips in your Raspberry Pi security camera.

Even if we switched on motion detection for the entire video frame, there could be motion detected outside of the area of interest. For example, we may be interested in birds resting on our plant rather than birds flying in the sky.

So how do we configure motionEye to only capture video if there are movements in a particular section of the surveillance area?

This post will show you how to do so.

How to use Python 3 Pillow on Raspbian Stretch Lite to compress your jpeg image

When you are building a Raspberry Pi camera project, you may want to compress the images captured from the camera to reduce the time to upload your image to a server endpoint. Moreover, when you connect your Raspberry Pi to your iPhone Personal WiFi hotspot, you will want to incur minimal mobile bandwidth charges from demonstrating your Raspberry Pi project in your class.

You may have either:

In this case, you will have the option to use Pillow, a fork of Python Imaging Library, to compress your jpeg image.

How to make your Raspberry Pi Zero W camera see an ultra-wide view

While I was organising cabinet, I found a pack of Camera Lens Kits for mobile phones.

Since I am using my Raspberry Pi Zero W as a surveillance camera, I figured that it would be useful if I can use the Fisheye lens in the pack to make my camera see a wider view.

This post shows how you can make a Raspberry Pi Zero W camera see an ultra-wide view.