Tag archive for: web server

Understanding the default Nginx virtual host (or server) configuration

After you had installed Nginx, one of the first thing to do is to check whether it is running ok.

One way to do so is to use your browser to send a HTTP request to test it.

If you had installed Nginx on your local machine, then you may enter http://localhost or http://127.0.0.1 into the location bar of your browser.

When you had setup Nginx on a separate machine on your home network, you may also enter http://<ip_address_of_the_machine> in the location bar of your browser. For example, in how to host a WordPress website on a Raspberry Pi with Raspbian Buster Lite and Nginx, I had entered http://192.168.1.114 as the location to test out the Nginx server running on my Raspberry Pi.

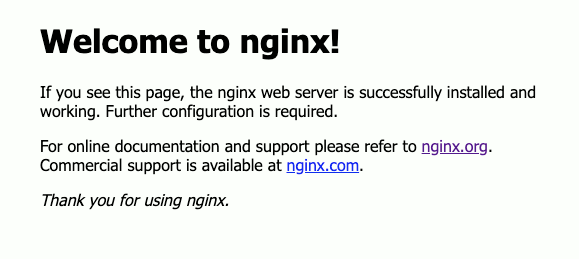
So be it http://localhost, http://127.0.0.1, http://<ip_address_of_the_machine>, you will always see this page on your browser screen:

default welcome page of Nginx 1.14.2

In case you are wondering why your Nginx behaves this way, this post will explain what the default Nginx Virtual Host configuration does to Nginx.

Installing Certbot on Raspbian Buster for obtaining Let’s Encrypt’s browser-trusted certificates for your Raspberry Pi server applications

Certbot + Raspbian logo

When you build Raspberry Pi server projects with Raspbian Buster, browser-trusted certificates can be needed.

Since the inception of Let’s Encrypt, many webmasters had been able to deploy web applications that encrypt communication channels with browser-trusted certificates.

Most importantly, Let’s Encrypt provide all the magic for free.

Let’s Encrypt certificates are automatically issued by software participating in the ACME protocol. Therefore, we will need to run such a software on a Raspberry Pi web server for serving HTTPS with browser-trusted certificates.

Given that, let’s see how we can install Certbot on Raspbian Buster.

How to setup a Raspberry Pi web server with Raspbian Stretch Lite, Nginx, MariaDB and PHP as the LEMP stack

Raspberry Pi LEMP Linux Nginx MariaDB PHP

When you want to deploy a PHP application that you wrote, you can first deploy it on a Raspberry Pi. Once your PHP application gets enough traction, you can then port it over to a computer with more horsepower.

When your PHP application employs MySQL or MariaDB as the backing database, we can put it up on a LEMP stack. In this situation, HTTP requests will first be directed to the Nginx reverse proxy server. Whenever the request is made to a php application, Nginx will then pass it on to the PHP7 Fast CGI Process Manager (PHP FPM) for generating the HTTP response.

Given these points, this post provides the steps to setup a Raspberry Pi web server with Raspbian Stretch Lite, Nginx, MariaDB and PHP as the LEMP stack.

Configuring Nginx for PHP web applications

Nginx and PHP FastCGI Process Manager (FPM) are often used side by side for PHP applications. In such a setting, Nginx will be the first point of contact for incoming HTTP requests, acting as a reverse proxy server for the PHP FastCGI Process Manager.

The PHP FastCGI Process Manager then interprets the HTTP requests that it receives from Nginx and runs the PHP scripts for generating the corresponding HTTP responses for Nginx to return back to the HTTP client.

This post discusses a set of configurations that you can use for configuring Nginx for your PHP web applications.

Configuring Nginx to serve files for a static website

In the world of HTTP, static files are content hosted on a web server that does not change. Some examples of static files include images, CSS files, JavaScript files and HTML files.

Although it is not too hard to implement a dynamic website through a content management framework like WordPress on your own server, there are cases where it makes more sense to just host a couple of static files to realise your website.

Nginx is an excellent web server for serving static websites. If you already have Nginx running on a Raspberry Pi 3 or any other kinds of server, you may want to configure it to serve files for your static website.

How to host a web server behind Linksys EA7500 Max-Stream AC1900 router

My 2 year broadband contract ended with StarHub a few months ago and I signed up for a dual broadband (Cable + Fibre) contract for the Linksys EA7500 Max-Stream AC1900 MU-MIMO gigabit router.

With the new broadband subscription, the D-Link DIR-868L router from my earlier contract sits behind the cable modem while the new Linksys EA7500 Max-Stream AC1900 MU-MIMO gigabit router sits behind my fibre optic modem.

Since I want my reverse proxy server to serve HTTP traffic via the fibre optic network, I had to configure my Linksys router so that my Raspbian Jessie Lite reverse proxy server can serve HTTP traffic from the Internet.

To have a reference on how to do that again when need be, this post documents the steps that I took to host a web server, which serves as a reverse proxy server, behind the Linksys EA7500 Max-Stream AC1900 router.

The reverse proxy server

With the proliferation of cloud computing and single board computers, the term – reverse proxy server, becomes a frequent mention in technical specifications that we may encounter as a developer or system implementation consultant.

Finding myself having to reiterate my understanding of the reverse proxy server, I reckoned that I should document what I know about the reverse proxy server so that I have a place where people can reference when they are lost with the topic of reverse proxy server.

The Nginx configurations that I had created to serve only robots.txt and sitemap-index.xml over http

I had initially configured a set of Nginx rules that will redirect every single request made over http to https. However, that breaks my doing so breaks my reference on how to send HTTP GET request with Java without using any external libraries.

Since the robots.txt is not sensitive data, I had decided to allow it to be retrieved via http as well. And since my robots.txt points to sitemap-index.xml via http, I also allowed sitemap-index.xml to be retrieved via http as well.

This post documents the changes that I had made to my Nginx configurations to serve only robots.txt and sitemap-index.xml over the http protocol.

Supervisor configurations to ensure that my Python Flask application releases binded port(s) during a supervisor restart

We use Supervisor to help keep our Python based applications running. One of our applications was built on the Python Flask framework to provide a RESTful api to connecting clients.

With continuous integration in place, we need to restart all our Supervisor managed applications whenever there is a change being merged to the master branch in our Git repository.

This post documents the Supervisor configurations to ensure that my Python Flask application releases any port that it had binded to when Jenkins send the command to restart the Supervisor and the processes that it manages.