How to host your own file sharing website on Raspberry Pi 3 with Raspbian Stretch Lite, Nginx, ProjectSend, MariaDB and PHP
While experiencing Northern Lights in Finland, you may capture some Northern Lights pictures with your DSLR. In case you want to share them with friends through your own file sharing website, have a look at ProjectSend.
Since a Raspberry Pi 3 is energy efficient and affordable, you may want to setup ProjectSend on a Raspberry Pi 3. With this in mind, this post discusses how to do so with Raspbian Stretch Lite, Nginx, MariaDB and PHP as the LEMP stack.
Recommended hardware list to build your Raspberry Pi 3 file sharing website
In case you need some reference on what you can buy for this Raspberry Pi 3 project, the following is a list of hardware recommendations for you:
- CanaKit Raspberry Pi 3 with 2.5A Micro USB Power Supply or CanaKit Raspberry Pi 3 B+ (B Plus) with 2.5A Power Supply (UL Listed)
- Raspberry Pi 2/3 official case Black/Grey or Raspberry Pi 2/3 official case Red/White
- Sandisk Ultra 64GB Micro SDXC UHS-I Card with Adapter - 100MB/s U1 A1
- AmazonBasics RJ45 Cat-6 Ethernet Patch Cable - 3 Feet (0.9 Meters)
Setting up Raspbian Stretch Lite with SSH server enabled on your microSD card
After you had gathered all the necessary hardware, proceed to setup Raspbian Stretch Lite with SSH server enabled on your microSD card. Once you had done so, you will be able to SSH into your Raspbian Stretch Lite to perform further configurations.
Assembling the hardware for the Raspberry Pi 3
After you had prepared the microSD card with Raspbian Stretch Lite as the operating system, remove the microSD card from your SD card reader and insert it to the microSD card slot on the Raspberry Pi 3 board. After that, proceed to assemble the Raspberry Pi 3 board to the Official Raspberry Pi case.
Starting the Raspbian Stretch Lite operating system
When you had assembled the Raspberry Pi 3 board with the Official Raspberry Pi case, you are ready to start the Raspbian Stretch Lite operating system. In order to do so, first connect one end of the RJ45 cable to the RJ45 port on the Raspberry Pi 3 board and the other end of the cable to one of the switch port of your home router. After that, connect the micro USB power supply to the Raspberry Pi 3 board and a wall socket. Lastly, turn on the power socket to supply power to the Raspberry Pi 3 board.
Changing default password, Locale and Timezone of your Raspbian Stretch Lite
There are a few configurations that you should perform on the first run of your Raspbian Stretch Lite. With this in mind, proceed to change the default password, Locale and Timezone of your Raspbian Stretch Lite.
Installing Nginx on Raspbian Stretch Lite
After you had performed the first set of configurations for your Raspbian Stretch Lite, proceed to install Nginx. In order to install Nginx on Raspbian Stretch Lite, you need to run the following commands:
sudo apt-get update
sudo apt-get install nginx -y
Once the commands complete, verify your Nginx installation by running the following command:
sudo systemctl status nginx.service
After you had ran the command, you should see output similar to the following:
● nginx.service - A high performance web server and a reverse proxy server
   Loaded: loaded (/lib/systemd/system/nginx.service; enabled; vendor preset: enabled)
   Active: active (running) since Wed 2018-06-06 22:38:24 +08; 5min ago
     Docs: man:nginx(8)
  Process: 1513 ExecStart=/usr/sbin/nginx -g daemon on; master_process on; (code=exited, status=0/SUCCESS)
  Process: 1510 ExecStartPre=/usr/sbin/nginx -t -q -g daemon on; master_process on; (code=exited, status=0/SUCCESS)
 Main PID: 1514 (nginx)
   CGroup: /system.slice/nginx.service
           ├─1514 nginx: master process /usr/sbin/nginx -g daemon on; master_process on;
           ├─1515 nginx: worker process
           ├─1516 nginx: worker process
           ├─1517 nginx: worker process
           └─1518 nginx: worker process

Jun 06 22:38:24 raspberrypi systemd[1]: Starting A high performance web server and a reverse proxy server...
Jun 06 22:38:24 raspberrypi systemd[1]: Started A high performance web server and a reverse proxy server...
Installing the MariaDB on Raspbian Stretch Lite
Once you had installed Nginx, proceed to install MariaDB on Raspbian Stretch Lite. In order to do so, run the following command:
sudo apt-get install mariadb-server mariadb-client -y
After the command complete, you will have the MariaDB server and the MariaDB client installed on your Raspbian Stretch Lite.
At this time, the installation of mariadb-server did not prompt for a root password. In essence, this is because the root user was by default set to use the unix_socket plugin. As a result of that, the operating system user credentials are used when connecting to MariaDB via Unix socket.
Since the pi user of Raspbian Stretch was configured to use sudo without password prompt, you should get into mariadb-server by running the following command:
sudo mariadb
After you run the command, you should see the following prompt:
Welcome to the MariaDB monitor.  Commands end with ; or \g.
Your MariaDB connection id is 2
Server version: 10.1.23-MariaDB-9+deb9u1 Raspbian 9.0

Copyright (c) 2000, 2017, Oracle, MariaDB Corporation Ab and others.

Type 'help;' or '\h' for help. Type '\c' to clear the current input statement.

MariaDB [(none)]>
When you can see that, it will mean that MariaDB was installed successfully.
Type exit in the MariaDB prompt to continue on with the rest of the installation.
Installing PHP 7 on Raspbian Stretch Lite
Following the installation of MariaDB, proceed to install PHP 7 and related components to run ProjectSend. In order to do so, you need to run the following commands:
sudo apt-get install php7.0 php7.0-fpm php7.0-mysql -y
After the installation complete, run the following command to check the status of PHP FPM:
systemctl status php7.0-fpm.service
As a result of doing so, you should see output similar to the following if PHP 7 was installed successfully:
● php7.0-fpm.service - The PHP 7.0 FastCGI Process Manager
   Loaded: loaded (/lib/systemd/system/php7.0-fpm.service; enabled; vendor preset: enabled)
   Active: active (running) since Fri 2018-06-08 17:20:57 +08; 2min 54s ago
     Docs: man:php-fpm7.0(8)
 Main PID: 10133 (php-fpm7.0)
   Status: "Processes active: 0, idle: 2, Requests: 0, slow: 0, Traffic: 0req/sec"
   CGroup: /system.slice/php7.0-fpm.service
           ├─10133 php-fpm: master process (/etc/php/7.0/fpm/php-fpm.conf)
           ├─10134 php-fpm: pool www
           └─10135 php-fpm: pool www

Jun 08 17:20:57 raspberrypi systemd[1]: Starting The PHP 7.0 FastCGI Process Manager...
Jun 08 17:20:57 raspberrypi systemd[1]: Started The PHP 7.0 FastCGI Process Manager.
Getting a copy of ProjectSend
Once you had installed PHP 7 and the necessary components, the next step is to download a copy of ProjectSend. At this time, the latest version of ProjectSend is r1053. Hence, run the following commands to get a copy of ProjectSend:
cd /var/www
sudo wget https://github.com/projectsend/projectsend/archive/r1053.zip
sudo unzip r1053.zip
sudo rm r1053.zip
After that, you will have ProjectSend source codes at /var/www/projectsend-r1053.
Changing the owner of ProjectSend's upload folder
In order to ensure that the file upload feature work correctly, the system user that runs PHP FPM had to own ProjectSend's upload folder. Since the PHP FPM is run by the www-data user by default, you need to change the ownership of ProjectSend's upload folder to the www-data user. For this purpose, you will need to run the following command:
sudo chown -R www-data:www-data /var/www/projectsend-r1053/upload
Creating a new MariaDB user and a database instance for your ProjectSend website
Your instance of ProjectSend will require a MariaDB user along with a database instance for data persistence. To begin with the creation of the user and database instance, first get into the MariaDB server instance with the MariaDB client:
sudo mariadb
Once the MariaDB client loads up, run the following SQL command:
CREATE DATABASE myProjectSendDb;
After your database instance had been created successfully, proceed on to create the MariaDB user which can interact with it:
CREATE USER 'anewuser'@'localhost' IDENTIFIED BY 'password';
GRANT ALL ON myProjectSendDb.* TO 'anewuser'@'localhost';
Creating ProjectSend configuration file for interacting with the database instance
As can be seen, there is a sys.config.sample.php file inside the /var/www/projectsend-r1053/includes directory. Therefore, you can use that file as a basis for configuring your ProjectSend instance.
To configure your ProjectSend instance, first make a copy of the sample configuration and name it as sys.config.php:
sudo cp /var/www/projectsend-r1053/includes/sys.config.sample.php /var/www/projectsend-r1053/includes/sys.config.php
Given that you had created the database details earlier, open up /var/www/projectsend-r1053/includes/sys.config.php with nano:
sudo nano /var/www/projectsend-r1053/includes/sys.config.php
Once the editor loads the file, replace the database definitions inside sys.config.php to look like the following:
/** Database name */
define('DB_NAME', 'myProjectSendDb');

/** Database host (in most cases it's localhost) */
define('DB_HOST', 'localhost');

/** Database username (must be assigned to the database) */
define('DB_USER', 'anewuser');

/** Database password */
define('DB_PASSWORD', 'password');
After you had made the changes, type Ctrl-X followed by Y to save the changes.
Configuring Nginx for running install script of your ProjectSend website
Once you had created the ProjectSend configuration file, proceed on to configure Nginx for running install script of your ProjectSend website. In order to do so, first open up the default Nginx configuration at /etc/nginx/sites-enabled/projectsend.conf:
sudo nano /etc/nginx/sites-enabled/projectsend.conf
Once the editor loads the file, change the contents to look like the following:
server {
    listen   80 default_server;
    root /var/www/projectsend-r1053;
    index index.php;

    server_name _;

    location / {
        try_files $uri $uri/ /index.php?$args;
    }

    location ~ \.php$ {
        include fastcgi.conf;
        fastcgi_pass unix:/run/php/php7.0-fpm.sock;
    }
}
After you had made the changes, type Ctrl-X followed by Y to save the changes.
Following the creation of /etc/nginx/sites-enabled/projectsend.conf, remove /etc/nginx/sites-enabled/default:
sudo rm /etc/nginx/sites-enabled/default
Once you had removed the default Nginx configurations, restart Nginx by running the following command:
sudo systemctl restart nginx.service
Running the install script of ProjectSend
At this point, you are ready to run the install script of ProjectSend. For the purpose of this guide, let's assume that your Raspberry Pi 3 had gotten 192.168.1.115 as the IP address from your router. Given that, use your browser to access http://192.168.1.115/install.
Subsequently, you will see the following page for you to specify some initial configurations for your ProjectSend installation:
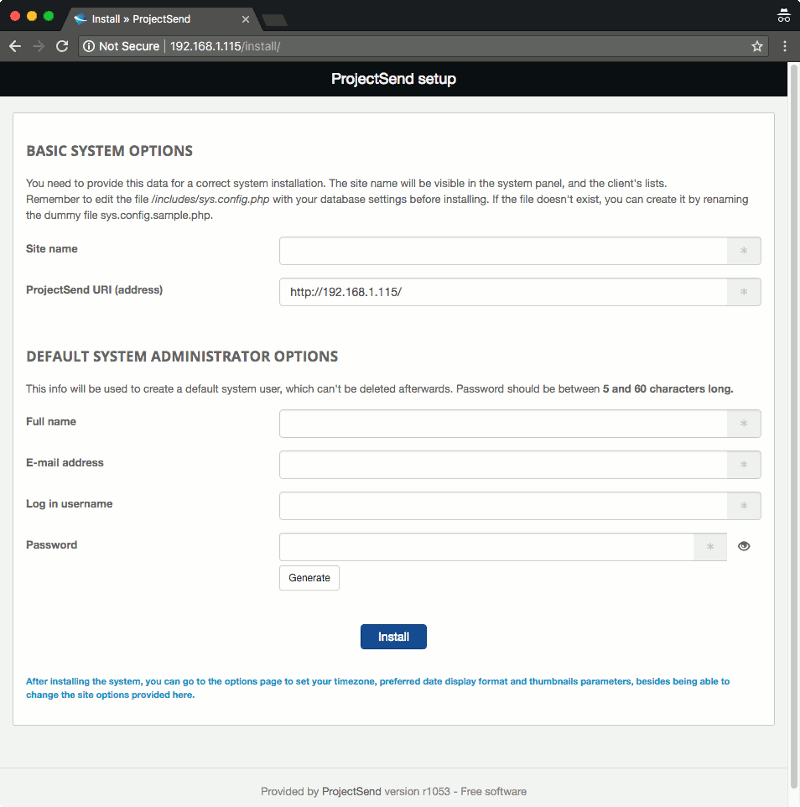
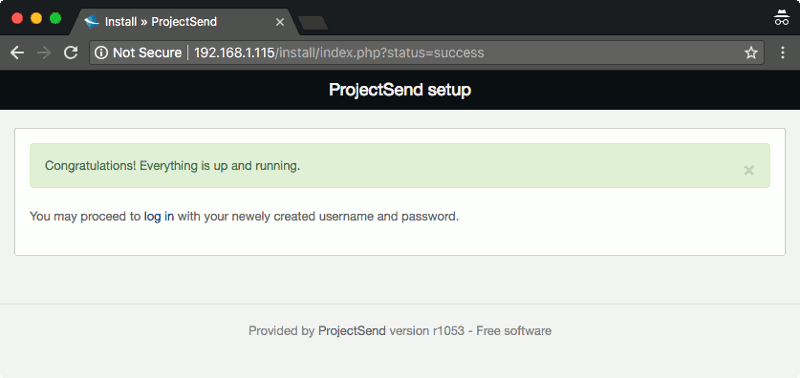
Once you had filled in your own configurations, click on the Install button. Afterwards, you will be presented with the following page:
Serving your ProjectSend website via HTTPs
At this time, you have a file sharing website that you can access from within your home network. However, a file sharing website should be accessible from outside your home network in a secured way. Given these points, this section will discuss how you can serve your ProjectSend website via HTTPS.
Prequisites
Previously, we had discussed the topic on how to host multiple websites from home. Following those pointers, you will need the following pieces for your ProjectSend site to be accessed from outside your home network, via HTTPS with Let's Encrypt browser-trusted certificate:
- A domain or subdomain name that is mapped to the public IP address that your home router had gotten from the Internet Service Provider.
- Forwarding of network traffic made to port 80 and 443 of your home router public IP address to the IP address of the Raspberry Pi 3 that contains your ProjectSend site. If you happen to use Linksys EA7500 Max-Stream AC1900 router, you can checkout this post on how to do so.
Installing Certbot on Raspbian Stretch Lite
Once you had met the pre-requisites, proceed to install Certbot on Raspbian Stretch Lite.
Configuring Nginx to facilitate Certbot in acquiring the SSL certificate for your domain or subdomain
After installing Certbot, proceed on to configure Nginx to facilitate Certbot in acquiring the SSL certificate for your domain. For the purpose of this guide, let's assume that you had designated ps.yourdomain.com as the domain to reach your ProjectSend site on your Raspberry Pi 3.
With this in mind, let's first move /etc/nginx/sites-enabled/projectsend.conf to /etc/nginx/sites-enabled/ps.yourdomain.com.conf:
sudo mv /etc/nginx/sites-enabled/projectsend.conf /etc/nginx/sites-enabled/ps.yourdomain.com.conf
Once you had done so, open up /etc/nginx/sites-enabled/ps.yourdomain.com.conf with nano:
sudo nano /etc/nginx/sites-enabled/ps.yourdomain.com.conf
After the editor loads the file, replace the content with the following:
server {
    listen   80 default_server;
    root /var/www/projectsend-r1053;
    index index.php;

    server_name ps.yourdomain.com;

    location ~ /.well-known {
        allow all;
    }

    location / {
        try_files $uri $uri/ /index.php?$args;
    }

    # pass the PHP scripts to FastCGI server
    location ~ \.php$ {
        include fastcgi.conf;
        fastcgi_pass unix:/run/php/php7.0-fpm.sock;
    }
}
Once you had replaced the content, type Ctrl-X followed by Y to save the file.
Afterwards, restart Nginx with the following command:
sudo systemctl restart nginx.service
Using Certbot to get Let's Encrypt to issue browser-trusted SSL certificate for your domain
At this time, you are ready to run Certbot to get Let's Encrypt to issue browser-trusted SSL certificate for your domain. Therefore, run the following command to do so:
sudo certbot certonly -a webroot --webroot-path=/var/www/projectsend-r1053 -d ps.yourdomain.com
Generating a strong Diffie-Hellman group
Once Certbot had fetched the SSL certificate artefacts for your domain, generate a Diffie-Hellman group for Nginx to use for exchanging cryptographic keys with its clients:
sudo openssl dhparam -out /etc/ssl/certs/dhparam.pem 2048
Updating the Nginx configurations for serving HTTPS for your ProjectSend website
Now that you have the necessary artefacts for serving HTTPS, proceed on to update the Nginx configurations. Firstly, use nano to load up /etc/nginx/sites-enabled/ps.yourdomain.com.conf:
sudo nano /etc/nginx/sites-enabled/ps.yourdomain.com.conf
Then, replace the content with the following:
server {
    listen 80;
    server_name  ps.yourdomain.com;
    return 301 https://$host$request_uri;
}

# For ssl
server {
    ssl on;
    ssl_certificate /etc/letsencrypt/live/ps.yourdomain.com/fullchain.pem;
    ssl_certificate_key /etc/letsencrypt/live/ps.yourdomain.com/privkey.pem;
    ssl_protocols TLSv1 TLSv1.1 TLSv1.2;
    ssl_prefer_server_ciphers on;
    ssl_dhparam /etc/ssl/certs/dhparam.pem;
    ssl_ciphers 'ECDHE-RSA-AES128-GCM-SHA256:ECDHE-ECDSA-AES128-GCM-SHA256:ECDHE-RSA-AES256-GCM-SHA384:ECDHE-ECDSA-AES256-GCM-SHA384:DHE-RSA-AES128-GCM-SHA256:DHE-DSS-AES128-GCM-SHA256:kEDH+AESGCM:ECDHE-RSA-AES128-SHA256:ECDHE-ECDSA-AES128-SHA256:ECDHE-RSA-AES128-SHA:ECDHE-ECDSA-AES128-SHA:ECDHE-RSA-AES256-SHA384:ECDHE-ECDSA-AES256-SHA384:ECDHE-RSA-AES256-SHA:ECDHE-ECDSA-AES256-SHA:DHE-RSA-AES128-SHA256:DHE-RSA-AES128-SHA:DHE-DSS-AES128-SHA256:DHE-RSA-AES256-SHA256:DHE-DSS-AES256-SHA:DHE-RSA-AES256-SHA:AES128-GCM-SHA256:AES256-GCM-SHA384:AES128-SHA256:AES256-SHA256:AES128-SHA:AES256-SHA:AES:CAMELLIA:DES-CBC3-SHA:!aNULL:!eNULL:!EXPORT:!DES:!RC4:!MD5:!PSK:!aECDH:!EDH-DSS-DES-CBC3-SHA:!EDH-RSA-DES-CBC3-SHA:!KRB5-DES-CBC3-SHA';
    ssl_session_timeout 1d;
    ssl_session_cache shared:SSL:50m;
    ssl_stapling on;
    ssl_stapling_verify on;
    add_header Strict-Transport-Security max-age=15768000;

    default_type  application/octet-stream;

    listen 443;
    server_name  ps.yourdomain.com;

    root /var/www/projectsend-r1053;
    index index.php;

    location ~ /.well-known {
        allow all;
    }

    location / {
        try_files $uri $uri/ /index.php?$args;
    }

    # pass the PHP scripts to FastCGI server
    location ~ \.php$ {
        include fastcgi.conf;
        fastcgi_pass unix:/run/php/php7.0-fpm.sock;
    }

}
After that, type Ctrl-X followed by Y to save the configuration file.
Once you had saved the configuration file, run the following command to restart nginx:
sudo systemctl restart nginx.service
Updating base uri to reflect your domain name with HTTPs
Since ProjectSend had saved the base uri with the protocol scheme, you need to change it in order for ProjectSend to work properly via HTTPS. In order to do so, open up the MariaDB client:
sudo mariadb
After the MariaDB client loads up, run the following SQL statement to update the base uri with https:// as the protocol scheme:
use myProjectSendDb;
UPDATE tbl_options SET value = 'https://ps.yourdomain.com/' WHERE name = 'base_uri';
After that, you will be able to access your ProjectSend site from outside your home network via HTTPS with Let's Encrypt certificate.
Buying the Raspberry Pi 3 hardware to host your own file sharing site
If you do not have the Raspberry Pi 3 hardware mentioned in this post yet, you may want to purchase them from Amazon. Simply click on the button below to add the Raspberry Pi 3 hardware to your cart. You may remove anything that you already have or replace some of the hardware with other hardware.