Setting up WordPress on Raspberry Pi Zero W with Raspbian Stretch Lite, Nginx, MariaDB and PHP as the LEMP stack
A Raspberry Pi Zero W is a small and capable computer that included a Wi-Fi chip for projects that requires an Internet connection.
Apart from running client programs on the Raspberry Pi Zero W, it is equally capable of being a web server. Since I had a spare Raspberry Pi Zero W lying around the house and there are good reasons to blog as a programmer, I decided to use it as a WordPress server to collect content for a new blog project.
This post documents how I setup WordPress on a Raspberry Pi Zero W with Raspbian Stretch Lite, Nginx, MariaDB and PHP as the LEMP stack.
Recommended hardware list
- Raspberry Pi Zero W (Wireless) & Official Case
- Kingston Digital 32GB microSDHC Class 10 UHS-I 45R Flash Card (SDC10G2/32GBSP)
- Belkin micro USB cable
- Unused USB charger
Required hardware to install Raspbian Stretch Lite onto the microSD
Raspberry Pi Zero W board will load Raspbian Stretch Lite from a microSD card. Hence, we will need to have a computer with a SD card reader. If your computer does not come with a SD card reader, you have to get one.
If you have the standard SD card reader on your computer but do not have a SD card adapter, you may want to get the Kingston Digital 32 GB microSDHC Class 10 UHS-1 Memory Card 30MB/s with Adapter (SDC10/32GB) instead.
Downloading Raspbian Stretch Lite for Raspberry Pi Zero W
Compared to Raspbian Stretch, Raspbian Stretch Lite does not come with a desktop environment. Hence, it is suitable to be used as the operating system for our WordPress project on a Raspberry Pi Zero W board.
With the hardware on my table, I proceeded to download a copy of Raspbian Stretch Lite. As of this writing, the one that was available was dated 29th November 2017:
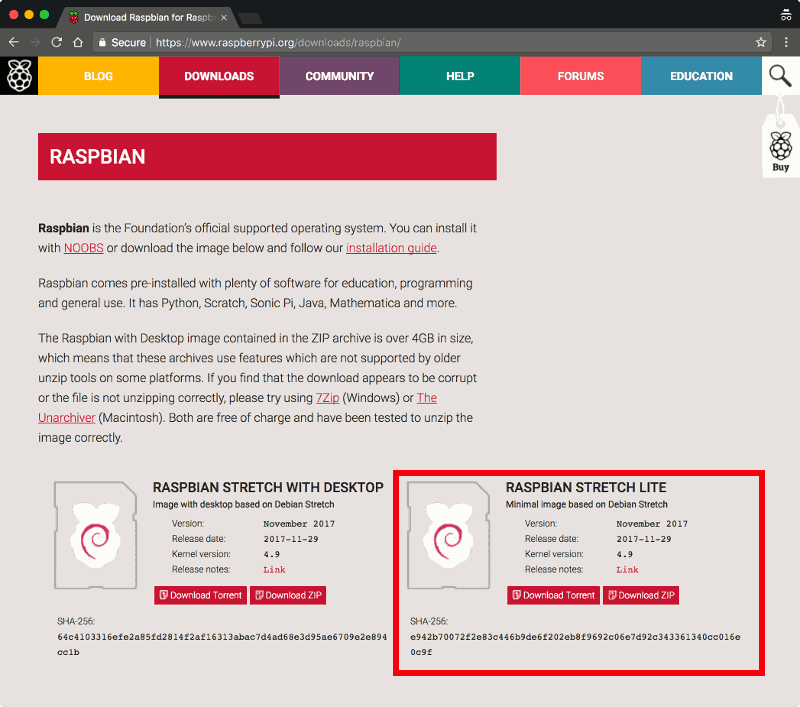
I clicked on the Download Zip button for Raspbian Stretch Lite and saved the zip file onto my file system.
Installing Raspbian Stretch Lite onto the microSD card
Once my browser had completed the download for the .zip file, I extracted the .img file from the .zip file. The .img file was the operating system image that I used for installing Raspbian Stretch Lite onto my microSD card.
I used Etcher on my MacBook Pro to install the operating system image onto the microSD card.
If you are using a windows machine, you can use Win32DiskImager to install the operating system for your Raspberry Pi Zero W.
If you are using a Linux desktop, you should be able to Etcher to install the operating system for your Raspberry Pi Zero W.
Enabling SSH server on Raspbian Stretch Lite first boot
With an SSH server running on Raspbian Stretch Lite, I do not have to find a spare keyboard, spare monitor, a mini HDMI to HDMI adapter and a OTG cable in order to configure Raspbian Stretch Lite after it had booted up for the first time.
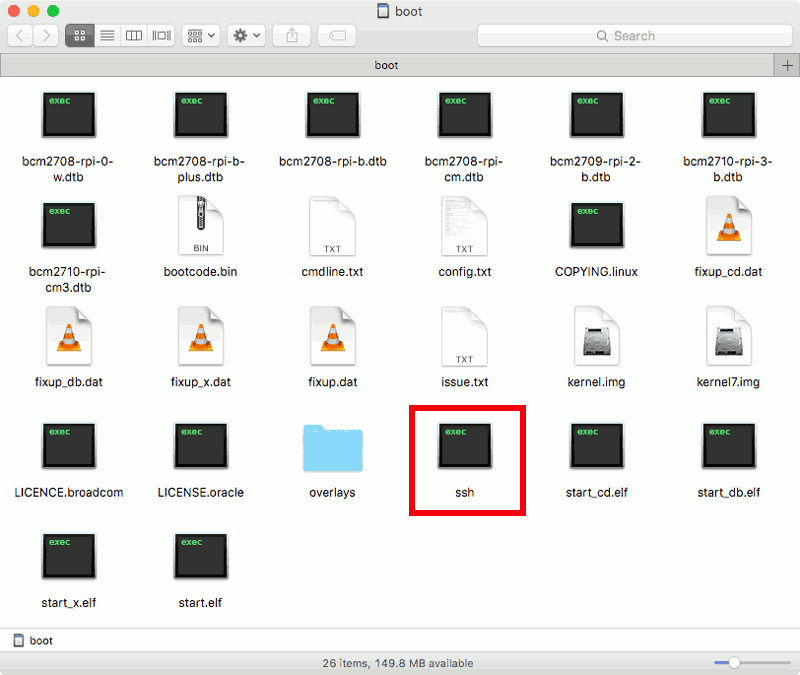
To ensure that I had the SSH server running after the first boot, I created an empty file named "ssh” in the boot partition of the microSD card:
Getting Raspberry Pi Zero W connect to your 2.4 GHz Wi-Fi network on first boot
The SSH server is the first piece to allow remote configuration of the Raspbian Stretch Lite operating system running the Raspberry Pi Zero W. The other piece is the Wi-Fi connection from my Raspberry Pi Zero W to my home network.
The Wi-Fi chip on Raspberry Pi Zero W connects to a 2.4 GHz Wi-Fi network. To get my Raspberry Pi Zero W to connect to my 2.4 GHz Wi-Fi network, I first created a text file with the following contents:
country=SG
ctrl_interface=DIR=/var/run/wpa_supplicant GROUP=netdev
update_config=1

network={
        scan_ssid=1
        ssid="the_2.4-hz-wireless-network"
        psk="the_2.4-hz-wireless-network_password"
        proto=WPA
        key_mgmt=WPA-PSK
}
and placed it into the boot partition of the microSD card:
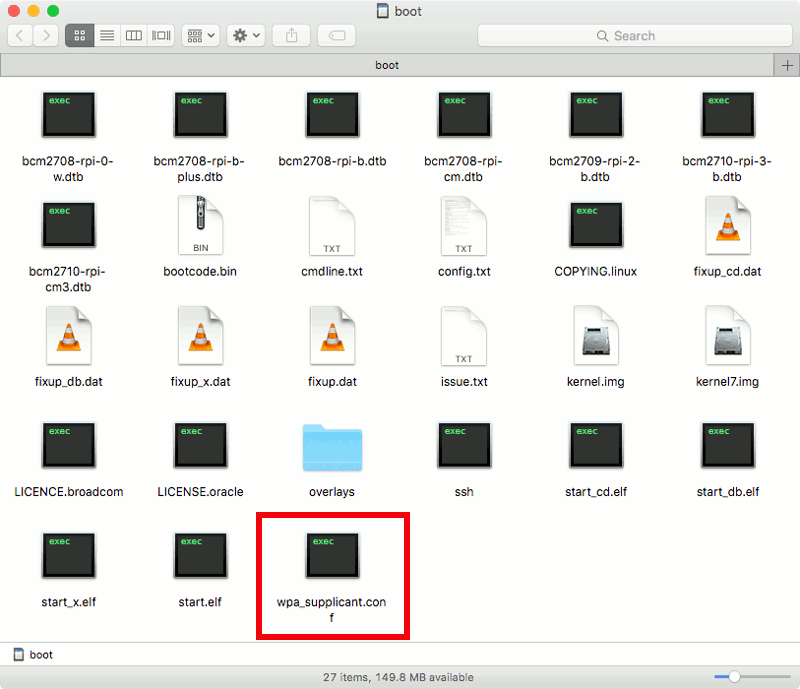
Be sure to replace the country, ssid and psk values to the appropriate values for your 2.4GHz Wi-Fi network.
After I got the wpa_supplicant.conf file into the boot partition of the microSD card, I removed it from my computer and inserted it into the microSD card slot on my Raspberry Pi Zero W board.
Booting up Raspbian Stretch Lite
After assembling the Raspberry Pi Zero W board to the Raspberry Pi Zero official case, I then proceeded to connect my Belkin micro USB cable to my USB charger and the power port on my Raspberry Pi Zero W board. After switching on the wall socket which my USB charger was plugged into, the Raspberry Pi Zero W board booted up the Raspbian Stretch Lite operating system.
Getting the IP address of my Raspberry Pi Zero W
When Raspbian Stretch Lite booted up, it requested an IP address from my router. This IP address was needed for me to SSH into my Raspberry Pi Zero W. To get the IP Address that my router had allocated to my Raspbian Stretch Lite, I went to my router's address allocation table and find an entry with the name raspberrypi. In my case, the router allocated 192.168.1.123 to my Raspbian Stretch Lite.
Getting into the Raspbian Stretch Lite operating system via SSH from my computer
The default credentials to log into Raspberry Pi Stretch Lite is as follows:
Username: pi
Password: raspberry
With the default credentials and the IP address that my router had given to my Raspbian Stretch Lite, I then used SSH to get into the operating system:
ssh pi@192.168.1.123
I entered raspberry when Raspbian Stretch Lite prompted for password. With that, my Raspbian Stretch Lite greeted me with the following output:
Linux raspberrypi 4.9.59+ #1047 Sun Oct 29 11:47:10 GMT 2017 armv6l

The programs included with the Debian GNU/Linux system are free software;
the exact distribution terms for each program are described in the
individual files in /usr/share/doc/*/copyright.

Debian GNU/Linux comes with ABSOLUTELY NO WARRANTY, to the extent
permitted by applicable law.

SSH is enabled and the default password for the 'pi' user has not been changed.
This is a security risk - please login as the 'pi' user and type 'passwd' to set a new password.
Changing the default password of the pi user
Since Raspbian Stretch Lite suggested that using the default password for the 'pi' user is a security risk, the next thing that I did was to change the default password. To do so, I entered the following command:
passwd
For the three prompts that followed the command, I entered raspberry and my favourite password twice.
Configuring the locale settings on Raspbian Stretch Lite
The next thing that I did was to configure the locale settings for my Raspbian Stretch Lite. To do so, I first opened up the Raspberry Pi Software Configuration Tool:
sudo raspi-config
I then followed through the following screens to generate the "en_US.UTF-8" locale and set it as the default locale for the system environment:
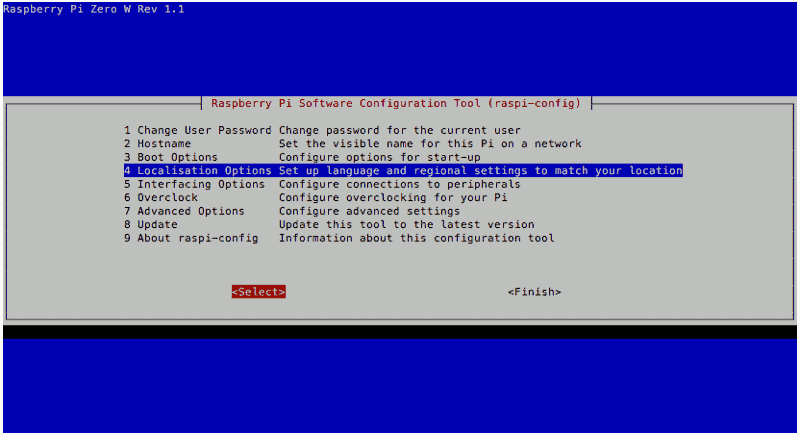
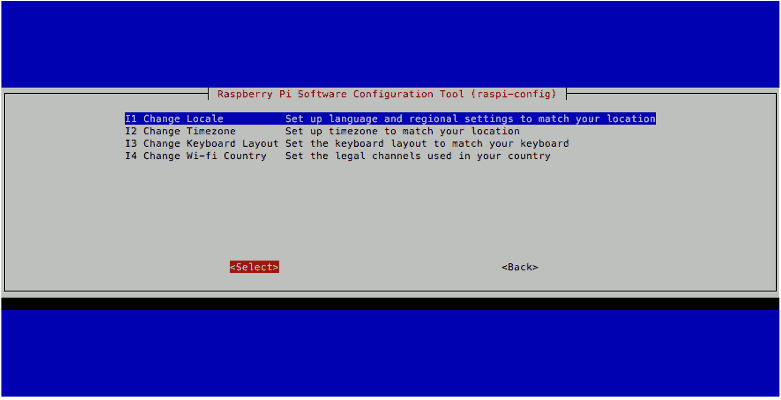

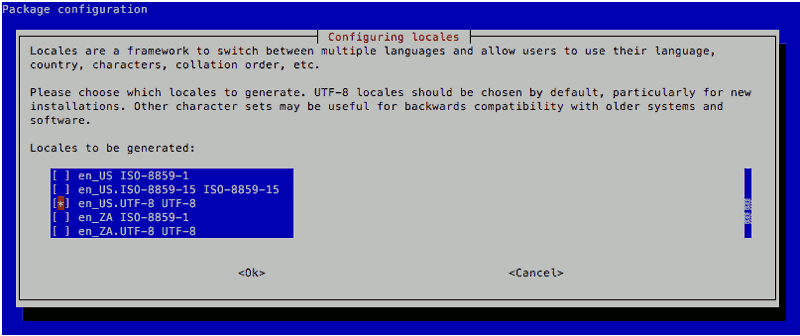

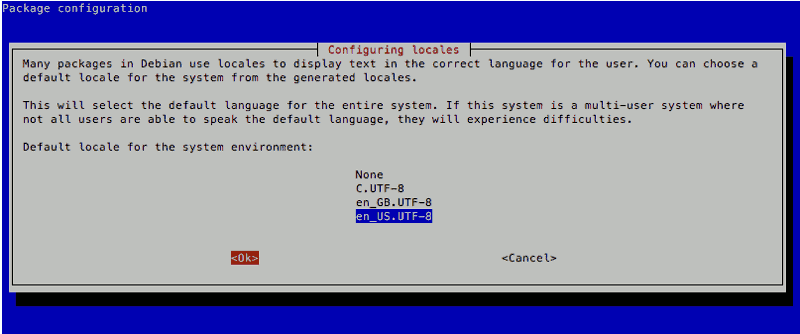

After doing so, I opened up /etc/default/locale with nano:
sudo nano /etc/default/locale
And updated the contents to look like the following:
LANG=en_US.UTF-8
LC_ALL=en_US.UTF-8
LANGUAGE=en_US.UTF-8
This would ensure that the locale settings for my Raspbian Stretch Lite persist through system reboots.
Changing Timezone
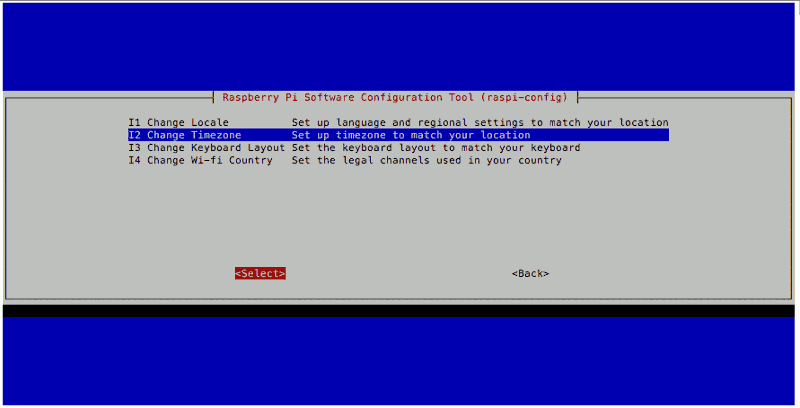
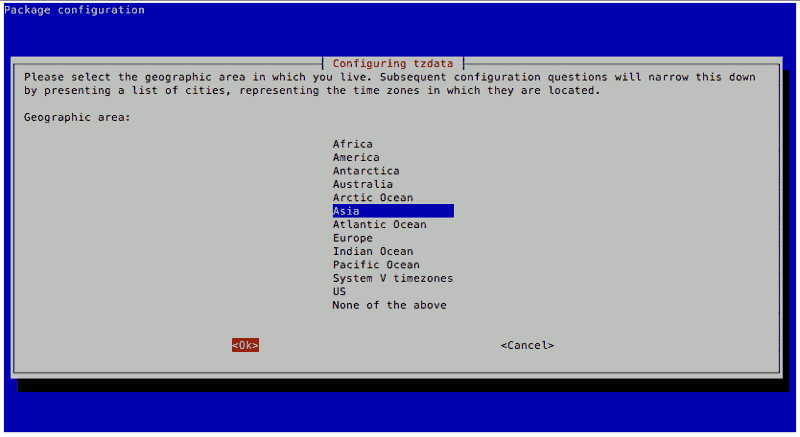
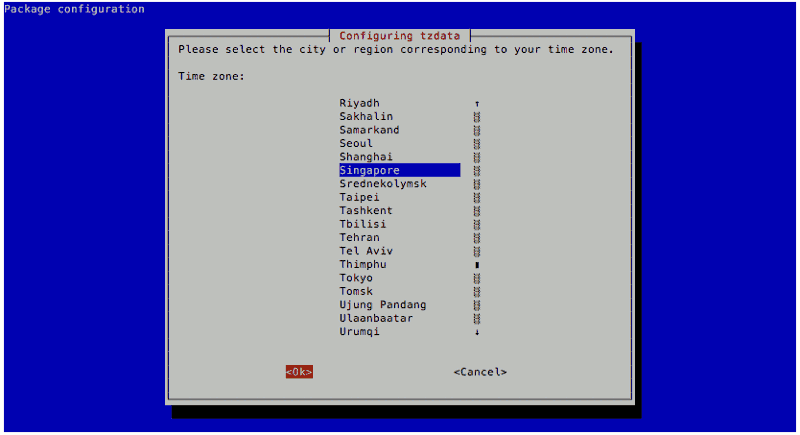
The default timezone of Raspbian Stretch Lite is "Etc/UTC". However, since my Raspberry Pi Zero W will be residing in Singapore, I wanted it to follow Singapore's Timezone.
To change the timezone on my Raspbian Stretch Lite, I used the Raspberry Pi Software Configuration Tool mentioned earlier and went through the following steps:





Installing Nginx on Raspbian Stretch Lite
With the locale settings configured, I then proceeded to install Nginx on my Raspbian Stretch Lite. To do so, I entered the following command:
sudo apt-get update
sudo apt-get install nginx -y
After the installation had completed, I ran the following command to verify that the installation was successful:
systemctl status nginx.service
Seeing the following output verified that Nginx was installed successfully on my Raspbian Stretch Lite:
● nginx.service - A high performance web server and a reverse proxy server
   Loaded: loaded (/lib/systemd/system/nginx.service; enabled; vendor preset: enabled)
   Active: active (running) since Tue 2017-12-12 23:41:06 +08; 9min ago
     Docs: man:nginx(8)
  Process: 15033 ExecStart=/usr/sbin/nginx -g daemon on; master_process on; (code=exited, status=0/SUCCESS)
  Process: 15030 ExecStartPre=/usr/sbin/nginx -t -q -g daemon on; master_process on; (code=exited, status=0/SUCCESS)
 Main PID: 15035 (nginx)
   CGroup: /system.slice/nginx.service
           ├─15035 nginx: master process /usr/sbin/nginx -g daemon on; master_process on;
           └─15036 nginx: worker process

Dec 12 23:41:05 raspberrypi systemd[1]: Starting A high performance web server and a reverse proxy server...
Dec 12 23:41:06 raspberrypi systemd[1]: Started A high performance web server and a reverse proxy server.
Installing MariaDB database server and command line client on Raspbian Stretch Lite
The next item on the list was to install the MariaDB database server and command line client. To do so, I ran the following command:
sudo apt-get install mariadb-server mariadb-client -y
After the command had completed, I proceeded to check the installation.
This installation of mariadb-server did not prompt me for a root password. This was because the root user was by default set to use the unix_socket plugin, which allows the user to use operating system credentials when connecting to MariaDB via Unix socket.
Since the pi user of my Raspbian Stretch installation was configured to use sudo without password prompt, I could get into my mariadb-server through the following command without supplying any password:
sudo mariadb
Running the command gave me the following prompt:
Welcome to the MariaDB monitor.  Commands end with ; or \g.
Your MariaDB connection id is 2
Server version: 10.1.23-MariaDB-9+deb9u1 Raspbian 9.0

Copyright (c) 2000, 2017, Oracle, MariaDB Corporation Ab and others.

Type 'help;' or '\h' for help. Type '\c' to clear the current input statement.

MariaDB [(none)]>
This implied that MariaDB was installed successfully. I typed exit in the MariaDB prompt to continue on with the rest of the installation.
Installing PHP 7 on my Raspbian Stretch Lite
With the MariaDB database installed, I proceeded on to install PHP 7 and the necessary PHP libraries to run WordPress on my Raspbian Stretch Lite. To do so, I ran the following command:
sudo apt-get install php7.0 php7.0-fpm php7.0-mysql -y
After installation of PHP 7 had completed, I ran the following command to verify that the PHP 7 FastCGI Process Manager was started successfully on my Raspbian Stretch Lite:
systemctl status php7.0-fpm.service
Doing so gave me the following output as an indication that PHP 7.0 FastCGI Process Manager was started successfully:
● php7.0-fpm.service - The PHP 7.0 FastCGI Process Manager
   Loaded: loaded (/lib/systemd/system/php7.0-fpm.service; enabled; vendor preset: enabled)
   Active: active (running) since Wed 2017-12-13 19:14:12 +08; 4min 35s ago
     Docs: man:php-fpm7.0(8)
 Main PID: 7995 (php-fpm7.0)
   Status: "Processes active: 0, idle: 2, Requests: 0, slow: 0, Traffic: 0req/sec"
   CGroup: /system.slice/php7.0-fpm.service
           ├─7995 php-fpm: master process (/etc/php/7.0/fpm/php-fpm.conf)
           ├─7996 php-fpm: pool www
           └─7997 php-fpm: pool www

Dec 13 19:14:12 raspberrypi systemd[1]: Starting The PHP 7.0 FastCGI Process Manager...
Dec 13 19:14:12 raspberrypi systemd[1]: Started The PHP 7.0 FastCGI Process Manager.
Getting a copy of WordPress
Once I had completed installation of the required components to run WordPress on Raspbian Stretch Lite, the next step that I did was to get a copy of WordPress.
To do so, I ran the following command:
cd /var/www
sudo wget https://wordpress.org/latest.tar.gz
sudo tar xvfz latest.tar.gz
sudo rm latest.tar.gz
sudo mv wordpress my_new_wordpress_site
Doing so would leave a my_new_wordpress_site folder inside the /var/www folder. The my_new_wordpress_site folder will contain the codes necessary to run WordPress.
Changing the owner of my_new_wordpress_site folder to www-data
In order for media upload to work, the www-data user needs to owned the my_new_wordpress_site folder. Hence, the next step was to change the ownership of the my_new_wordpress_site folder to the same user that runs PHP Fast CGI Manager:
sudo chown -R www-data:www-data /var/www/my_new_wordpress_site
Configuring Nginx to proxy HTTP requests to the FastCGI Process Manager
Next, I went on to configure Nginx to serve as a reverse proxy server for my WordPress site. Referencing the informative guide on configuring Nginx for a PHP web application like WordPress, I created /etc/nginx/sites-enabled/anewwebsite.com.conf:
# WordPress single site rules.
# Designed to be included in any server {} block.
# Upstream to abstract backend connection(s) for php
upstream php {
        server unix:/run/php/php7.0-fpm.sock;
}

server {
        listen   80;
        ## Your website name goes here.
        server_name anewwebsite.com www.anewwebsite.com;
        ## Your only path reference.
        root /var/www/my_new_wordpress_site;
        ## This should be in your http block and if it is, it's not needed here.
        index index.php;

        location = /favicon.ico {
                log_not_found off;
                access_log off;
        }

        location = /robots.txt {
                allow all;
                log_not_found off;
                access_log off;
        }

        location / {
                # This is cool because no php is touched for static content.
                # include the "?$args" part so non-default permalinks doesn't break when using query string
                try_files $uri $uri/ /index.php?$args;
        }

        location ~ \.php$ {
                #NOTE: You should have "cgi.fix_pathinfo = 0;" in php.ini
                include fastcgi.conf;
                fastcgi_intercept_errors on;
                fastcgi_pass php;
                fastcgi_buffers 16 16k;
                fastcgi_buffer_size 32k;
        }

        location ~* \.(js|css|png|jpg|jpeg|gif|ico)$ {
                expires max;
                log_not_found off;
        }
}
Once I had created the configuration file, I got Nginx to take in the configurations by restarting it with the following command:
sudo systemctl restart nginx.service
Creating a MariaDB user and a database instance for the WordPress site
Next up was to setup the persistency in MariaDB for our WordPress site to interact with. Since it is a good practice to create a separate database user for the WordPress site to interact with the database, the next step that I did was to create a Maria DB user that only have the privileges to interact with a particular database instance.
To do so, I first get into the MariaDB prompt to interact with the MariaDB server:
sudo mariadb
Once the MariaDB prompt appeared, I first ran the following command to create a new database instance:
CREATE DATABASE newWordPressDb;
With that database instance created successfully, I then created the MariaDB user with the relevant privileges for accessing that database instance:
CREATE USER 'anewuser'@'localhost' IDENTIFIED BY 'password';
GRANT ALL ON newWordPressDb.* TO 'anewuser'@'localhost';
Setting cgi.fix_pathinfo = 0 in php.ini of PHP 7 Fast CGI Manager
Since WordPress suggested that we should have "cgi.fix_pathinfo = 0;" in php.ini, the next step that I did was to do that.
The php.ini file for PHP 7 Fast CGI Manager is found in the /etc/php/7.0/fpm folder. With that, I used nano to open up /etc/php/7.0/fpm/php.ini and replaced:
;cgi.fix_pathinfo = 1;
with:
cgi.fix_pathinfo = 0;
I then restarted the PHP 7 Fast CGI Manager with the following command:
sudo systemctl restart php7.0-fpm.service
Creating the WordPress configurations to use the database instance
With the MariaDB user and database instance in place, the next thing that I did was to create the WordPress configurations for WordPress to use the database instance.
To do so, I first renamed /var/www/my_new_wordpress_site/wp-config-sample.php to /var/www/my_new_wordpress_site/wp-config.php:
sudo mv /var/www/my_new_wordpress_site/wp-config-sample.php /var/www/my_new_wordpress_site/wp-config.php
I then used my browser to access https://api.wordpress.org/secret-key/1.1/salt/ to generate some key and salt values for my /var/www/my_new_wordpress_site/wp-config.php.
With that, I opened up /var/www/my_new_wordpress_site/wp-config.php with nano and updated some sections of the file to look like the following:
// ** MySQL settings - You can get this info from your web host ** //
/** The name of the database for WordPress */
define('DB_NAME', 'newWordPressDb');

/** MySQL database username */
define('DB_USER', 'anewuser');

/** MySQL database password */
define('DB_PASSWORD', 'password');

/** MySQL hostname */
define('DB_HOST', 'localhost');

/** Database Charset to use in creating database tables. */
define('DB_CHARSET', 'utf8');

/** The Database Collate type. Don't change this if in doubt. */
define('DB_COLLATE', '');

/**#@+
 * Authentication Unique Keys and Salts.
 *
 * Change these to different unique phrases!
 * You can generate these using the {@link https://api.wordpress.org/secret-key/1.1/salt/ WordPress.org secret-key service}
 * You can change these at any point in time to invalidate all existing cookies. This will force all users to have to log in again.
 *
 * @since 2.6.0
 */
define('AUTH_KEY',         '+cSfNRx/GGIC.w*S!Bm-tHSZ;XG{&KL$Ciah!&U!XpM1_) c{q1+Z5nZ&:n$3|EA');
define('SECURE_AUTH_KEY',  'b&YwiG*4|u-GPq ],XfvrK.m>@G]77S_50J3TF@XpsrG.!b}sPjYQliq; EYaHO+');
define('LOGGED_IN_KEY',    '!:Z`K-+mxdD{]KuXOxEV _KoPY[e r2|0|p|kT-S;Fp4aKat>(k6;{tNM8+<93HU');
define('NONCE_KEY',        'Ws9-:a=77-CYQiu-4&5S:[&sDo++d(TCm=us|D,Y!ZsG*Q+F/Q|6QP(dx{{Kz{|3');
define('AUTH_SALT',        'AG+J* 6n2%$`,Lsw<2`G[;aK->K_=@C<#gn|@z9t+?|{y-`7F~otjp`0{$[d.&C6');
define('SECURE_AUTH_SALT', 'S{^tpy:o#sN)+vq#93jv<WD_FX6[T 6g*=tAvP+KBj!Wm})v<0)g(?BkUB#vH1YD');
define('LOGGED_IN_SALT',   'J~~FNzfG>1B(Xo=B1j4H<eN9bjEg9sZkKCSSB.+~;|,J!MYKDXw4`aHKwI_Uw-N<');
define('NONCE_SALT',       '[Qj-Qz:5G-RIX*vm[?B0Wuej^w|qy !)AOkrC3gHI_tR1B%]$o8/SsG-;r:CfE@)');
/**#@-*/
Editing the hosts file to access my WordPress site from my work computer
After putting in the configurations that are necessary for WordPress to function, the next thing that I did was to get my computer to resolve the domains anewwebsite.com and www.anewwebsite.com with the IP Address of my Raspberry Pi Zero W: 192.168.1.123. To do so, I opened up /etc/hosts on my Mac and add in the following entries:
192.168.1.123 anewwebsite.com
192.168.1.123 www.anewwebsite.com
Running the WordPress installation script
Once I had added the necessary hosts entries, I then accessed www.anewwebsite.com with my browser.
Once the installation page appeared, I then keyed in the necessary input:
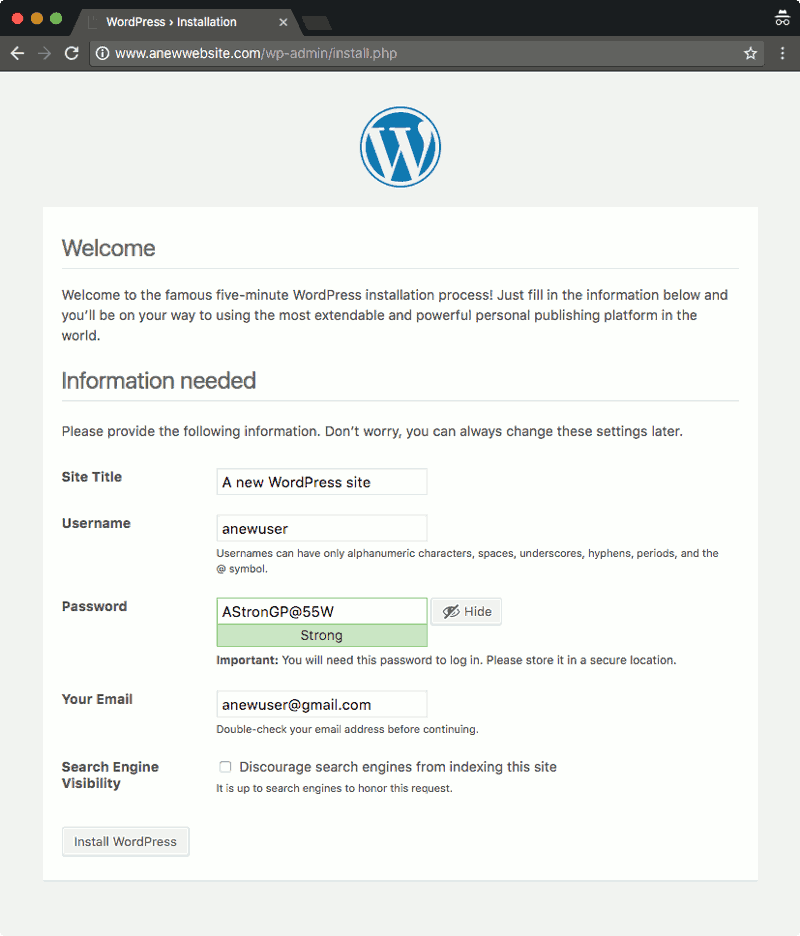

And clicked the Install WordPress button:
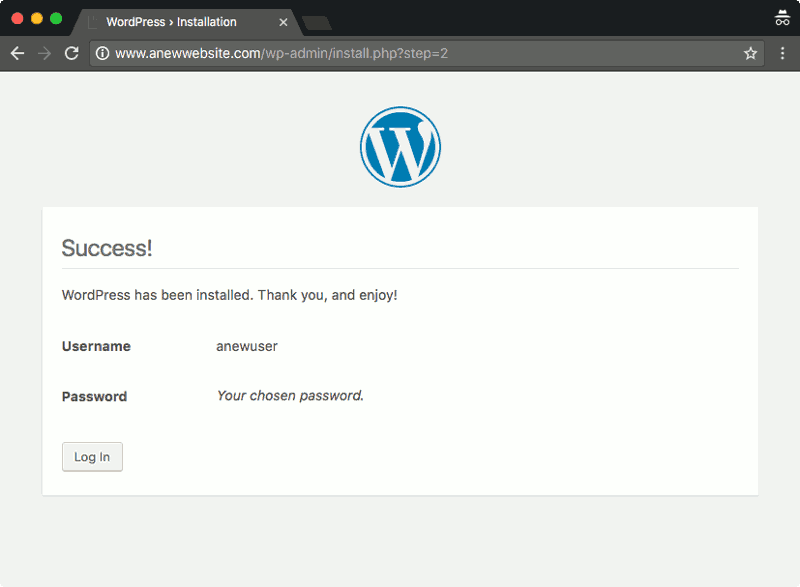

With that, I had WordPress running on Raspberry Pi Zero W with Raspbian Stretch Lite, Nginx, MariaDB and PHP 7 as the LEMP stack.
Until the point when I had created enough content to put up my Raspberry Pi Zero W WordPress site on the Internet, this setup is sufficient for me.
Further enhancements that I will want to make to my Raspberry Pi Zero W WordPress site
When I have clocked enough Raspberry Pi Zero W WordPress site in the future, there are some enhancements that I may want to make.
Increasing file upload limit
Since the default file upload size limit is slightly less than 1 Megabyte for Nginx and 2 Megabytes for PHP FPM 7, I can only upload slightly less than 1 Megabyte of content to my Raspberry Pi Zero W WordPress site.
When I wish to tweak the file upload limit, I can look at how to configure Nginx and PHP 7 stack in Linux to increase or decrease file upload size limit.
Installing a SMTP server for my Raspberry Pi Zero W WordPress site to send out emails
When I want to receive emails from my Raspberry Pi Zero W WordPress, I will need to install a SMTP server on my Raspberry Pi Zero W. For this purpose, I can install Postfix as the SMTP server for applications in Raspbian Stretch Lite to send email.
Let's Encrypt my Raspberry Pi Zero W WordPress site with a browser-trusted SSL/TLS certificates
Since Google encourages securing our site with HTTPS for better user experience, I should make my Raspberry Pi Zero W WordPress communicate in HTTPS when I put it onto the Internet.
When I make my Raspberry Pi Zero W WordPress communicate in HTTPS, I can be pretty sure that the communication channel between browsers and my WordPress site is safely encrypted.
Fortunately, Let's Encrypt makes it easy for web masters to deploy secure web applications that serve HTTPS.
Prequisites to serving my Raspberry Pi Zero W WordPress site via HTTPS
In a separate post, I had discussed the topic on how to host multiple websites from home. Following those pointers, I will need the following pieces for my Raspberry Pi Zero W WordPress site to be accessed from outside my home network with Let's Encrypt browser-trusted certificate:
- A domain or subdomain name that is mapped to the public IP address that my home router had gotten from the Internet Service Provider. If my public IP address changes frequently or you do not have a domain name, I will need to use the service of a Dynamic DNS service. For example, I can buy a Namecheap domain and get my Raspberry Pi 3 to use Namecheap dynamic DNS to update my domain when my home’s public IP address changes.
- Forwarding of network traffic made to port 80 and 443 of my home router public IP address to the IP address of the Raspberry Pi Zero W that contains my WordPress site.
Installing Certbot on Raspbian Stretch Lite for obtaining Let’s Encrypt’s browser-trusted certificates
In order to use Let's Encrypt facilities, we will need a ACME client to help us get the SSL artefacts from Let's Encrypt. Therefore, I will need to install Certbot on Raspbian Stretch Lite for obtaining Let’s Encrypt’s browser-trusted certificates.
Configuring Nginx to facilitate Certbot in acquiring the SSL certificate for my domain or subdomain
After installing Certbot, I will need to configure Nginx to facilitate Certbot in acquiring the SSL certificate for my domain. For the purpose of this guide, let's assume that I designate mynewblog.techcoil.com as the domain to reach my WordPress site on my Raspberry Pi Zero W.
Given these points, I will use nano to create the Nginx configurations file at /etc/nginx/sites-enabled/mynewblog.techcoil.com.conf:
sudo nano /etc/nginx/sites-enabled/mynewblog.techcoil.com.conf
After the editor loads the file, I will include the following content in the file:
server {
    listen   80;
    root /var/www/my_new_wordpress_site;
    index index.php;

    server_name mynewblog.techcoil.com;

    location ~ /.well-known {
        allow all;
    }
}
Once I had included the content, I will type Ctrl-X followed by Y to save the file.
Afterwards, I will restart Nginx with the following command:
sudo systemctl restart nginx.service
Using Certbot to get Let's Encrypt to issue browser-trusted SSL certificate for my domain
After Nginx is ready to facilitate Certbot in acquiring the SSL certificate artefacts, I will then run the following command to acquire them:
sudo certbot certonly -a webroot --webroot-path=/var/www/my_new_wordpress_site -d mynewblog.techcoil.com
Generating a strong Diffie-Hellman group
Once Certbot had fetched the SSL certificate artefacts for my domain, I will then generate a Diffie-Hellman group for Nginx to use for exchanging cryptographic keys with its clients:
sudo openssl dhparam -out /etc/ssl/certs/dhparam.pem 2048
Updating the Nginx configurations for serving HTTPS for my Raspberry Pi Zero W WordPress site
Till this point, I will have the necessary artefacts for Nginx to serve HTTPS. Therefore, I can update the Nginx configurations to use those artefacts in serving HTTPS.
Therefore, I will first use nano to load /etc/nginx/sites-enabled/mynewblog.techcoil.com.conf again:
sudo nano /etc/nginx/sites-enabled/mynewblog.techcoil.com.conf
Once the editor loads the file, I will replace its content with the following:
# WordPress single site rules.
# Designed to be included in any server {} block.
# Upstream to abstract backend connection(s) for php
upstream php {
        server unix:/run/php/php7.0-fpm.sock;
}

server {
    listen 80;
    server_name  mynewblog.techcoil.com;
    return 301 https://$host$request_uri;
}

# For ssl
server {
    ssl on;
    ssl_certificate /etc/letsencrypt/live/mynewblog.techcoil.com/fullchain.pem;
    ssl_certificate_key /etc/letsencrypt/live/mynewblog.techcoil.com/privkey.pem;
    ssl_protocols TLSv1 TLSv1.1 TLSv1.2;
    ssl_prefer_server_ciphers on;
    ssl_dhparam /etc/ssl/certs/dhparam.pem;
    ssl_ciphers 'ECDHE-RSA-AES128-GCM-SHA256:ECDHE-ECDSA-AES128-GCM-SHA256:ECDHE-RSA-AES256-GCM-SHA384:ECDHE-ECDSA-AES256-GCM-SHA384:DHE-RSA-AES128-GCM-SHA256:DHE-DSS-AES128-GCM-SHA256:kEDH+AESGCM:ECDHE-RSA-AES128-SHA256:ECDHE-ECDSA-AES128-SHA256:ECDHE-RSA-AES128-SHA:ECDHE-ECDSA-AES128-SHA:ECDHE-RSA-AES256-SHA384:ECDHE-ECDSA-AES256-SHA384:ECDHE-RSA-AES256-SHA:ECDHE-ECDSA-AES256-SHA:DHE-RSA-AES128-SHA256:DHE-RSA-AES128-SHA:DHE-DSS-AES128-SHA256:DHE-RSA-AES256-SHA256:DHE-DSS-AES256-SHA:DHE-RSA-AES256-SHA:AES128-GCM-SHA256:AES256-GCM-SHA384:AES128-SHA256:AES256-SHA256:AES128-SHA:AES256-SHA:AES:CAMELLIA:DES-CBC3-SHA:!aNULL:!eNULL:!EXPORT:!DES:!RC4:!MD5:!PSK:!aECDH:!EDH-DSS-DES-CBC3-SHA:!EDH-RSA-DES-CBC3-SHA:!KRB5-DES-CBC3-SHA';
    ssl_session_timeout 1d;
    ssl_session_cache shared:SSL:50m;
    ssl_stapling on;
    ssl_stapling_verify on;
    add_header Strict-Transport-Security max-age=15768000;

    default_type  application/octet-stream;

    listen 443;
    server_name  mynewblog.techcoil.com;

    root /var/www/my_new_wordpress_site;
    index index.php;

    location ~ /.well-known {
        allow all;
    }

    location = /favicon.ico {
                log_not_found off;
                access_log off;
    }

    location = /robots.txt {
            allow all;
            log_not_found off;
            access_log off;
    }

    location / {
            # This is cool because no php is touched for static content.
            # include the "?$args" part so non-default permalinks doesn't break when using query string
            try_files $uri $uri/ /index.php?$args;
    }

    location ~ \.php$ {
            #NOTE: You should have "cgi.fix_pathinfo = 0;" in php.ini
            include fastcgi.conf;
            fastcgi_intercept_errors on;
            fastcgi_pass php;
            fastcgi_buffers 16 16k;
            fastcgi_buffer_size 32k;
    }

    location ~* \.(js|css|png|jpg|jpeg|gif|ico)$ {
            expires max;
            log_not_found off;
    }

}
After that, I will type Ctrl-X followed by Y to save the configuration file.
Once I had saved the configuration file, I will run the following command to restart Nginx:
sudo systemctl restart nginx.service
Updating WordPress on the new URL
Once my Nginx server can serve my Raspberry Pi WordPress site with HTTPS, I will then get into MariaDB shell with the following command:
sudo mariadb
When MariaDB shell gets loaded, I will then run the following SQL statements to update WordPress with my new domain name:
UPDATE wp_options SET option_value = replace(option_value, 'http://anewwebsite.com', 'https://mynewblog.techcoil.com') WHERE option_name = 'home' OR option_name = 'siteurl';

UPDATE wp_posts SET guid = replace(guid, 'http://anewwebsite.com','https://mynewblog.techcoil.com');

UPDATE wp_posts SET post_content = replace(post_content, 'http://anewwebsite.com', 'https://mynewblog.techcoil.com');

UPDATE wp_postmeta SET meta_value = replace(meta_value,'http://anewwebsite.com','https://mynewblog.techcoil.com');

UPDATE wp_options SET option_value = replace(option_value, 'http://www.anewwebsite.com', 'https://mynewblog.techcoil.com') WHERE option_name = 'home' OR option_name = 'siteurl';

UPDATE wp_posts SET guid = replace(guid, 'http://www.anewwebsite.com','https://mynewblog.techcoil.com');

UPDATE wp_posts SET post_content = replace(post_content, 'http://www.anewwebsite.com', 'https://mynewblog.techcoil.com');

UPDATE wp_postmeta SET meta_value = replace(meta_value,'http://www.anewwebsite.com','https://mynewblog.techcoil.com');
Cleaning up unnecessary configurations
Since I will be able to access my Raspberry Pi Zero W WordPress site with the new URL, https://mynewblog.techcoil.com, I will not be some of the configurations that I had created earlier.
Therefore, I will run the following command to remove the unnecessary Nginx configuration file at /etc/nginx/sites-enabled/anewwebsite.com.conf:
sudo rm /etc/nginx/sites-enabled/anewwebsite.com.conf
After that, I will go to my laptop and remove the following content from /etc/hosts:
192.168.1.123 anewwebsite.com
192.168.1.123 www.anewwebsite.com
Buying the Raspberry Pi Zero W hardware to build your own LEMP server to run WordPress
If you do not have the Raspberry Pi Zero W hardware mentioned in this post yet, you may want to get them from Amazon. Simply click on the button below to add the Raspberry Pi Zero W hardware to your cart. You may remove anything that you already have or replace some of the hardware with other hardware.
