How I setup a Raspberry Pi Zero W CCTV camera with motionEye and Raspbian Stretch Lite
I had previously built a Raspberry Pi Zero W CCTV camera with motionEyeOS which was connected to the Wifi network of my old DLink router.
After I started using Linksys AC1900 Dual Band Wireless Router as my home router, I could no longer connect to that Raspberry Pi Zero W CCTV camera.
After reinstalling motionEyeOS a couple of times on my Raspberry Pi Zero W, I determined that motionEyeOS is not suitable for this new Wifi network.
On the other hand, my setup of WordPress on Raspberry Pi Zero W with Raspbian Stretch Lite, Nginx, mariadb and PHP was able to connect to my new Wifi network, even after multiple system reboots.
Hence, I figured that if I wanted to build a Raspberry Pi Zero W CCTV camera that can connect to my new Wifi network, I could use Raspbian Stretch Lite as the base operating system and install motionEye for the web frontend to view the camera footage.
This post documents how I setup a Raspberry Pi Zero W CCTV with motionEye and Raspbian Stretch Lite.
Hardware used for this CCTV camera setup
I utilized the following hardware component for this CCTV camera setup:
- Raspberry Pi Zero W (Wireless) & Official Case
- Raspberry Pi 5MP Camera Board Module
- SanDisk Ultra 128GB microSDXC UHS-I Card with Adapter, Black, Standard Packaging
- Belkin micro USB cable
- Unused USB charger
Note that I had utilized an earlier version of the Raspberry Pi Camera module. If you do not have a Raspberry Pi Camera module, you may want to get the Raspberry Pi Camera module V2 instead.
Required hardware to install Raspbian Stretch Lite onto the microSD
Raspberry Pi Zero W board will load Raspbian Stretch Lite from a microSD card. Hence, we will need to have a computer with a SD card reader. If your computer does not come with a SD card reader, you have to get one.
Downloading Raspbian Stretch Lite for Raspberry Pi Zero W
Compared to Raspbian Stretch, Raspbian Stretch Lite does have a desktop environment. Hence, it is suitable to be used as the operating system for motionEye on a Raspberry Pi Zero W board.
With the hardware on my table, I proceeded to download a copy of Raspbian Stretch Lite. As of this writing, the one that was available was dated 29th November 2017:
I clicked on the Download Zip button for Raspbian Stretch Lite and saved the zip file onto my file system.
Installing Raspbian Stretch Lite onto the microSD card
Once my browser had completed the download for the .zip file, I extracted the .img file from the .zip file. The .img file was the operating system image that I used for installing Raspbian Stretch Lite onto my microSD card.
I used Etcher on my MacBook Pro to install the operating system image onto the microSD card.
If you are using a windows machine, you can use Win32DiskImager to install the operating system for your Raspberry Pi Zero W.
If you are using a Linux desktop, you should be able to Etcher to install the operating system for your Raspberry Pi Zero W.
Enabling SSH server on Raspbian Stretch Lite first boot
With an SSH server running on Raspbian Stretch Lite, I do not have to find a spare keyboard, spare monitor, a mini HDMI to HDMI adapter and a OTG cable in order to configure Raspbian Stretch Lite after it had booted up for the first time.
To ensure that I had the SSH server running after the first boot, I created an empty file named "ssh” in the boot partition of the microSD card:
Getting Raspberry Pi Zero W connect to your 2.4 GHz Wi-Fi network on first boot
The SSH server is the first piece to allow remote configuration of the Raspbian Stretch Lite operating system running the Raspberry Pi Zero W. The other piece is the Wi-Fi connection from my Raspberry Pi Zero W to my home network.
The Wi-Fi chip on Raspberry Pi Zero W connects to a 2.4 GHz Wi-Fi network. To get my Raspberry Pi Zero W to connect to my 2.4 GHz Wi-Fi network, I first created a text file with the following contents:
country=SG
ctrl_interface=DIR=/var/run/wpa_supplicant GROUP=netdev
update_config=1

network={
        scan_ssid=1
        ssid="the_2.4-hz-wireless-network"
        psk="the_2.4-hz-wireless-network_password"
        proto=WPA
        key_mgmt=WPA-PSK
}
and placed it into the boot partition of the microSD card:
Be sure to replace the country, ssid and psk values to the appropriate values for your 2.4GHz Wi-Fi network.
After I got the wpa_supplicant.conf file into the boot partition of the microSD card, I removed it from my computer and inserted it into the microSD card slot on my Raspberry Pi Zero W board.
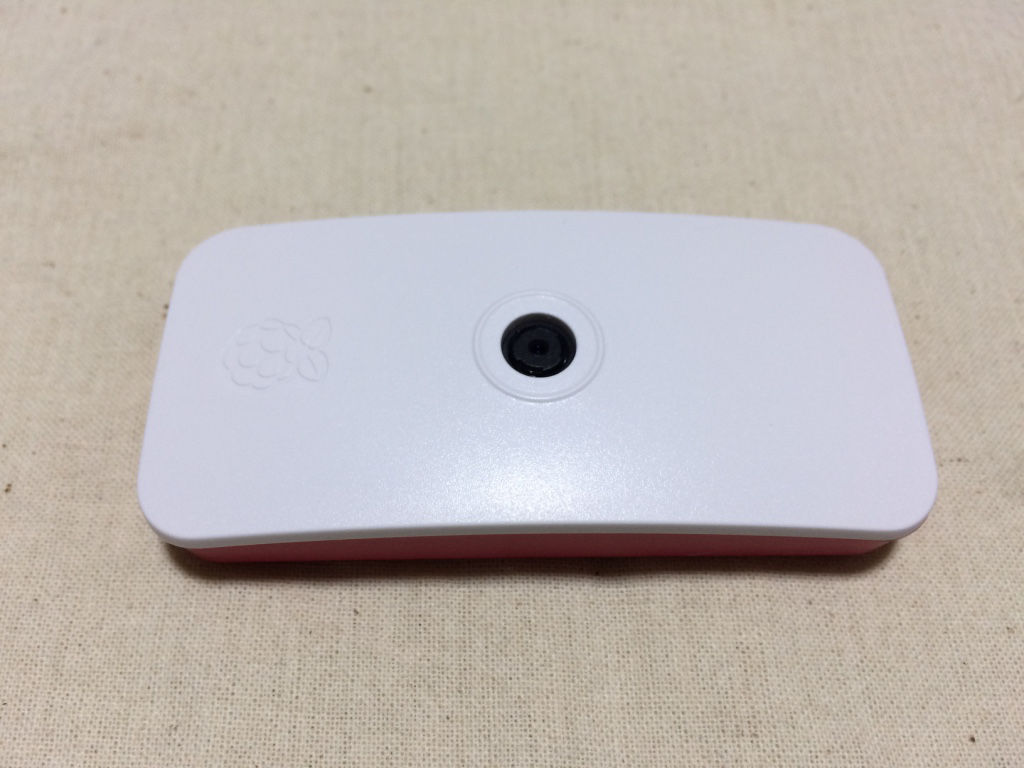
Connecting the Raspberry Pi Camera Module to Raspberry Pi Zero W board and the Official Case
After preparing the microSD card, I inserted the microSD card into the microSD card slot on my Raspberry Pi Zero W board. With that, I could then connect the Raspberry Pi Camera Module to the Raspberry Pi Zero W board and the Raspberry Pi Zero Official Case. After assembling the parts, my Raspberry Pi Zero W CCTV camera looks like this:
Booting up Raspbian Stretch Lite
After assembling the Raspberry Pi Zero W board to the Raspberry Pi Zero official case, I then proceeded to connect my Belkin micro USB cable to my USB charger and the power port on my Raspberry Pi Zero W board. After switching on the wall socket which my USB charger was plugged into, the Raspberry Pi Zero W board booted up the Raspbian Stretch Lite operating system.
Getting the IP address of my Raspberry Pi Zero W
When Raspbian Stretch Lite booted up, it requested an IP address from my router. This IP address was needed for me to SSH into my Raspberry Pi Zero W. To get the IP Address that my router had allocated to my Raspbian Stretch Lite, I went to my router's address allocation table and find an entry with the name raspberrypi. In my case, the router allocated 192.168.1.122 to my Raspbian Stretch Lite.
Getting into the Raspbian Stretch Lite operating system via SSH from my computer
The default credentials to log into Raspberry Pi Stretch Lite is as follows:
Username: pi
Password: raspberry
With the default credentials and the IP address that my router had given to my Raspbian Stretch Lite, I then used SSH to get into the operating system:
ssh pi@192.168.1.122
I entered raspberry when Raspbian Stretch Lite prompted for password. With that, my Raspbian Stretch Lite greeted me with the following output:
Linux raspberrypi 4.9.59+ #1047 Sun Oct 29 11:47:10 GMT 2017 armv6l

The programs included with the Debian GNU/Linux system are free software;
the exact distribution terms for each program are described in the
individual files in /usr/share/doc/*/copyright.

Debian GNU/Linux comes with ABSOLUTELY NO WARRANTY, to the extent
permitted by applicable law.
Last login: Thu Dec 28 05:00:23 2017 from 192.168.1.145

SSH is enabled and the default password for the 'pi' user has not been changed.
This is a security risk - please login as the 'pi' user and type 'passwd' to set a new password.
Changing the default password of the pi user
Since Raspbian Stretch Lite suggested that using the default password for the 'pi' user is a security risk, the next thing that I did was to change the default password. To do so, I entered the following command:
passwd
For the three prompts that followed the command, I entered raspberry and my favourite password twice.
Configuring the locale settings on Raspbian Stretch Lite
The next thing that I did was to configure the locale settings for my Raspbian Stretch Lite. To do so, I first opened up the Raspberry Pi Software Configuration Tool:
sudo raspi-config
I then followed through the following screens to generate the "en_US.UTF-8" locale and set it as the default locale for the system environment:
After doing so, I opened up /etc/default/locale with nano:
sudo nano /etc/default/locale
And updated the contents to look like the following:
LANG=en_US.UTF-8
LC_ALL=en_US.UTF-8
LANGUAGE=en_US.UTF-8
This would ensure that the locale settings for my Raspbian Stretch Lite persist through system reboots.
Changing Timezone
The default timezone of Raspbian Stretch Lite is "Etc/UTC". However, since my Raspberry Pi Zero W will be residing in Singapore, I wanted it to follow Singapore's Timezone.
To change the timezone on my Raspbian Stretch Lite, I used the Raspberry Pi Software Configuration Tool mentioned earlier and went through the following steps:

After configuring the Timezone, I restarted Raspbian Stretch Lite by entering the following command:
sudo shutdown -r now
Once my Raspberry Pi Zero W had successfully restarted, I got back into my Raspbian Stretch Lite via SSH.
Making sure that the camera interface is enabled
After I got into my Raspbian Stretch Lite, the next step that I did was to make sure that the camera interface was enabled.
To do so, I entered the following command:
sudo raspi-config
and followed through the following configuration screens:

Turning off LED indicator of the Raspberry Pi Camera module in Raspbian Stretch Lite
Since the Raspberry Pi Zero Official Case is opaque, it doesn't make much sense to turn on the camera LED indicator. Furthermore, turning off the camera LED indicator can also reduce the power consumption of my Raspberry Pi Zero W CCTV camera.
To disable the camera LED indicator of the Raspberry Pi Camera module from Raspbian Stretch Lite, I first opened up the /boot/config.txt file with nano:
sudo nano /boot/config.txt
Added the following line at the end of /boot/config.txt:
disable_camera_led=1
Saved the file and reboot Raspbian Stretch Lite:
sudo shutdown -r now
Preventing Hash Sum mismatch errors
By default, this installation of Raspbian Stretch Lite will attempt to download packages from a mirror that is nearest to my location. However, the download processes for some of the packages threw Hash Sum mismatch errors. To prevent such errors from occurring, I configured apt-get to always download packages from archive.raspbian.org. To do so, I changed the contents of the /etc/apt/sources.list file to look like the following:
#deb http://mirrordirector.raspbian.org/raspbian/ stretch main contrib non-free rpi
# Uncomment line below then 'apt-get update' to enable 'apt-get source'
#deb-src http://archive.raspbian.org/raspbian/ stretch main contrib non-free rpi

deb http://archive.raspbian.org/raspbian/ stretch main contrib non-free rpi
After editing the /etc/apt/sources.list file, I then entered the following command to persist the new configurations:
sudo apt-get update
Installing motionEye on Raspbian Stretch Lite
Once the initial configurations for Raspbian Stretch Lite was done, I went on to follow the instructions provided by Calin Crisan on how to install motionEye on Raspbian:
- Install
ffmpegandv4l-utils:sudo apt-get install ffmpeg v4l-utils -y
- Install
libmariadbclient18andlibpq5required by motion:sudo apt-get install libmariadbclient18 libpq5 -y
- Install
motion:sudo wget https://github.com/Motion-Project/motion/releases/download/release-4.1/pi_stretch_motion_4.1-1_armhf.deb sudo dpkg -i pi_stretch_motion_4.1-1_armhf.deb
- Install the dependencies from the repositories:
sudo apt-get install python-pip python-dev libssl-dev libcurl4-openssl-dev libjpeg-dev -y
- Install
motioneyeglobally. This will automatically pull Python dependencies (tornado,jinja2,pillowandpycurl):sudo -H pip install motioneye
- Prepare the configuration directory:
sudo mkdir -p /etc/motioneye
sudo cp /usr/local/share/motioneye/extra/motioneye.conf.sample /etc/motioneye/motioneye.conf
- Prepare the media directory:
sudo mkdir -p /var/lib/motioneye
- Add an init script, configure it to run at startup and start the motionEye server:
sudo cp /usr/local/share/motioneye/extra/motioneye.systemd-unit-local /etc/systemd/system/motioneye.service
sudo systemctl daemon-reload
sudo systemctl enable motioneye
sudo systemctl start motioneye
After completing the instructions, I then checked motionEye status with the following command:
sudo systemctl status motioneye
which returned me the following output to indicate that motionEye had started successfully:
● motioneye.service - motionEye Server
   Loaded: loaded (/etc/systemd/system/motioneye.service; enabled; vendor preset: enabled)
   Active: active (running) since Fri 2017-12-29 23:57:55 +08; 7s ago
 Main PID: 4483 (meyectl)
   CGroup: /system.slice/motioneye.service
           ├─4483 /usr/bin/python /usr/local/bin/meyectl startserver -c /etc/motioneye/motioneye.conf
           ├─4491 /bin/sh -c /usr/bin/ffmpeg -version
           └─4492 /usr/bin/ffmpeg -version

Dec 29 23:57:55 raspberrypi systemd[1]: Started motionEye Server.
Dec 29 23:57:57 raspberrypi meyectl[4483]:     INFO: hello! this is motionEye server 0.38
Logging into my Raspberry Pi Zero W CCTV for the first time
After I had installed the relevant software for my Raspberry Pi Zero W CCTV, I entered http://192.168.1.122:8765 into the location bar of my browser to access the motionEye server. With that I was shown the following screen:
I then entered admin as the username, left the password field blank and clicked on Login.
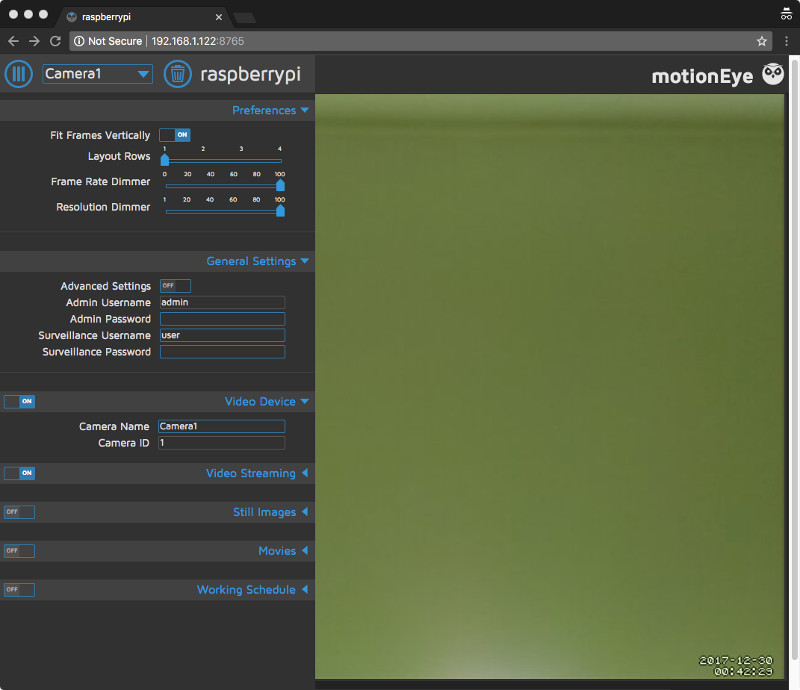
With that I was shown the following screen:
Adding the Raspberry Pi Camera module to motionEye server
The motionEye server instance did not auto-detect my Raspberry Pi Camera module. As such, I had to manually add the Raspberry Pi Camera module to the motionEye server.
To do so, I clicked on the message and chose the "Local MMAL Camera" option in the dialog that appeared:
Once I clicked on OK, I was shown the following screen with video streaming from my Raspberry Pi Camera module:
Making sure that my Raspberry Pi Zero W CCTV camera can only be accessed through my user account
By default, motionEyeOS allows anybody with a browser to watch the camera video stream of my Raspberry Pi Zero W CCTV camera without any restriction. I am definitely not comfortable with this default setting. Hence, the next configuration that I made to my Raspberry Pi Zero W CCTV camera was to set some passwords to restrict access to the camera stream.
Setting a password for the admin user
In motionEyeOS, only the admin user is allowed to configure motionEyeOS and the username of the admin user cannot be changed.
To set a password for the admin user, I entered a password in the "Admin Username" text field.
Creating the surveillance user
The surveillance user is only granted view access to the video stream from my Raspberry Pi Zero W CCTV camera. Configuring a username and password for the surveillance user would ensure that the video stream from my Raspberry Pi Zero W CCTV camera only displays after either the surveillance user or admin user logs in successfully.
To create a surveillance user, I entered a username in the "Surveillance Username" field and a password in the "Surveillance Password" text field.
Saving the new user credentials for the admin user and surveillance user
After I had entered the new credentials for the admin user and surveillance user, I clicked on the "Apply" button at the top to commit the changes.
Once I did so, my motionEye server showed the login screen again. I entered my new admin credentials to continue with the rest of the configurations.
When I had logged in successfully with my admin user, I clicked on the hamburger icon on the top left corner of the screens to bring out the configurations panel.
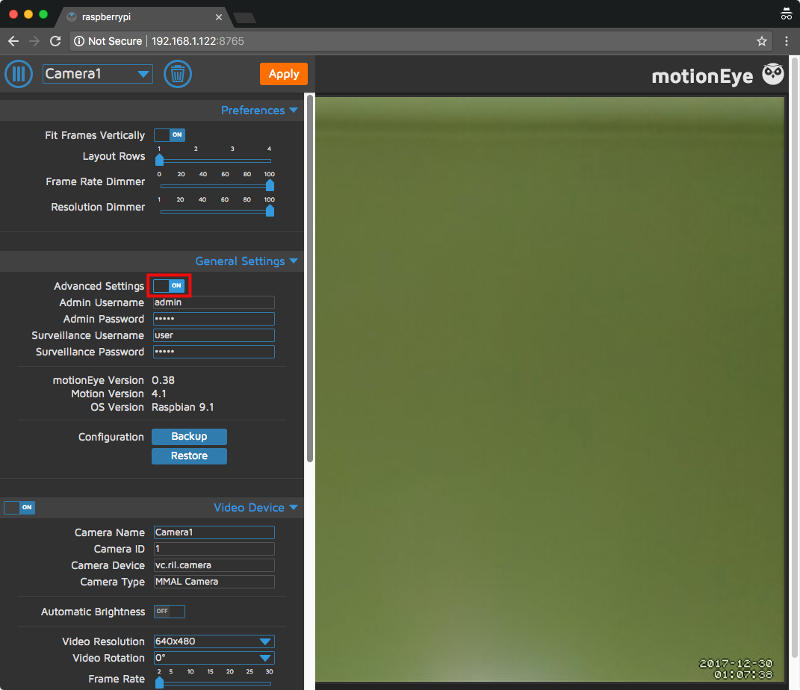
Turning on Advanced Settings for motionEye server
With the access control configured, the next thing that I did was to turn on "Advanced Settings" so that I could configure my Raspberry Pi Zero W CCTV further.
To do so, I clicked on the toggle button next to "Advanced Settings" under the "General Settings" tab:
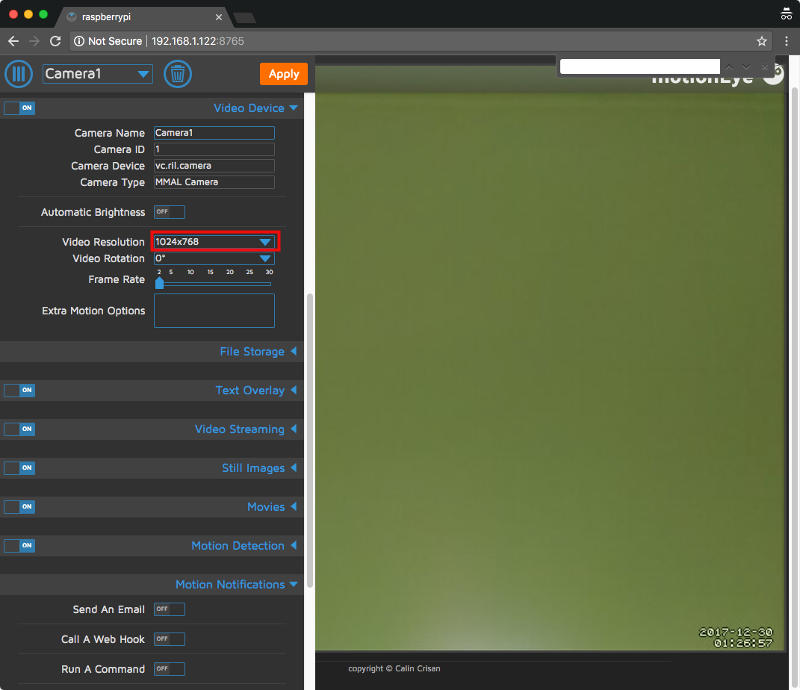
Changing video resolution on motionEye server
The default video resolution that came with my motionEye server installation was 640 X 480. Since I had a 128 GB microSD card, I could afford my videos having a higher resolution. As such, I changed the video resolution to "1024 X 768" from the drop down box besides "Video Resolution" and clicked "Apply" at the top:
Limiting the preservation of still images and movies
By default, motionEyeOS keeps images and movies for as long as it can. In the event where the storage space on the microSD card got maxed out, it will stop recording movies. This is not an ideal behaviour for my use case. To ensure that there is always storage space for new videos, there is a need to limit the preservation of still images and movies.
To configure the preservation period of pictures and movies, I clicked on the hamburger icon to bring out the configuration panel. Inside the configuration panel, I clicked on the "Still Images" and "Movies" tabs to expand both sections. I then chose the "For One Month" option for both the "Preserve Pictures" and "Preserve Movies" drop down boxes.
Changes to both drop down boxes caused the following prompt to appear:
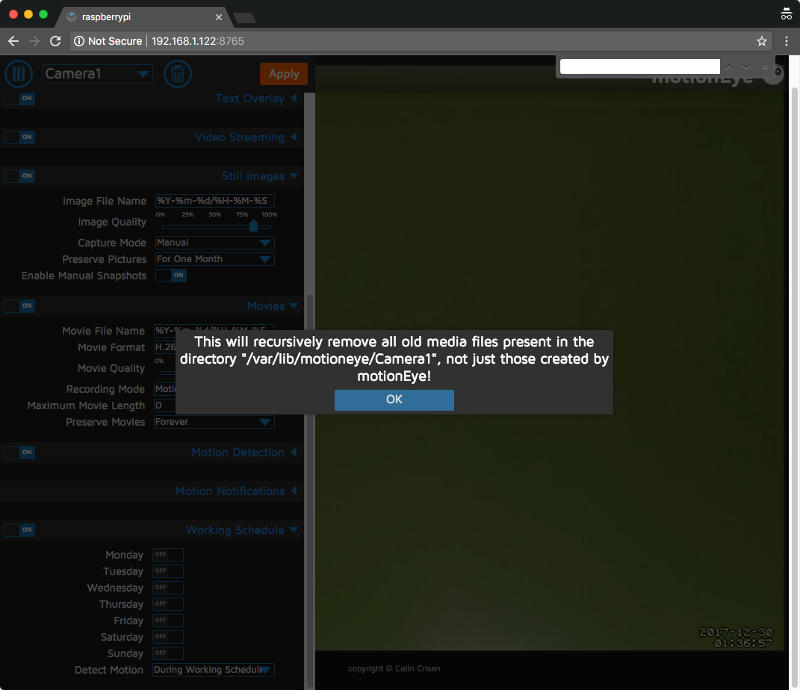
I clicked the "Ok" button on both prompts and got the following configuration state:
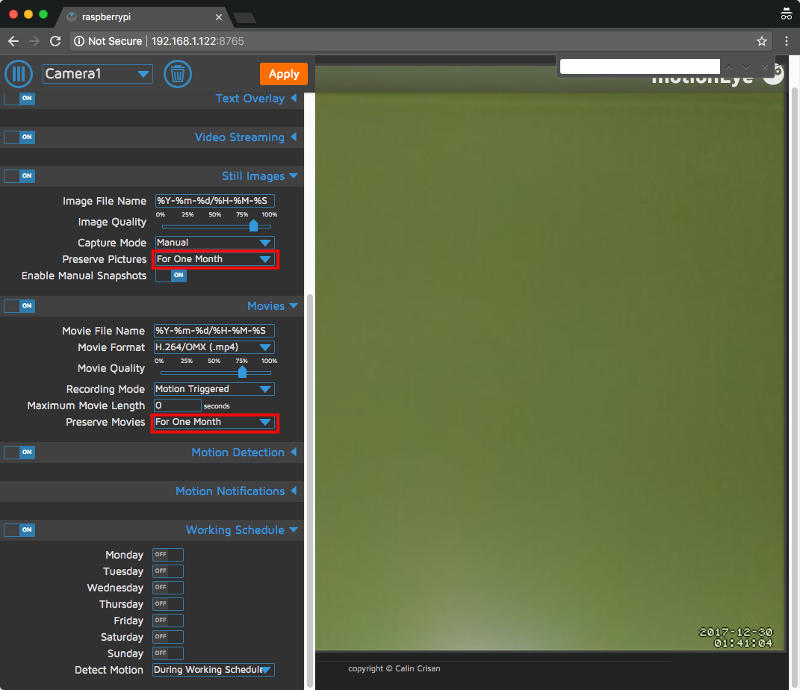
Once I was done with that, I clicked on the "Apply" button at the top to persist the configurations and rebooted my Raspberry Pi Zero W CCTV camera.
With that, I was satisfied with the configurations that I wanted for my Raspberry Pi Zero W CCTV camera.
Making my Raspberry Pi Zero W CCTV camera accessible from outside my home network through HTTPS
Up to this point, I had configured a Raspberry Pi Zero W CCTV camera which I can access from computers that are connected to the same Wifi network that my Raspberry Pi Zero W CCTV camera had connected to.
However, being able to access my Raspberry Pi Zero W CCTV from the Internet will be useful for me. Furthermore, I would want to access my Raspberry Pi Zero W CCTV via HTTPS. Without HTTPS, it would be insecure to access my Raspberry Pi Zero W CCTV camera from outside my home network.
As mentioned in my post on how to host multiple websites from home, protecting the HTTP traffic between a web browser and my Raspberry Pi Zero W CCTV camera would require a reverse proxy server, a domain name and a SSL certificate. That reverse proxy server must receive port 80 and 443 traffic that is directed at the home router.
Since I had already setup a reverse proxy server with Certbot installed, I could use it as a proxy for HTTPS traffic made to my Raspberry Pi Zero W CCTV.
Creating a sub domain from a domain that I already owned and point that sub domain to the public IP address of my home router
Since I own a couple of domain names, I could create a sub domain from one of the domain names. And since I am leveraging on DigitalOcean name servers to translate my domain names into IP addresses, I could create a sub domain via DigitalOcean's control panel.
To create a sub domain via DigitalOcean's control panel, I logged into my Digital Ocean account and go to the "Networking" page. I then proceeded to the "Domain" tab to select a domain which I wanted to create a sub domain from.
At the "Create new record" page, I entered the sub domain that I wanted for my Raspberry Pi Zero W CCTV camera and the public IP address of my home router:
After clicking on the "Create Record" button, I was able to get the IP address of my home router by sending a ping to cctv.adomainname.com.
And being able to reach my home router will meant that I was able to reach my reverse proxy server.
Configuring Nginx to facilitate Certbot in acquiring the SSL certificate for my sub domain
Once I was sure that the Nginx server running on my Raspberry Pi 3 reverse proxy server could receive HTTP requests directed at my sub domain, I proceeded on with creating the Nginx configurations to facilitate Certbot in acquiring the SSL certificate for my sub domain.
To do so, I connected to my Raspberry Pi 3 reverse proxy server via SSH:
ssh pi@192.168.1.123
Once I got into my Raspberry Pi 3 reverse proxy server, I used nano to create a configuration file at /etc/nginx/sites-enabled/cctv.adomainname.com.conf:
sudo nano /etc/nginx/sites-enabled/cctv.adomainname.com.conf
Once inside my nano editor, I created the following nginx configuration:
server {
	listen 80;
	server_name  cctv.adomainname.com;

	root /var/www/cctv.adomainname.com;

	location ~ /.well-known {
		allow all;
	}
}
After creating the Nginx configurations, I saved the file and restarted my Nginx server:
sudo systemctl restart nginx.service
I also created the directory /www/var/cctv.adomainname.com for Certbot to use in the process of acquiring the SSL certificate for my sub domain:
sudo mkdir /www/var/cctv.adomainname.com
sudo chown www-data:www-data /www/var/cctv.adomainname.com
Running Certbot to get the SSL certificate artefacts for the sub domain to my Raspberry Pi Zero W CCTV camera
Once I had the configurations necessary for Certbot to acquire the SSL certificate artefacts for my sub domain, I ran the following command to get Certbot running:
sudo certbot certonly -a webroot --webroot-path=/var/www/cctv.adomainname.com -d cctv.adomainname.com
Generating a strong Diffie-Hellman group
After the SSL certificate and the corresponding private key were created successfully, I went on to precompute a strong Diffie-Hellman group for my server to use for exchanging cryptographic keys with its clients:
sudo openssl dhparam -out /etc/ssl/certs/dhparam.pem 2048
This process took a very long time to complete but it was worth the effort as it would make communicating with my server more secure.
Creating the Nginx configurations for serving HTTPS on behalf of my Raspberry Pi Zero W CCTV camera
Once I had the corresponding SSL certificate artefacts for my sub domain, my Nginx was ready for the corresponding configurations to serve HTTPS on behalf of my Raspberry Pi Zero W CCTV camera. The following is the last set of configurations that I included in /etc/nginx/sites-enabled/cctv.adomainname.com.conf. These set of configurations allows me to access my Raspberry Pi Zero W CCTV camera over HTTPS via my sub domain:
# Redirect HTTP requests to HTTPS
server {
	listen 80;
	server_name  cctv.adomainname.com;
	return 301 https://$host$request_uri;
}

# For ssl
server {
	ssl on;
	ssl_certificate /etc/letsencrypt/live/cctv.adomainname.com/fullchain.pem;
	ssl_certificate_key /etc/letsencrypt/live/cctv.adomainname.com/privkey.pem;
	ssl_protocols TLSv1 TLSv1.1 TLSv1.2;
	ssl_prefer_server_ciphers on;
	ssl_dhparam /etc/ssl/certs/dhparam.pem;
	ssl_ciphers 'ECDHE-RSA-AES128-GCM-SHA256:ECDHE-ECDSA-AES128-GCM-SHA256:ECDHE-RSA-AES256-GCM-SHA384:ECDHE-ECDSA-AES256-GCM-SHA384:DHE-RSA-AES128-GCM-SHA256:DHE-DSS-AES128-GCM-SHA256:kEDH+AESGCM:ECDHE-RSA-AES128-SHA256:ECDHE-ECDSA-AES128-SHA256:ECDHE-RSA-AES128-SHA:ECDHE-ECDSA-AES128-SHA:ECDHE-RSA-AES256-SHA384:ECDHE-ECDSA-AES256-SHA384:ECDHE-RSA-AES256-SHA:ECDHE-ECDSA-AES256-SHA:DHE-RSA-AES128-SHA256:DHE-RSA-AES128-SHA:DHE-DSS-AES128-SHA256:DHE-RSA-AES256-SHA256:DHE-DSS-AES256-SHA:DHE-RSA-AES256-SHA:AES128-GCM-SHA256:AES256-GCM-SHA384:AES128-SHA256:AES256-SHA256:AES128-SHA:AES256-SHA:AES:CAMELLIA:DES-CBC3-SHA:!aNULL:!eNULL:!EXPORT:!DES:!RC4:!MD5:!PSK:!aECDH:!EDH-DSS-DES-CBC3-SHA:!EDH-RSA-DES-CBC3-SHA:!KRB5-DES-CBC3-SHA';
	ssl_session_timeout 1d;
	ssl_session_cache shared:SSL:50m;
	ssl_stapling on;
	ssl_stapling_verify on;
	add_header Strict-Transport-Security max-age=15768000;

	default_type  application/octet-stream;

	listen 443;
	server_name  cctv.adomainname.com;

	root /var/www/cctv.adomainname.com;

	location ~ /.well-known {
		allow all;
	}

	location / {
		proxy_pass http://192.168.1.122:8765;
	}
}
With that, I had setup a Raspberry Pi Zero W CCTV camera with motionEye and Raspbian Stretch Lite that I could access from the Internet via HTTPS.
Buying your Raspberry Pi Zero W CCTV camera from Amazon
If you do not have the Raspberry Pi Zero W CCTV components mentioned in this post yet, you may want to purchase them from Amazon. Simply click on the button below to add the Raspberry Pi Zero W CCTV components to your cart. You may remove anything that you already have or replace some of the components with other components.
Further enhancements for your Raspberry Pi Zero CCTV camera
If you want to make your Raspberry Pi Zero W CCTV camera see a wider view, you may want to get a pack of Camera Lens Kit for mobile phones. In case, you are curious about the effects of those lens, this is a comparison of the 0.67x wide angle lens and the Fisheye lens on a Raspberry Pi CCTV.
Since there is a 0.67x wide angle lens and a Fisheye lens in the pack, you will have the option to:
- turn your Raspberry Pi Zero W CCTV into a wide angle security camera.
- make your Raspberry Pi Zero W camera see an ultra-wide view.
Reducing the number of false positives for your video recordings
When your surveillance area has a background with changes that you are not interested in capturing, your Raspberry Pi Zero W CCTV will create a lot of redundant video recordings. In such a situation, you may want to configure motionEye to only capture video if there are movements in particular sections of the surveillance area.