How to setup your own Wiki site on a Raspberry Pi 3 with Dokuwiki, Raspbian Stretch Lite, Nginx and PHP
![]()
As a result of the proliferation of single-board computers like the Raspberry Pi 3, we get energy-efficient computers. In addition to being energy-efficient, Raspberry Pi 3 is small and priced affordably. Therefore, the Raspberry Pi 3 is an ideal gift for programmers.
Given that you had received one as a programmer, you may be wondering what you can do with it. In case you are yearning for your own Wiki site, you may consider setting up your DokuWiki site on your Raspberry Pi 3.
With this in mind, this post walks through how you can setup your own Wiki site on a Raspberry Pi 3 with Raspbian Stretch Lite, Nginx and PHP.
Recommended hardware list for your own Raspberry Pi 3 Dokuwiki
In case you are wondering what to buy for your Raspberry Pi 3 project, you can consider the following hardware list:
- CanaKit Raspberry Pi 3 with 2.5A Micro USB Power Supply or CanaKit Raspberry Pi 3 B+ (B Plus) with 2.5A Power Supply (UL Listed)
- Raspberry Pi 2/3 official case Black/Grey or Raspberry Pi 2/3 official case Red/White
- Sandisk Ultra 32GB Micro SDHC UHS-I Card with Adapter
- AmazonBasics RJ45 Cat-6 Ethernet Patch Cable - 3 Feet (0.9 Meters)
Setting up Raspbian Stretch Lite with SSH server enabled on your microSD card
Once you had gathered all the necessary hardware, proceed to setup Raspbian Stretch Lite with SSH server enabled on your microSD card. When you had done so, you will be able to SSH into your Raspbian Stretch Lite to perform further configurations.
Assembling the hardware for your Raspberry Pi 3 Wiki site
Next, remove your microSD card from your SD card reader and insert it to the microSD card slot on the Raspberry Pi 3 board. Thereafter, proceed to assemble the Raspberry Pi 3 board to the Official Raspberry Pi case.
Starting the Raspbian Stretch Lite operating system
Following the assembly of your Raspberry Pi 3 board and Official Raspberry Pi case, connect one end of the RJ45 cable to the RJ45 port on your Raspberry Pi 3 board and the other end of the cable to one of the switch port of your home router. After that, connect your micro USB cable and supply power to your Raspberry Pi 3 board.
Changing default password, Locale and Timezone of your Raspbian Stretch Lite
There are a few configurations that we should perform on the first run of our Raspbian Stretch Lite. Therefore, proceed on to change the default password, Locale and Timezone of Raspbian Stretch Lite.
Installing Nginx on Raspbian Stretch Lite
Once you had preformed the configurations on the first run of your Raspbian Stretch Lite, proceed on to install Nginx. To install Nginx on Raspbian Stretch Lite, run the following command:
sudo apt-get update
sudo apt-get install nginx -y
After that, run the following command to verify that the installation was successful:
systemctl status nginx.service
At this point, as an indication that Nginx was installed successfull, you should see output similar to the following:
● nginx.service - A high performance web server and a reverse proxy server
   Loaded: loaded (/lib/systemd/system/nginx.service; enabled; vendor preset: enabled)
   Active: active (running) since Wed 2018-05-16 19:25:05 UTC; 7min ago
     Docs: man:nginx(8)
  Process: 15356 ExecStart=/usr/sbin/nginx -g daemon on; master_process on; (code=exited, status=0/SUCCESS)
  Process: 15353 ExecStartPre=/usr/sbin/nginx -t -q -g daemon on; master_process on; (code=exited, status=0/SUCCESS
 Main PID: 15357 (nginx)
   CGroup: /system.slice/nginx.service
           ├─15357 nginx: master process /usr/sbin/nginx -g daemon on; master_process on;
           ├─15358 nginx: worker process
           ├─15359 nginx: worker process
           ├─15360 nginx: worker process
           └─15361 nginx: worker process

May 16 19:25:05 raspberrypi systemd[1]: Starting A high performance web server and a reverse proxy server...
May 16 19:25:05 raspberrypi systemd[1]: Started A high performance web server and a reverse proxy server.
Installing PHP 7 on your Raspbian Stretch Lite
Since Dokuwiki is written in PHP, proceed to install PHP7, PHP7 Fast CGI Process Manager and php7.0-mbstring:
sudo apt-get install php7.0 php7.0-fpm php7.0-mbstring -y
After that, verify your PHP installation with the following command:
systemctl status php7.0-fpm.service
At this instant, as an indication that PHP 7 was installed successfully, you should see output similar to the following:
● php7.0-fpm.service - The PHP 7.0 FastCGI Process Manager
   Loaded: loaded (/lib/systemd/system/php7.0-fpm.service; enabled; vendor preset: enabled)
   Active: active (running) since Wed 2018-05-16 19:25:05 +8; 7min ago
     Docs: man:php-fpm7.0(8)
 Main PID: 7995 (php-fpm7.0)
   Status: "Processes active: 0, idle: 2, Requests: 0, slow: 0, Traffic: 0req/sec"
   CGroup: /system.slice/php7.0-fpm.service
           ├─7995 php-fpm: master process (/etc/php/7.0/fpm/php-fpm.conf)
           ├─7996 php-fpm: pool www
           └─7997 php-fpm: pool www

May 16 19:25:05 raspberrypi systemd[1]: Starting The PHP 7.0 FastCGI Process Manager...
May 16 19:25:06 raspberrypi systemd[1]: Started The PHP 7.0 FastCGI Process Manager.
Downloading a copy of Dokuwiki
Once you had verified that PHP 7 was installed successfully, you can proceed to download a copy of Dokuwiki. To do so, run the following commands:
cd /var/www
sudo wget https://download.dokuwiki.org/src/dokuwiki/dokuwiki-stable.tgz
sudo tar xfz dokuwiki-stable.tgz
sudo rm dokuwiki-stable.tgz
After that, you will find a directory /var/www/dokuwiki-xxx where xxx can vary depending on the version of the stable release. For the purpose of this guide, let us assume that we had gotten the directory /var/www/dokuwiki-2018-04-22a. This is the directory that contains the source code for realising your Wiki site.
Changing the owner of /var/www/dokuwiki-2018-04-22a directory to www-data user
Since Dokuwiki keeps data within the source directory by default, you should change the ownership of /var/www/dokuwiki-2018-04-22a directory to www-data user. To do so, run the following command:
sudo chown -R www-data:www-data /var/www/dokuwiki-2018-04-22a
Configuring Nginx to proxy HTTP requests bound for a custom domain to PHP 7 Fast CGI Manager
At this point in time, you are ready to configure Nginx to proxy HTTP requests bound for a custom domain. For the purpose of this guide, let's arbitrarily define the custom domain as mydokuwikiathome. Whenever Nginx sees HTTP requests made to http://mydokuwikiathome, it should proxy those requests to PHP 7 Fast CGI Manager so as to bring up Dokuwiki.
With this in mind, first create a Nginx configuration file at /etc/nginx/sites-enabled/mydokuwikiathome.conf with the following command:
sudo nano /etc/nginx/sites-enabled/mydokuwikiathome.conf
Once nano editor loads up, copy the following content to the editor:
server {
    listen               80;
    server_name          mydokuwikiathome;

    root /var/www/dokuwiki-2018-04-22a;

    location / {
        index doku.php;
        try_files $uri $uri/ @dokuwiki;
    }

    location @dokuwiki {
        rewrite ^/_media/(.*) /lib/exe/fetch.php?media=$1 last;
        rewrite ^/_detail/(.*) /lib/exe/detail.php?media=$1 last;
        rewrite ^/_export/([^/]+)/(.*) /doku.php?do=export_$1&id=$2 last;
        rewrite ^/(.*) /doku.php?id=$1&$args last;
    }

    location ~ \.php$ {
        include fastcgi_params;
        fastcgi_param SCRIPT_FILENAME $document_root$fastcgi_script_name;
        fastcgi_pass unix:/run/php/php7.0-fpm.sock;
    }

    location ~ /(data|conf|bin|inc)/ {
        deny all;
    }

}
After that, type Ctrl-X followed by Y to save the configuration file.
Once you had saved the configuration file, run the following command to restart Nginx:
sudo systemctl restart nginx.service
Setting your hosts file to point mydokuwikiathome to the IP address of your Raspberry Pi 3
Once you had restarted Nginx, go to your hosts file in your computer and add in a row like the following:
192.168.1.109 mydokuwikiathome
In this case, your browser will send HTTP requests to 192.168.1.109 whenever it sees the domain name mydokuwikiathome. In case your Raspberry Pi 3 gets a different IP address, make sure to substitute that IP address with 192.168.1.109.
Triggering the install script for DokuWiki
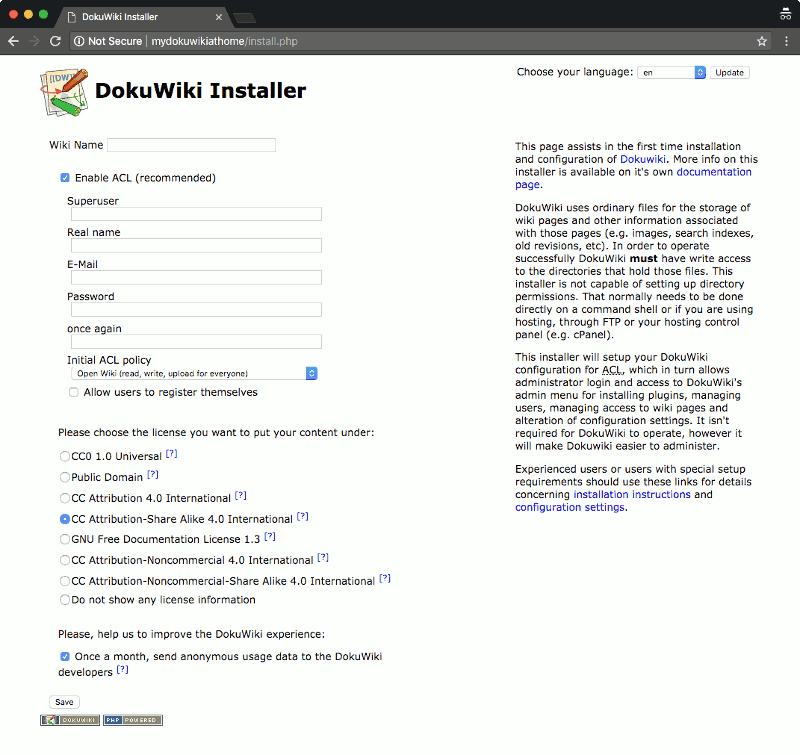
Following the changes to your hosts file, open up your favourite browser on your computer and enter http://mydokuwikiathome/install.php in the location bar. After that, you should see the following screen:

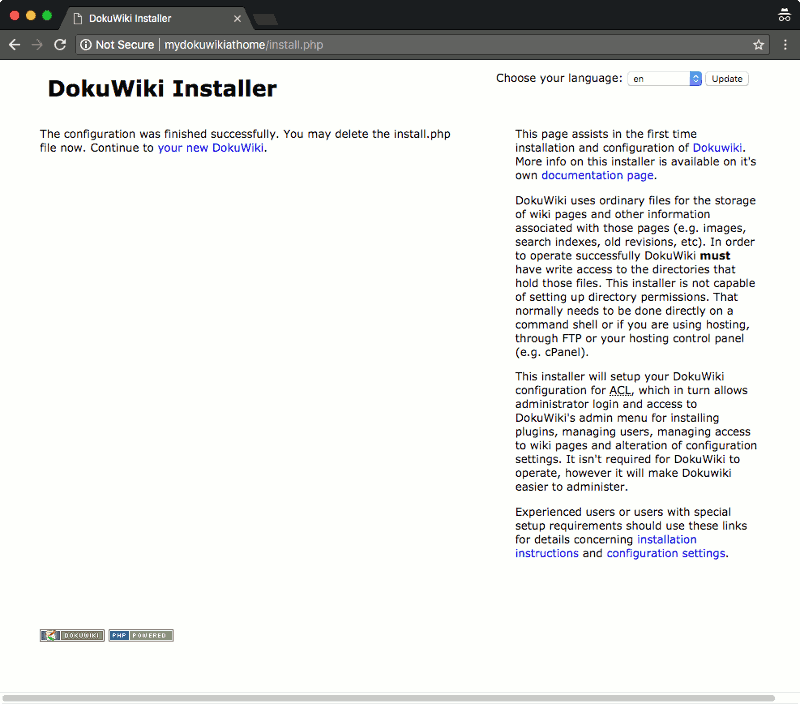
Once you had filled in the necessary input fields, click the Save button. After that, you will be presented with the following screen:

This is an indication that you had gotten a DokuWiki site running on your Raspberry Pi 3.
Since DokuWiki had suggested you to delete install.php, go back to the SSH terminal session and run the following command:
sudo rm /var/www/dokuwiki-2018-04-22a/install.php
Configuring your DokuWiki to be accessed from outside your home network via HTTPS with Let's Encrypt certificate
At this point in time, you had setup a DokuWiki site on your Raspberry Pi 3 that can only be accessed from within your home network.
In case you want to access your DokuWiki site from outside your home network, there are more configurations to be done.
Pre-requisites
As mentioned in an earlier post on how to host multiple websites from home, you will need the following pieces for enabling your DokuWiki site to be accessed from outside your home network via HTTPS with Let's Encrypt browser-trusted certificate:
- A domain or subdomain name that is mapped to the public IP address that your home router had gotten from the Internet Service Provider. If your public IP address changes frequently, you may want to buy a Namecheap domain and get your Raspberry Pi 3 to use Namecheap dynamic DNS to update your domain when your home’s public IP address changes.
- Forwarding of network traffic made to port 80 and 443 of your home router public IP address to the IP address of the Raspberry Pi 3 that contains your DokuWiki site. If you happen to use Linksys EA7500 Max-Stream AC1900 router, you can checkout this post on how to do so.
Installing CertBot
Once you had met the pre-requisites, proceed to install Certbot on Raspbian Stretch Lite.
Configuring Nginx to facilitate Certbot in acquiring the SSL certificate for your domain or subdomain
For the purpose of this guide, let's assume that you had designated wiki.yourdomain.com as the domain to reach your DokuWiki site on your Raspberry Pi 3.
With this in mind, let's first move /etc/nginx/sites-enabled/mydokuwikiathome.conf
to /etc/nginx/sites-enabled/wiki.yourdomain.com.conf:
sudo mv /etc/nginx/sites-enabled/mydokuwikiathome.conf /etc/nginx/sites-enabled/wiki.yourdomain.com.conf
Once you had done so, open up /etc/nginx/sites-enabled/wiki.yourdomain.com.conf with nano:
sudo nano /etc/nginx/sites-enabled/wiki.yourdomain.com.conf
After that, edit the contents of /etc/nginx/sites-enabled/wiki.yourdomain.com.conf to look like the following:
server {
    listen               80;
    server_name          wiki.yourdomain.com;

    root /var/www/dokuwiki-2018-04-22a;

    # For ACME challenge
    location ~ /.well-known {
        allow all;
    }

    location / {
        index doku.php;
        try_files $uri $uri/ @dokuwiki;
    }

    location @dokuwiki {
        rewrite ^/_media/(.*) /lib/exe/fetch.php?media=$1 last;
        rewrite ^/_detail/(.*) /lib/exe/detail.php?media=$1 last;
        rewrite ^/_export/([^/]+)/(.*) /doku.php?do=export_$1&id=$2 last;
        rewrite ^/(.*) /doku.php?id=$1&$args last;
    }

    location ~ \.php$ {
        include fastcgi_params;
        fastcgi_param SCRIPT_FILENAME $document_root$fastcgi_script_name;
        fastcgi_pass unix:/run/php/php7.0-fpm.sock;
    }

    location ~ /(data|conf|bin|inc)/ {
        deny all;
    }

}
Once you had edited the contents, type Ctrl-X followed by Y to save the configuration file.
After that, run the following command to restart Nginx:
sudo systemctl restart nginx.service
As a result of these configuration changes, Nginx server will proxy HTTP requests bound for http://wiki.yourdomain.com to PHP 7 FPM to load up your DokuWiki site.
In addition, these configuration changes allow Let's Encrypt servers to access a secret file that Certbot will create inside /var/www/dokuwiki-2018-04-22a/.well-known directory later. That is one of the steps that Certbot does in the process of requesting for Let's Encrypt browser-trusted certificate.
Running Certbot to get the SSL certificate artefacts for your domain / subdomain
Once you had configured Nginx to facilitate Certbot in acquiring the SSL certificate for your domain or subdomain, you can run Certbot to get the SSL certificate artefacts for your domain / subdomain. To do so, run the following command:
sudo certbot certonly -a webroot --webroot-path=/var/www/dokuwiki-2018-04-22a -d wiki.yourdomain.com
Generating a Diffie-Hellman group
Once Certbot had fetched the SSL certificate artefacts for your domain / subdomain, proceed on to generate a Diffie-Hellman group for Nginx to use for exchanging cryptographic keys with its clients:
sudo openssl dhparam -out /etc/ssl/certs/dhparam.pem 2048
Configuring Nginx to serve HTTPS traffic
With the Diffie-Hellman group generated, you can proceed on to configure Nginx to serve HTTPS traffic for requests made to your DokuWiki site.
To do so, open up /etc/nginx/sites-enabled/wiki.yourdomain.com.conf with nano:
sudo nano /etc/nginx/sites-enabled/wiki.yourdomain.com.conf
Once nano editor appears, paste in the following content:
server {
    listen 80;
    server_name  wiki.yourdomain.com;
    return 301 https://$host$request_uri;
}

# For ssl
server {
    ssl on;
    ssl_certificate /etc/letsencrypt/live/wiki.yourdomain.com/fullchain.pem;
    ssl_certificate_key /etc/letsencrypt/live/wiki.yourdomain.com/privkey.pem;
    ssl_protocols TLSv1 TLSv1.1 TLSv1.2;
    ssl_prefer_server_ciphers on;
    ssl_dhparam /etc/ssl/certs/dhparam.pem;
    ssl_ciphers 'ECDHE-RSA-AES128-GCM-SHA256:ECDHE-ECDSA-AES128-GCM-SHA256:ECDHE-RSA-AES256-GCM-SHA384:ECDHE-ECDSA-AES256-GCM-SHA384:DHE-RSA-AES128-GCM-SHA256:DHE-DSS-AES128-GCM-SHA256:kEDH+AESGCM:ECDHE-RSA-AES128-SHA256:ECDHE-ECDSA-AES128-SHA256:ECDHE-RSA-AES128-SHA:ECDHE-ECDSA-AES128-SHA:ECDHE-RSA-AES256-SHA384:ECDHE-ECDSA-AES256-SHA384:ECDHE-RSA-AES256-SHA:ECDHE-ECDSA-AES256-SHA:DHE-RSA-AES128-SHA256:DHE-RSA-AES128-SHA:DHE-DSS-AES128-SHA256:DHE-RSA-AES256-SHA256:DHE-DSS-AES256-SHA:DHE-RSA-AES256-SHA:AES128-GCM-SHA256:AES256-GCM-SHA384:AES128-SHA256:AES256-SHA256:AES128-SHA:AES256-SHA:AES:CAMELLIA:DES-CBC3-SHA:!aNULL:!eNULL:!EXPORT:!DES:!RC4:!MD5:!PSK:!aECDH:!EDH-DSS-DES-CBC3-SHA:!EDH-RSA-DES-CBC3-SHA:!KRB5-DES-CBC3-SHA';
    ssl_session_timeout 1d;
    ssl_session_cache shared:SSL:50m;
    ssl_stapling on;
    ssl_stapling_verify on;
    add_header Strict-Transport-Security max-age=15768000;

    default_type  application/octet-stream;

    listen 443;
    server_name  wiki.yourdomain.com;

    root /var/www/dokuwiki-2018-04-22a;

    # For ACME challenge
    location ~ /.well-known {
        allow all;
    }

    location / {
        index doku.php;
        try_files $uri $uri/ @dokuwiki;
    }

    location @dokuwiki {
        rewrite ^/_media/(.*) /lib/exe/fetch.php?media=$1 last;
        rewrite ^/_detail/(.*) /lib/exe/detail.php?media=$1 last;
        rewrite ^/_export/([^/]+)/(.*) /doku.php?do=export_$1&id=$2 last;
        rewrite ^/(.*) /doku.php?id=$1&$args last;
    }

    location ~ \.php$ {
        include fastcgi_params;
        fastcgi_param SCRIPT_FILENAME $document_root$fastcgi_script_name;
        fastcgi_pass unix:/run/php/php7.0-fpm.sock;
    }

    location ~ /(data|conf|bin|inc)/ {
        deny all;
    }

}
After that, type Ctrl-X followed by Y to save the configuration file.
Once you had saved the configuration file, run the following command to restart Nginx:
sudo systemctl restart nginx.service
After that, you will be able to access your DokuWiki site from outside your home network via HTTPS with Let's Encrypt certificate.
Buying the Raspberry Pi 3 hardware to host your own DokuWiki site
If you do not have the Raspberry Pi 3 hardware mentioned in this post yet, you may want to purchase them from Amazon. Simply click on the button below to add the Raspberry Pi 3 hardware to your cart. You may remove anything that you already have or replace some of the hardware with other hardware.
