Setting up a low cost desktop computer with Raspberry Pi 3
With the advent of single-board computers like Raspberry Pi, we do not have to spend too much money on a computer that can fulfil our basic computing needs. The launch of Raspberry Pi 3 was like icing on the cake; it came with WiFi connectivity. Since WiFi is ubiquitous, the WiFi connectivity of the Raspberry Pi 3 made it a suitable candidate to be used as a low cost desktop computer in the house, office or school.
This post documents how you can setup a low cost desktop computer with Raspberry Pi 3.
Hardware recommendations for a low cost desktop computer
I recommend the following list of hardware for setting up a low cost desktop computer with Raspberry Pi 3:
- Official Raspberry Pi 3 Case - Black/Grey or Official Raspberry Pi 3 Case - Red/White
- Raspberry PI 3 Model B A1.2GHz 64-bit quad-core ARMv8 CPU, 1GB RAM
- SanDisk Ultra 128GB microSDXC UHS-I Card with Adapter, Black, Standard Packaging
- CanaKit 5V 2.5A Raspberry Pi 3 Power Supply / Adapter / Charger (UL Listed)
- Belkin HDMI to HDMI Cable
- Samsung SF350 Series 22-Inch Slim Design Monitor (S22F350)
- Logitech MK120 Keyboard & Mouse
- HP S4000 Enceintes PC
If you have a spare micro USB charger that came along with your typical Android phone, you can use it to power your Raspberry Pi 3 instead of buying the CanaKit 5V 2.5A Raspberry Pi 3 Power Supply.
Prerequisite hardware to install operating system onto microSD
Raspberry Pi 3 board will load an operating system from a microSD card. Hence, we will need to have a computer with a SD card reader. If your computer does not come with a SD card reader, you have to get one.
Downloading an operating system for your Raspberry Pi 3
Once you had the hardware in place, we should decide on an operating system that will drive your Raspberry Pi 3. Since Raspbian is the Raspberry Pi Foundation’s official supported operating system, using it as an operating system for your Raspberry Pi 3 will ensure that you can solve any future issues pretty easily.
The Raspbian operating system is available for download at https://www.raspberrypi.org/downloads/raspbian/. As of this writing, it comes in two flavours - one with a graphical user interface, the other without. The one with a graphical user interface will take up more storage space on the microSD card.
Since we wanted to use our Raspberry Pi 3 as a desktop computer, we shall download the version with the graphical user interface. As of this writing, the one that I downloaded was 'RASPBIAN JESSIE WITH PIXEL':
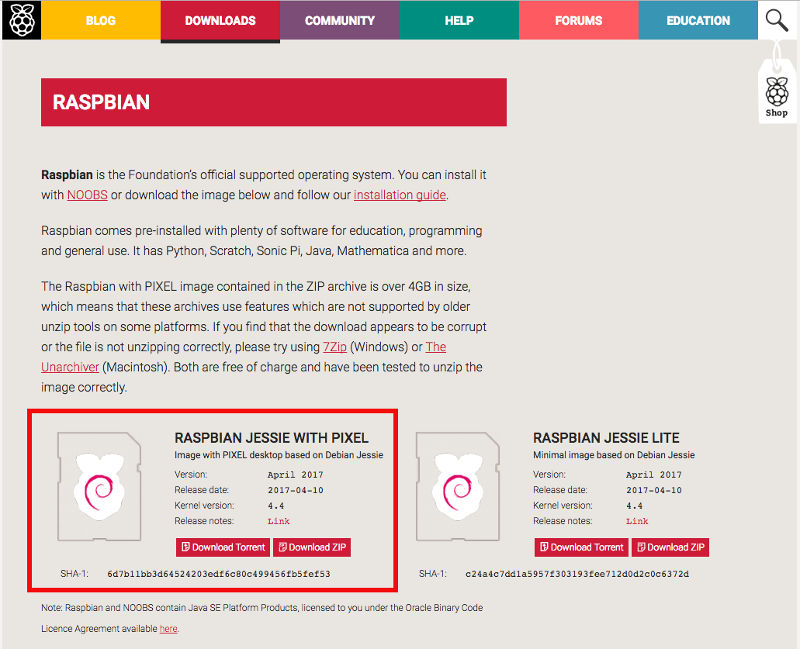
Download the zip file and save it onto your computer. It will take quite a while to download as the file is pretty big.
Installing the operating system onto your microSD card
Once you have the .zip file in your computer, you can then extract the .img file from the .zip file. The .img file is the operating system image that you will use for installing Raspbian onto our microSD card.
If you are using a windows machine, you can use Win32DiskImager to install the operating system for your Raspberry Pi 3.
If you are using Mac, you can use Etcher to install the operating system for your Raspberry Pi 3.
If you are using a Linux desktop, you should be able to Etcher to install the operating system for your Raspberry Pi 3.
Assembling the Raspberry Pi 3 hardware
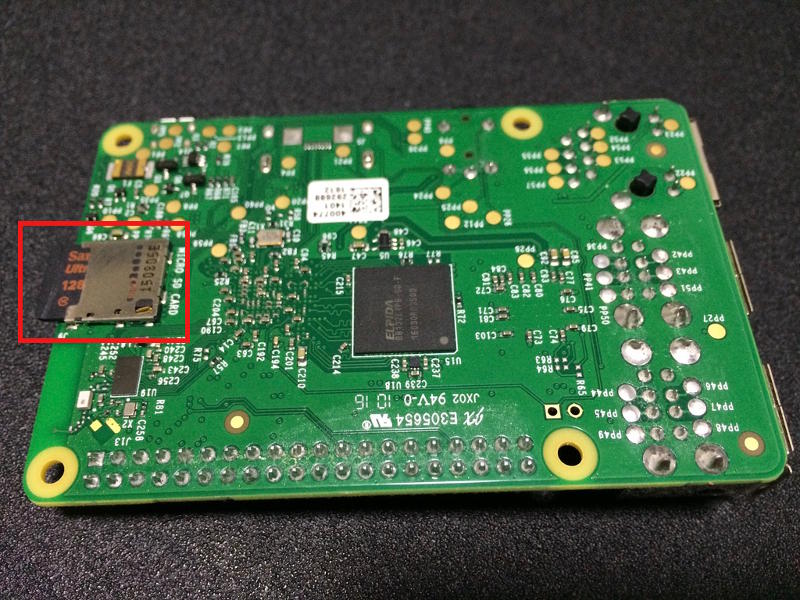
Slotting in the microSD card into the microSD card slot of the Raspberry Pi 3 board
After installing the Raspbian operating system onto the microSD card, you need to put it into the microSD card slot of the Raspberry Pi 3 board:
Assembling the Raspberry Pi 3 board with the Official Raspberry Pi 3 Case
Once you had slotted the microSD card into the microSD card slot of the Raspberry Pi 3 board, you can proceed to assemble the Raspberry Pi 3 board with the Official Raspberry Pi 3 Case.
Connecting the computer monitor to your Raspberry Pi 3 board
Once you had pieced together the Official Raspberry Pi 3 Official case with the Raspberry Pi 3 board, you can connect the HDMI port on the Raspberry Pi 3 board to the Samsung monitor with the HDMI cable. Doing so will enable you to get visual feedback from the Raspbian operating system while you perform the rest of the configuration steps.
Connecting the mouse and keyboard to the USB ports
The Raspberry Pi 3 has 4 USB ports for external peripherals. To be able to surf the web through the web browser in Raspbian or perform other computing tasks, you will need to connect the mouse and the keyboard to 2 of the USB ports.
Connecting HP S4000 Enceintes PC to the USB port and 3.5mm audio jack
The HP S4000 Enceintes PC produces decent sound and hence is good enough for us to watch videos on our low cost desktop computer. To use the speaker with the Raspberry Pi 3, simply connect its USB cable to one of the USB ports on the Raspberry Pi 3 and its 3.5mm audio jack to the headphone jack on the Raspberry Pi 3.
Booting into your Raspbian operating system
Once you had connected the monitor screen, the keyboard and the mouse to your Raspberry Pi 3 board, you can boot into your Raspbian operating system to perform further configurations. To power up your Raspberry Pi 3, you will need to plug in the micro USB power adapter to your wall socket. When you switch on your wall socket, your Raspberry Pi 3 will load the Raspbian operating system.
Once the Raspbian operating system had successfully booted up, you will be able to see the desktop:
![]()
Locating the Raspberry Pi Configuration tool
We can use the Raspberry Pi Configuration tool to configure many of the settings that will be mentioned in this post. The Raspberry Pi Configuration tool can be located by clicking on Raspberry Pi icon > Preferences > Raspberry Pi Configuration:
![]()
Clicking on "Raspberry Pi Configuration" will start the Raspberry Pi Configuration tool:
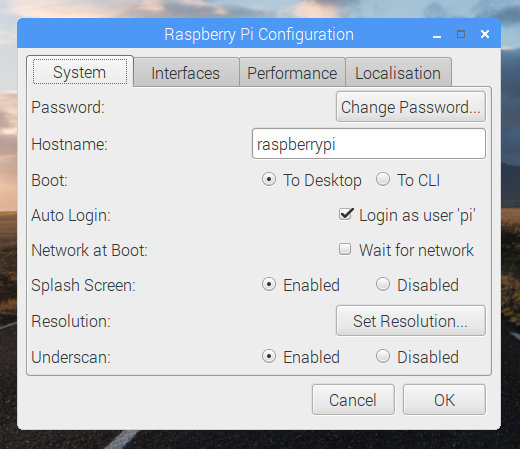
Setting a username and a password to restrict access to your Raspbian operating system
The default user is pi, and the password is raspberry. Since such information is publicly available online, anybody can access your Raspbian operating system.
To restrict access to your Raspbian operating system, you can click on the "Change Password" button at the "System tab" of the Raspberry Pi Configuration Tool to open up the "Change Password" dialog. Once the "Change Password" dialog appears, enter "raspberry" in the "Current Password" textfield and your ideal password in the other two textfields, and click the "Ok" button.
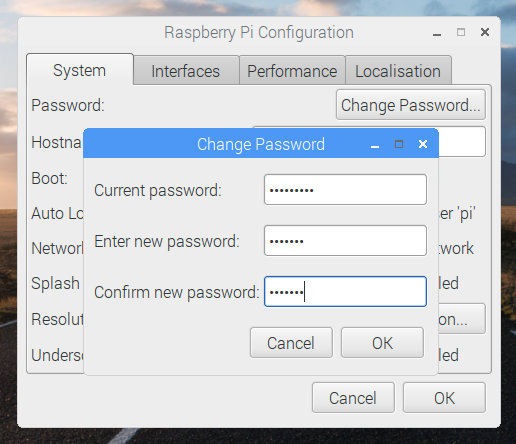
After changing the password, uncheck the "Login as user 'pi'" option in the "System" tab of the Raspberry Pi Configuration Tool.
Configuring your WiFi connection
Once you had changed the default password and prevented your Raspberry Pi from logging in automatically, you will want to do is to configure your WiFi connection.
To configure your WiFi connection, hover your mouse to the network icon at the top right corner of your screen:
![]()
Click on the icon and select your wireless network:
![]()
Key in your wireless network password and you will be able to access the Internet with your Raspberry Pi.
Getting the latest updates for your Raspbian operating system
Once you are connected to your WiFi, the next step that you will want to do is to get the latest updates for your Raspbian operating system. Click on the highlighted icon at the top left corner of your desktop to open up a terminal program:
![]()
In the terminal program type in the following to get the latest updates for your Raspbian operating system:
sudo apt-get update
Forcing audio output to the audio jack
If you encounter the issue of not having any sound from your Raspberry Pi 3 audio port, you can force the audio output of your Raspberry Pi 3 to the audio jack.
To do so, open up a terminal program, and type in the following command:
sudo raspi-config
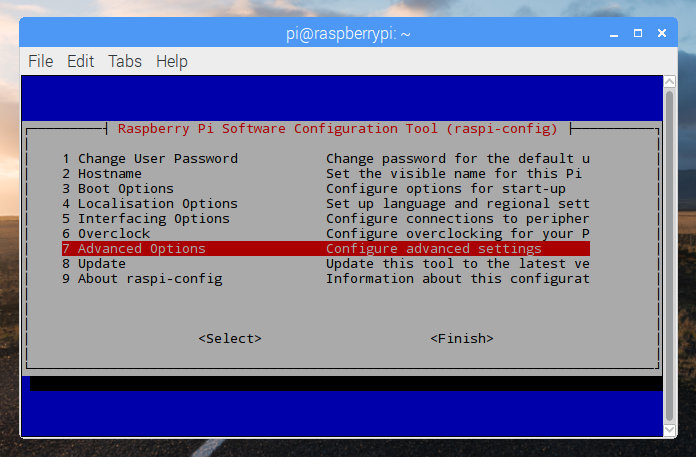
With that you will open up the Raspberry Pi Software Configuration Tool.
To force audio output to the audio jack of your Raspberry Pi 3, select "Advanced Options":
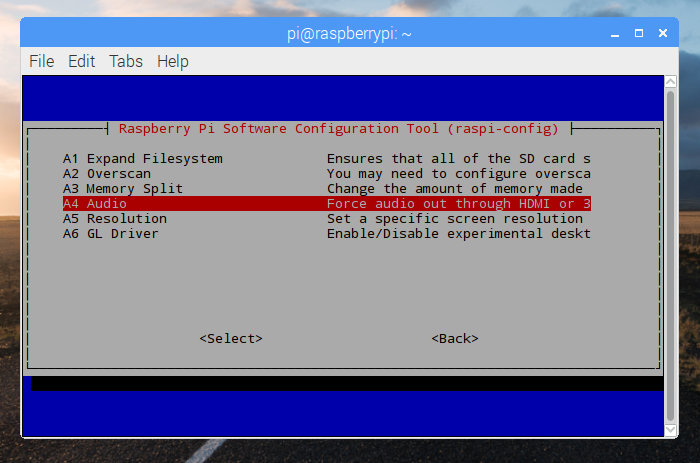
And then select "Audio":
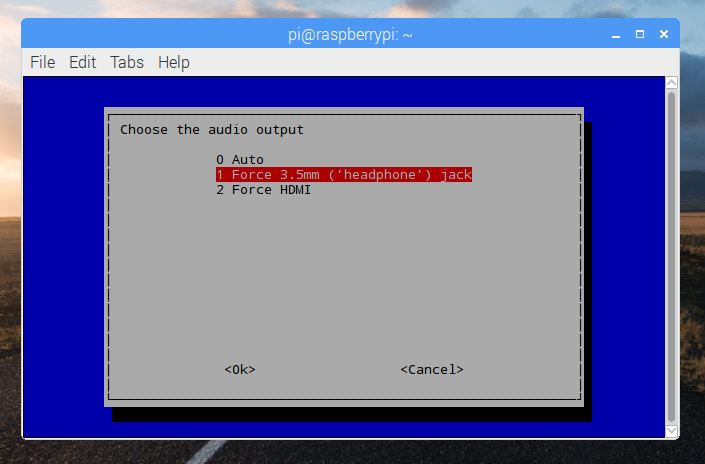
And then select "Force 3.5mm ('headphone') jack":
Fixing problem with black margin around screen
If you see a black margin around your screen, you can fix it via the Raspberry Pi Configuration tool. To remove the black margin around the screen, select the "disabled" option for "Underscan":
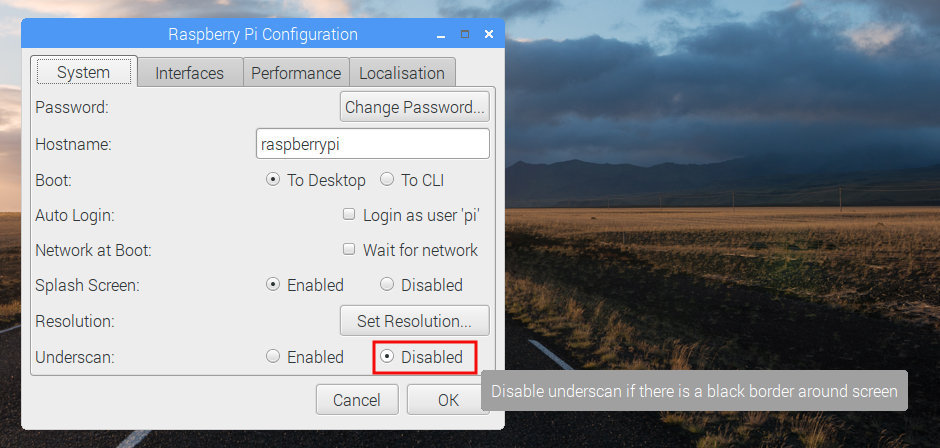
After you had selected the disabled option, you will be prompted to restart the Raspbian operating system. Your Raspbian desktop screen should fill the entire screen of your monitor when Raspbian had restarted.
Configuring keyboard layout
If you are not from UK, chances are you need to configure the keyboard layout for your Raspbian operating system.
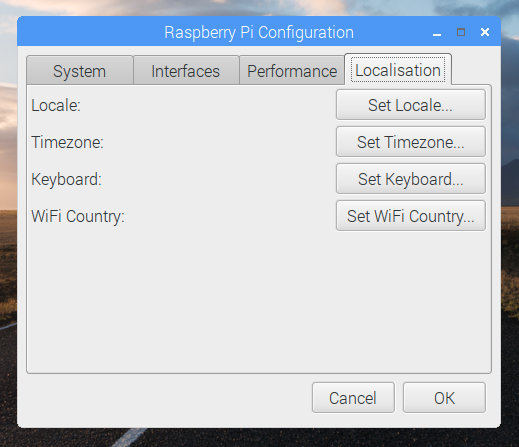
To configure the keyboard layout, click on the 'Localisation' tab of the Raspberry Pi Configuration tool:
Then click on "Set Keyboard..." and choose your country and keyboard variant in the "Keyboard Layout" dialog that appears:

After you had selected your keyboard layout, click on the "Ok" button to get your Raspbian operating system to remember your keyboard layout.
Configuring timezone
If you had to set your keyboard layout, you will probably need to configure the timezone of your Raspbian operating system as well.
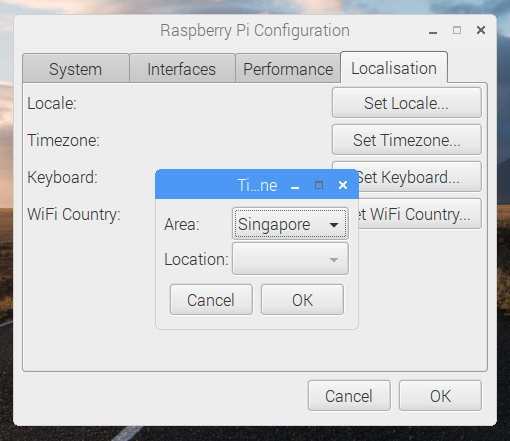
To configure the timezone of your Raspbian operating system, click on the "Set Timezone..." button and select your current location:
After you had selected your timezone, click on the "Ok button to get your Raspbian operating system to remember your timezone.
Buying your Raspberry Pi 3 low cost desktop computer from Amazon
If you do not have the Raspberry Pi 3 components mentioned in this post yet, you may want to purchase them from Amazon. Simply click on the button below to add the Raspberry Pi 3 components to your cart. You may remove anything that you already have or replace some of the components with other components.