Setting up a fast git server on Raspberry Pi Zero W with Go Git Service (Gogs) and Raspbian Stretch Lite
The Go Programming Language is a compiled programming language created by Robert Griesemer, Rob Pike, and Ken Thompson from Google in 2009. With Google Go, it is possible to build programs that run efficiently on minimum hardware resources. The compiled code runs close to the speed of C. Use cases of Go Programming language includes Docker, Kubernetes and Go Git Service.
If you happen to need a self-hosted git server to track software projects that you build on the side, you can consider using Go Git Service. With the Raspberry Pi Zero W bundle set, you can set up a fast git server that does not take up too much space on your desk.
This post details how you can setup a fast git server on Raspberry Pi Zero W with Go Git Service and Raspbian Stretch Lite.
Recommended hardware for Raspberry Pi Zero W fast git server
You can setup a fast git server with the following hardware:
- CanaKit Raspberry Pi Zero W (Wireless) with Official Case and Power Supply
- Sandisk Ultra 128GB Micro SDXC UHS-I Card with Adapter
Required hardware to install Raspbian Stretch Lite onto the microSD
Raspberry Pi Zero W board will load Raspbian Stretch Lite from a microSD card. Hence, we will need to have a computer with a SD card reader. If your computer does not come with a SD card reader, you have to get one.
Downloading Raspbian Stretch Lite for Raspberry Pi Zero W
Compared to Raspbian Stretch, Raspbian Stretch Lite does have a desktop environment. Hence, it is suitable to be used as the operating system for your fast git server.
Once you have the necessary hardware on your table, proceed to download a copy of Raspbian Stretch Lite. As of this writing, the one that was available was dated 29th November 2017:
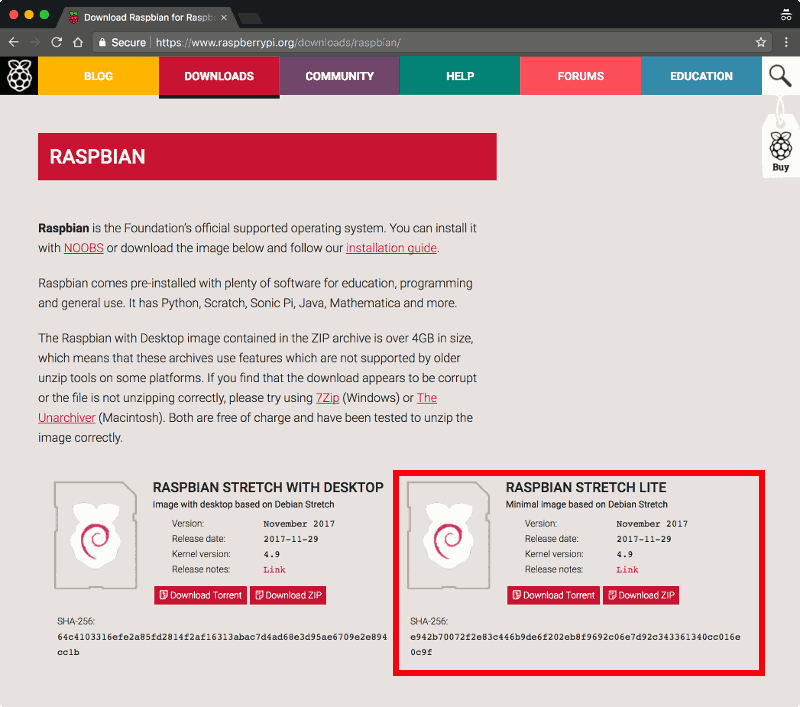
Click on the Download Zip button for Raspbian Stretch Lite and save the zip file onto your file system.
Installing Raspbian Stretch Lite onto the microSD card
Once your browser had completed the download for the .zip file, extract the .img file from the .zip file. The .img file is the operating system image for installing Raspbian Stretch Lite onto your microSD card.
I used Etcher on my MacBook Pro to install the operating system image onto the microSD card.
If you are using a windows machine, you can use Win32DiskImager to install the operating system for your Raspberry Pi Zero W.
If you are using a Linux desktop, you should be able to Etcher to install the operating system for your Raspberry Pi Zero W.
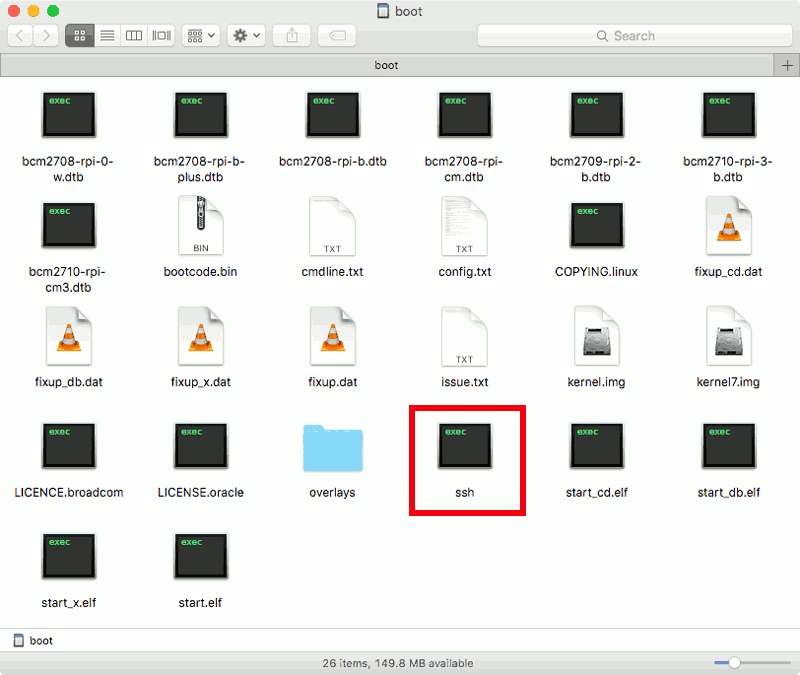
Enabling SSH server on Raspbian Stretch Lite first boot
With an SSH server running on Raspbian Stretch Lite, you do not need to find a spare keyboard, spare monitor, a mini HDMI to HDMI adapter and a OTG cable in order to configure Raspbian Stretch Lite after it had booted up for the first time.
To ensure that you have the SSH server running on your Raspbian Stretch Lite after the first boot, create an empty file named "ssh” in the boot partition of the microSD card:
Getting Raspberry Pi Zero W connect to your 2.4 GHz Wi-Fi network on first boot
The SSH server is the first piece to allow remote configuration of the Raspbian Stretch Lite operating system running the Raspberry Pi Zero W. The other piece is the Wi-Fi connection from your Raspberry Pi Zero W to your home network.
The Wi-Fi chip on Raspberry Pi Zero W connects to a 2.4 GHz Wi-Fi network. To get your Raspberry Pi Zero W to connect to your 2.4 GHz Wi-Fi network, create a text file with content similar to the following:
country=SG
ctrl_interface=DIR=/var/run/wpa_supplicant GROUP=netdev
update_config=1

network={
        scan_ssid=1
        ssid="the_2.4-hz-wireless-network"
        psk="the_2.4-hz-wireless-network_password"
        proto=WPA
        key_mgmt=WPA-PSK
}
and place it into the boot partition of the microSD card:
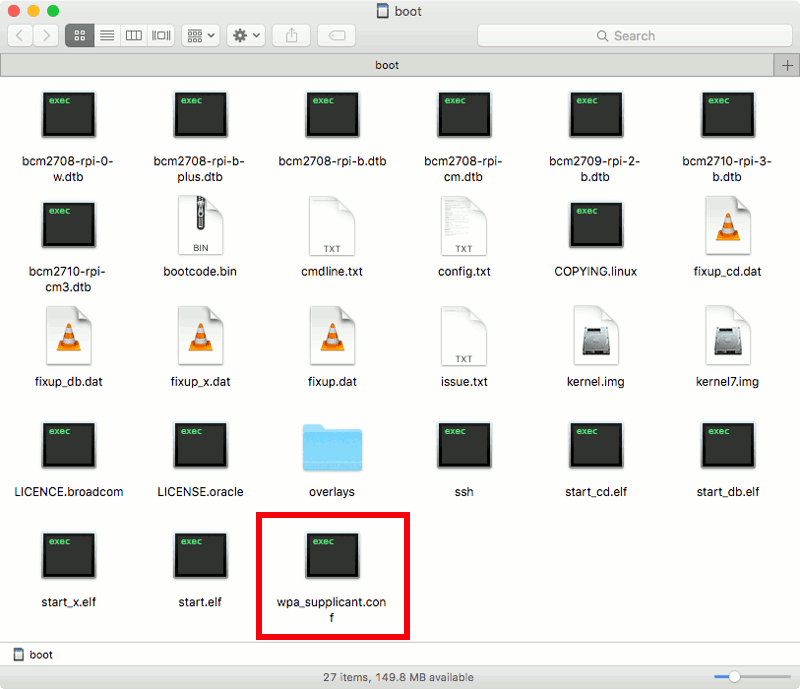
Be sure to replace the country, ssid and psk values to the appropriate values for your 2.4GHz Wi-Fi network.
Once you had created the wpa_supplicant.conf file that reflects your 2.4 GHz Wi-Fi network configurations,
- copy the
wpa_supplicant.conffile into the boot partition of the microSD card, - remove it from your computer,
- insert it into the microSD card slot on your Raspberry Pi Zero W board.
Booting up Raspbian Stretch Lite
After assembling the Raspberry Pi Zero W board to the Raspberry Pi Zero official case, connect the power supply to the power port on your Raspberry Pi Zero W board and the wall socket.
After switching on the wall socket which your USB charger was plugged into, the Raspberry Pi Zero W board will boot up the Raspbian Stretch Lite operating system.
Getting the IP address of your Raspberry Pi Zero W
When Raspbian Stretch Lite booted up, it will get an IP address from your router. This IP address is needed for you to SSH into your Raspberry Pi Zero W. To get the IP Address that your router had allocated to your Raspbian Stretch Lite, go to your router's address allocation table and find an entry with the name raspberrypi.
Getting into the Raspbian Stretch Lite operating system via SSH from your computer
The default credentials to log into Raspberry Pi Stretch Lite is as follows:
Username: pi
Password: raspberry
Suppose your router allocated your Raspbian Stretch Lite the IP address 192.168.1.123. With the default credentials and the IP address that your router had given to your Raspbian Stretch Lite, you can then use SSH to get into the operating system:
ssh pi@192.168.1.123
Enter raspberry when Raspbian Stretch Lite prompts for password. With that, your Raspbian Stretch Lite should greet you with output similar to the following:
Linux raspberrypi 4.9.59+ #1047 Sun Oct 29 11:47:10 GMT 2017 armv6l

The programs included with the Debian GNU/Linux system are free software;
the exact distribution terms for each program are described in the
individual files in /usr/share/doc/*/copyright.

Debian GNU/Linux comes with ABSOLUTELY NO WARRANTY, to the extent
permitted by applicable law.

SSH is enabled and the default password for the 'pi' user has not been changed.
This is a security risk - please login as the 'pi' user and type 'passwd' to set a new password.
Changing the default password of the pi user
Since Raspbian Stretch Lite suggested that using the default password for the 'pi' user is a security risk, the next thing that you should do is to change the default password. To do so, enter the following command:
passwd
For the three prompts that follow the command, enter raspberry and your favourite password twice.
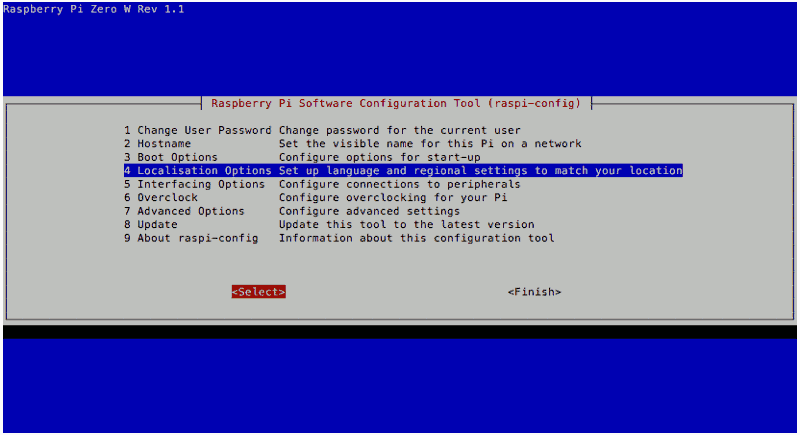
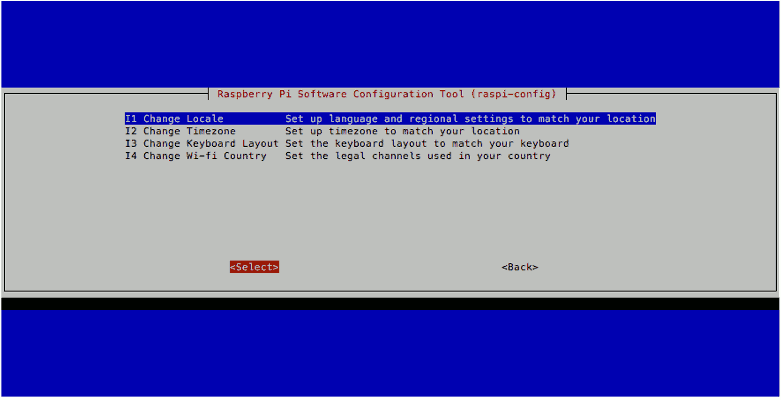
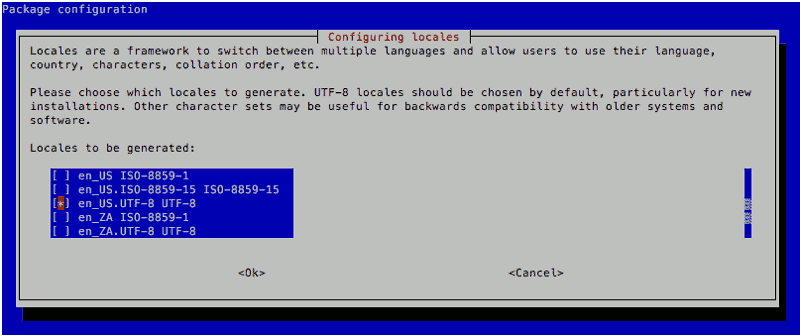
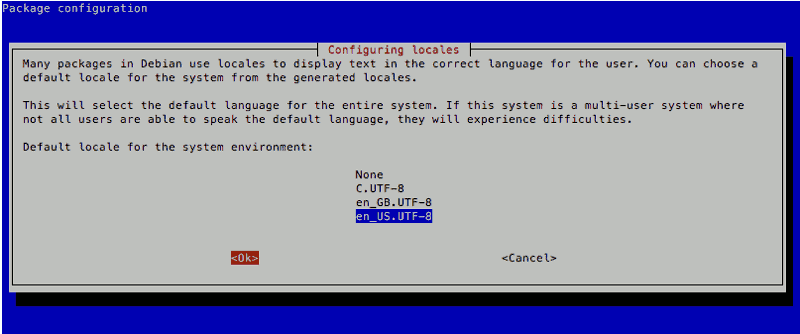
Configuring the locale settings on Raspbian Stretch Lite
The next thing that to do is to configure the locale settings for your Raspbian Stretch Lite. To do so, first fire up the Raspberry Pi Software Configuration Tool:
sudo raspi-config
With the Software Configuration Tool, follow through the following screens to generate the "en_US.UTF-8" locale and set it as the default locale for the system environment:
After doing so, I open up /etc/default/locale with nano:
sudo nano /etc/default/locale
And update the contents to look like the following:
LANG=en_US.UTF-8
LC_ALL=en_US.UTF-8
LANGUAGE=en_US.UTF-8
This will ensure that the locale settings for your Raspbian Stretch Lite persist through system reboots.
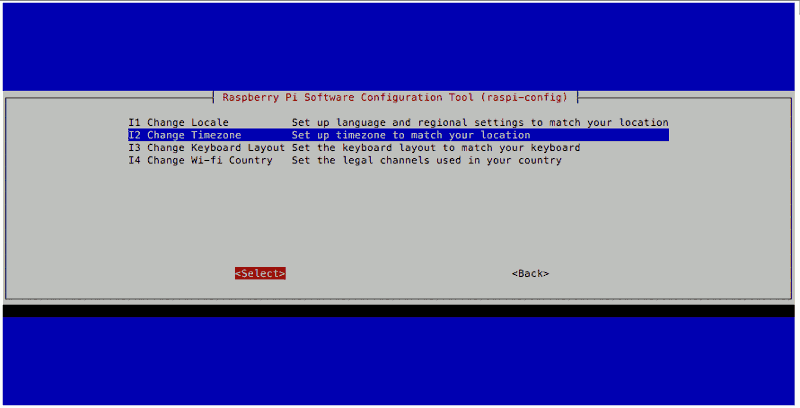
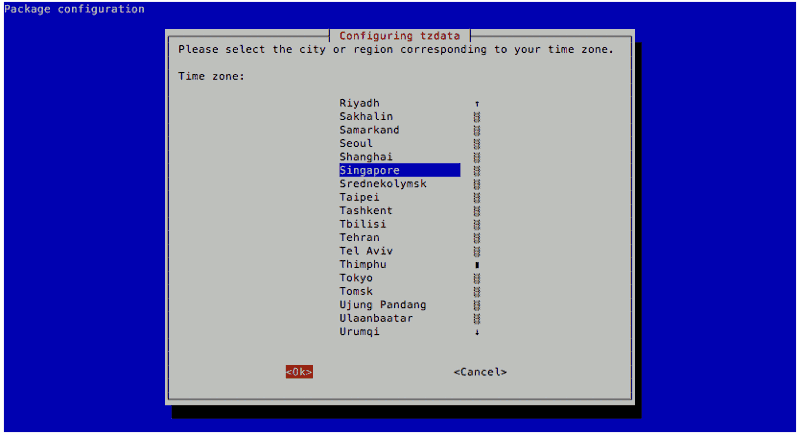
Changing Timezone
The default timezone of Raspbian Stretch Lite is "Etc/UTC", which is not the timezone that your git server will sit in.
Suppose that you want to change the timezone on your Raspbian Stretch Lite to Singapore's timezone, use the Raspberry Pi Software Configuration Tool mentioned earlier and go through the following steps:

Installing Git
After you got the Timezone that you preferred, the next item to install is Git. To do so, run the following command in terminal:
sudo apt-get install git -y
Downloading a copy of Go Git Service for Raspberry Pi Zero W
We can download precompiled versions of Go Git Service for different platforms from the Go Git Service download page. There is also a version compiled for Raspberry Pi. As of this writing, the latest version is 0.11.34. Run the following commands to download a copy of Go Git Service onto your Raspberry Pi Zero W:
cd /opt
sudo wget https://dl.gogs.io/0.11.34/raspi2_armv6.zip
sudo unzip raspi2_armv6.zip
sudo rm raspi2_armv6.zip
That will place the contents of Go Git Service 0.11.34 into the /opt/gogs directory.
Creating the system user account that will run Go Git Service
Once you had downloaded Go Git Service, the next step is to create a system user account that will run Go Git Service.
To do so, run the following command:
sudo adduser --disabled-login --gecos 'Go Git Service' git
After the command completes, you will have a system user account named as git. This user account cannot be used for logging into Raspbian Stretch Lite. In addition, the home directory of this system user account will be at /home/git.
Making git the owner of /opt/gogs
To enable the git user account to run Go Git Service, you will need to make it the owner of the /opt/gogs directory. To do so, run the following command:
sudo chown -R git:git /opt/gogs
Using systemctl to run Go Git Service
Once you had ensured that the git user has the privileges to run the Go Git Service binary, you can then proceed on to configuring systemctl to run Go Git Service.
Use a text editor to open up /opt/gogs/scripts/systemd/gogs.service:
sudo nano /opt/gogs/scripts/systemd/gogs.service
Edit the content to look like the following:
[Unit]
Description=Gogs
After=syslog.target
After=network.target
#After=mariadb.service mysqld.service postgresql.service memcached.service redis.service
[Service]
# Modify these two values and uncomment them if you have
# repos with lots of files and get an HTTP error 500 because
# of that
###
#LimitMEMLOCK=infinity
#LimitNOFILE=65535
Type=simple
User=git
Group=git
WorkingDirectory=/home/git/gogs
ExecStart=/opt/gogs/gogs web
Restart=always
Environment=USER=git HOME=/home/git

[Install]
WantedBy=multi-user.target
After saving changes to /opt/gogs/scripts/systemd/gogs.service, create the /home/git/gogs directory to serve as the working directory for Go Git Service:
sudo -H -u git mkdir /home/git/gogs
After that, enable your Go Git Service so that it can be ran by systemctl:
sudo systemctl enable /opt/gogs/scripts/systemd/gogs.service
This will cause symbolic links to be created in the /etc/systemd/system/multi-user.target.wants and /etc/systemd/system directories. These new symbolic links will link to /opt/gogs/scripts/systemd/gogs.service.
Once systemctl is ready to run your Go Git Service, you can run the following command to start Go Git Service:
sudo systemctl start gogs.service
You can then verify whether Go Git Service had started successfully by running the following command:
sudo systemctl status gogs.service
You should see output similar to the following when your Go Git Service was started successfully:
● gogs.service - Gogs
   Loaded: loaded (/opt/gogs/scripts/systemd/gogs.service; enabled; vendor preset: enabled)
   Active: active (running) since Wed 2018-01-24 10:43:20 UTC; 4s ago
 Main PID: 2592 (gogs)
   CGroup: /system.slice/gogs.service
           └─2592 /opt/gogs/gogs web

Jan 24 10:43:21 raspberrypi gogs[2592]: 2018/01/24 10:43:21 [TRACE] Log path: /opt/gogs/log
Jan 24 10:43:21 raspberrypi gogs[2592]: 2018/01/24 10:43:21 [TRACE] Build Time: 2017-11-22 08:06:22 UTC
Jan 24 10:43:21 raspberrypi gogs[2592]: 2018/01/24 10:43:21 [TRACE] Build Git Hash: 6f2347fc71f17b5703a9b1f383a2d3451f88b741
Jan 24 10:43:21 raspberrypi gogs[2592]: 2018/01/24 10:43:21 [TRACE] Log Mode: Console (Trace)
Jan 24 10:43:21 raspberrypi gogs[2592]: 2018/01/24 10:43:21 [ INFO] Gogs 0.11.34.1122
Jan 24 10:43:21 raspberrypi gogs[2592]: 2018/01/24 10:43:21 [ INFO] Cache Service Enabled
Jan 24 10:43:21 raspberrypi gogs[2592]: 2018/01/24 10:43:21 [ INFO] Session Service Enabled
Jan 24 10:43:21 raspberrypi gogs[2592]: 2018/01/24 10:43:21 [ INFO] SQLite3 Supported
Jan 24 10:43:21 raspberrypi gogs[2592]: 2018/01/24 10:43:21 [ INFO] Run Mode: Development
Jan 24 10:43:24 raspberrypi gogs[2592]: 2018/01/24 10:43:24 [ INFO] Listen: http://0.0.0.0:3000
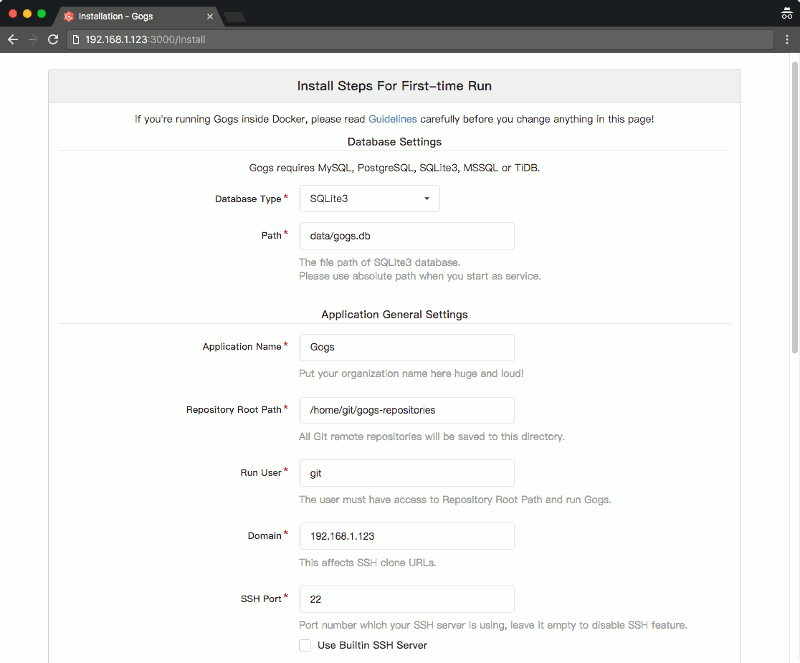
Running the installation process from Go Git Service
After you are done with the systems configurations, the final step will be to run the installation process from Go Git Service.
To do so, access your Go Git Service with your browser via http://192.168.1.123:3000, where 192.168.1.123 is the ip address of the Raspberry Pi Zero W.
You will see a web page that asks for some initial software configurations.
Supply the following settings as your initial configurations:
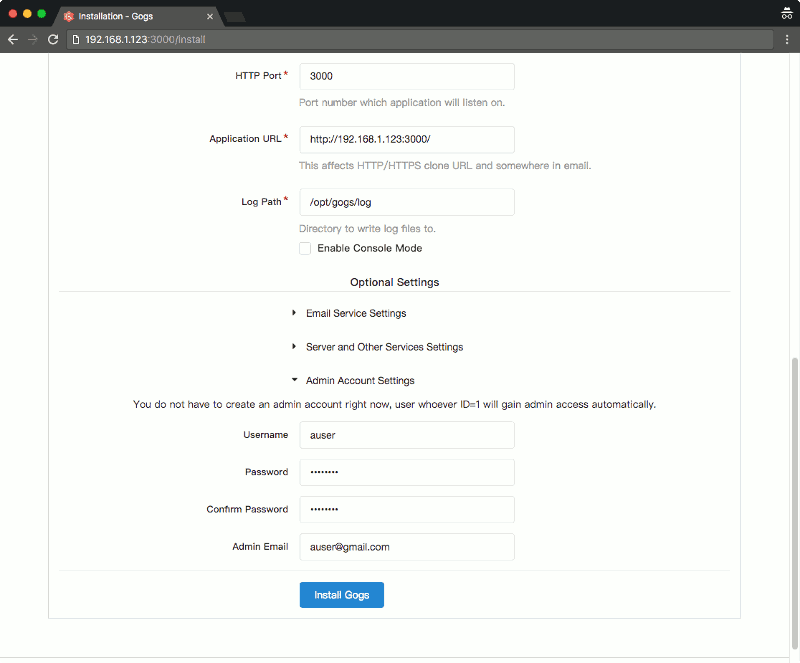
And click the Install Gogs button.
Once Go Git Service had initialized itself, you will be able to see a screen similar to the following:

Buy the Raspberry Pi Zero W hardware to build your own Go Git Service
If you do not have the Raspberry Pi Zero W hardware mentioned in this post yet, you may want to purchase them from Amazon. Simply click on the button below to add the Raspberry Pi Zero W hardware to your cart. You may remove anything that you already have or replace some of the hardware with other hardware.