How to setup phpMyAdmin on a Raspbian Stretch Lite, Nginx, MariaDB / MySQL and PHP 7 LEMP stack
The phpMyAdmin project is a solid software tool written in PHP, that can help us handle the administration of MySQL / MariaDB over the web.
If you want to build your next project with a Raspbian Stretch Lite, Nginx, MariaDB / MySQL and PHP 7 LEMP stack, you may want to consider setting up phpMyAdmin as well. This post details how you can do so.
Prerequisites
This post assumes that you had setup a Raspberry Pi running a Raspbian Stretch Lite, Nginx, MariaDB / MySQL and PHP 7 LEMP stack. If you had not done so, you may want to reference either the Raspberry Pi 3 WordPress tutorial or Raspberry Pi Zero W WordPress tutorial to setup your LEMP stack.
Using SSH to get into your Raspbian Stretch Lite
Suppose that your Raspbian Stretch Lite had gotten the IP address 192.168.1.109 from your home router and you had the pi user in the system, run the following command on your terminal to SSH into your Raspberry Stretch Lite:
ssh pi@192.168.1.109
Installing mbstring extension for PHP 7.0 on Raspbian Stretch Lite
Without the mbstring extension, phpMyAdmin is unable to split strings correctly and it may result in unexpected results.
Run the following command to install the mbstring extension for PHP 7.0 on Raspbian Stretch Lite:
sudo apt-get install php7.0-mbstring
Creating a database user for administering your database via phpMyAdmin
The root user of MariaDB / MySQL could be using the Authentication Plugin for authentication.
The Authentication Plugin allows the user to use operating system credentials when connecting to MariaDB via Unix socket. This authentication mode cannot be used for logging into phpMyAdmin for administering your database.
Hence, we need to create a database user for us to login through phpMyAdmin. To do so, we first get into MariaDB interactive shell with the following command:
sudo mariadb
Or the MySQL interactive shell with the following command:
sudo mysql
Once you are inside the interactive shell, run the following commands to create a database user that have the privileges to administer any database in your MariaDB / MySQL server:
CREATE USER 'pmauser'@'localhost' IDENTIFIED BY 'password';
GRANT ALL ON *.* TO 'pmauser'@'localhost';
Allocate a domain name for your phpMyAdmin site
The next step is to designate a domain name for accessing your phpMyAdmin site. If you already own a domain, you may want to create a subdomain out of your existing domain. For instance, I could use pma.techcoil.com for my phpMyAdmin site residing on my Raspbian Stretch Lite.
Getting a copy of phpMyAdmin
Once we had decided the domain for accessing our phpMyAdmin site, we can proceed to download a copy of phpMyAdmin. You can see the list of phpMyAdmin versions that are available for download via their download page.
As of this writing, the latest stable version is version 4.7.8. Proceed to download the english version by running the following commands:
cd /var/www
sudo wget https://files.phpmyadmin.net/phpMyAdmin/4.7.8/phpMyAdmin-4.7.8-english.tar.gz
sudo tar -xvf phpMyAdmin-4.7.8-english.tar.gz
sudo mv phpMyAdmin-4.7.8-english pma.techcoil.com
sudo rm phpMyAdmin-4.7.8-english.tar.gz
Once the command completes, you should have the source codes for phpMyAdmin 4.7.8 available at the /var/www/pma.techcoil.com directory.
Configuring blowfish secret for your phpMyAdmin site
The phpMyAdmin installation directory contains a sample configuration file which we can reference for configuring our phpMyAdmin site.
To configure our phpMyAdmin site, we first make a copy of that configuration file:
sudo cp /var/www/pma.techcoil.com/config.sample.inc.php /var/www/pma.techcoil.com/config.inc.php
Once we had done so, use nano to open up the configuration file for editing:
sudo nano /var/www/pma.techcoil.com/config.inc.php
Inside the editor, look for $cfg['blowfish_secret'] and provide a 32 character long blowfish secret:
$cfg['blowfish_secret'] = '123456789012345678901234567890AB';
Once you had done so, save the file.
Configuring Nginx to proxy HTTP traffic to your phpMyAdmin site
Once we had configured the blowfish secret for phpMyAdmin, the next step is to configure Nginx to proxy HTTP traffic to our PHP web application.
To do so, create a configuration file at /etc/nginx/sites-enabled/pma.techcoil.com.conf with nano:
sudo nano /etc/nginx/sites-enabled/pma.techcoil.com.conf
And paste in the following contents:
server {

        listen 80;
        server_name pma.techcoil.com;
        root /var/www/pma.techcoil.com;
        index index.php;

        location / {
                try_files $uri $uri/ /index.php?$args;
        }

        location ~ \.php$ {
                include fastcgi.conf;
                fastcgi_pass unix:/run/php/php7.0-fpm.sock;
        }

}
Once you had created the configuration file, restart Nginx with the following command:
sudo systemctl restart nginx.service
Editing the hosts file to access your phpMyAdmin site from your work computer
Once you had restarted Nginx on your Raspbian Stretch Lite, go to your computer and add in the following contents to your hosts file:
192.168.1.109 pma.techcoil.com
Accessing your phpMyAdmin site from your work computer
With the entry in your hosts file, you can access your phpMyAdmin site via the domain name that you had provided (for eg. http://pma.techcoil.com/) with your browser. You should be able to see the login screen:
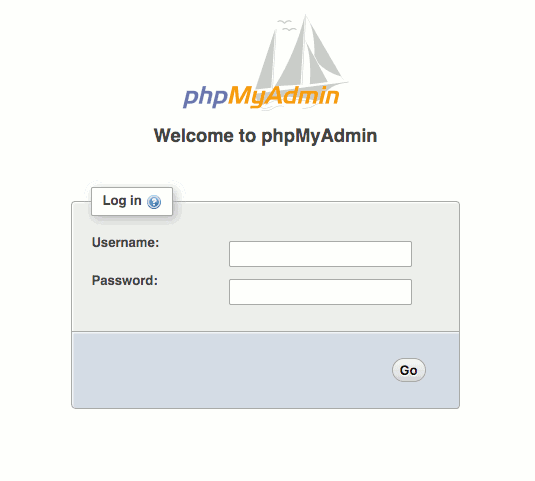
Key in the details of the database user that you had created earlier to login to the dashboard. Once you had logged in successfully, you should be able to see the following screen:
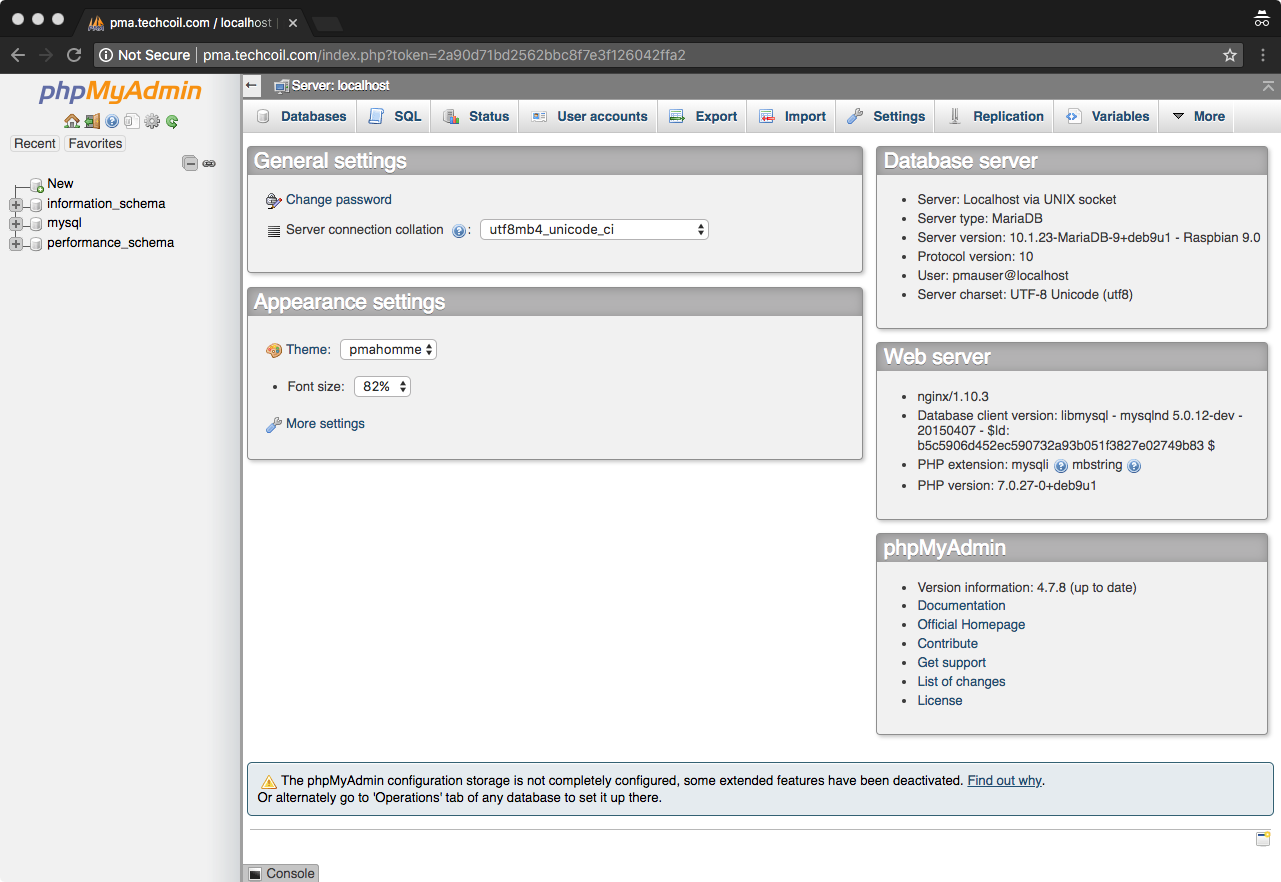
Setting up phpMyAdmin configuration storage
A warning message will be displayed at the bottom of the dashboard:
The phpMyAdmin configuration storage is not completely configured, some extended features have been deactivated. Find out why.
Or alternately go to 'Operations' tab of any database to set it up there.
Click on the "Find out why" link and then click on the "Create" link on the next page that follows. After you had clicked on the "Create" link, phpMyAdmin will create a database instance phpmyadmin for it to store configuration information such as navigation histories, bookmarks and etc.
At this point in time, you have a setup that is sufficient for your to administer your MariaDB database on your Raspbian Stretch Lite.
However, if you wish to access your phpMyAdmin site from outside your home network, read on to implement further configurations for your site.
Let's Encrypt your phpMyAdmin site with a browser-trusted SSL/TLS certificates
When you make your phpMyAdmin site communicate in HTTPS, you can be sure that the communication channel between your browser and your phpMyAdmin site is secure.
Fortunately, Let's Encrypt makes it easy for web masters to deploy secure web applications that serve HTTPS.
This section shows how you can secure your phpMyAdmin site with Let's Encrypt.
Prequisites to serving your phpMyAdmin site via HTTPS
In a separate post, I had discussed the topic on how to host multiple websites from home. Following those pointers, you will need the following pieces for your phpMyAdmin site to be accessed from outside your home network with Let's Encrypt browser-trusted certificate:
- A domain or subdomain name that is mapped to the public IP address that your home router had gotten from the Internet Service Provider.
- Forwarding of network traffic made to port 80 and 443 of your home router public IP address to the IP address of the Raspberry Pi that contains your phpMyAdmin site. In case you are using the Linksys AC1900 Dual Band Wireless Router, you can checkout this post on how to do so
Installing Certbot on Raspbian Stretch Lite for obtaining Let’s Encrypt’s browser-trusted certificates
In order to use Let's Encrypt facilities, we will need a ACME client to help us get the SSL artefacts from Let's Encrypt. Therefore, you will need to install Certbot on Raspbian Stretch Lite for obtaining Let’s Encrypt’s browser-trusted certificates.
Configuring Nginx to facilitate Certbot in acquiring the SSL certificate for my domain or subdomain
After installing Certbot, proceed to configure Nginx to facilitate Certbot in acquiring the SSL certificate for your domain.
In order to do so, use nano to load /etc/nginx/sites-enabled/pma.techcoil.com.conf:
sudo nano /etc/nginx/sites-enabled/pma.techcoil.com.conf
After the editor loads the file, change the content to look like the following:
server {

        listen 80;
        server_name pma.techcoil.com;
        root /var/www/pma.techcoil.com;
        index index.php;

        location / {
                try_files $uri $uri/ /index.php?$args;
        }

        location ~ \.php$ {
                include fastcgi.conf;
                fastcgi_pass unix:/run/php/php7.0-fpm.sock;
        }

        location ~ /.well-known {
                allow all;
        }

}
Once you had changed the content, type Ctrl-X followed by Y to save the file.
Afterwards, restart Nginx with the following command:
sudo systemctl restart nginx.service
Using Certbot to get Let's Encrypt to issue browser-trusted SSL certificate for my domain
After Nginx is ready to facilitate Certbot in acquiring the SSL certificate artefacts, run the following command to acquire them:
sudo certbot certonly -a webroot --webroot-path=/var/www/pma.techcoil.com -d pma.techcoil.com
Generating a strong Diffie-Hellman group
Once Certbot had fetched the SSL certificate artefacts for my domain, generate a Diffie-Hellman group for Nginx to use for exchanging cryptographic keys with its clients:
sudo openssl dhparam -out /etc/ssl/certs/dhparam.pem 2048
Updating the Nginx configurations for serving HTTPS for your phpMyAdmin site
Till this point, you will have the necessary artefacts for Nginx to serve HTTPS. Therefore, you can update the Nginx configurations to use those artefacts in serving HTTPS.
Firstly, use nano to load /etc/nginx/sites-enabled/pma.techcoil.com.conf again:
sudo nano /etc/nginx/sites-enabled/pma.techcoil.com.conf
Once the editor loads the file, replace its content with the following:
upstream php {
        server unix:/run/php/php7.0-fpm.sock;
}

server {
	listen 80;
	server_name  pma.techcoil.com;
	return 301 https://$host$request_uri;
}

# For ssl
	ssl on;
    	ssl_certificate /etc/letsencrypt/live/pma.techcoil.com/fullchain.pem;
    	ssl_certificate_key /etc/letsencrypt/live/pma.techcoil.com/privkey.pem;
    	ssl_protocols TLSv1 TLSv1.1 TLSv1.2;
    	ssl_prefer_server_ciphers on;
    	ssl_dhparam /etc/ssl/certs/dhparam.pem;
   	ssl_ciphers 'ECDHE-RSA-AES128-GCM-SHA256:ECDHE-ECDSA-AES128-GCM-SHA256:ECDHE-RSA-AES256-GCM-SHA384:ECDHE-ECDSA-AES256-GCM-SHA384:DHE-RSA-AES128-GCM-SHA256:DHE-DSS-AES128-GCM-SHA256:kEDH+AESGCM:ECDHE-RSA-AES128-SHA256:ECDHE-ECDSA-AES128-SHA256:ECDHE-RSA-AES128-SHA:ECDHE-ECDSA-AES128-SHA:ECDHE-RSA-AES256-SHA384:ECDHE-ECDSA-AES256-SHA384:ECDHE-RSA-AES256-SHA:ECDHE-ECDSA-AES256-SHA:DHE-RSA-AES128-SHA256:DHE-RSA-AES128-SHA:DHE-DSS-AES128-SHA256:DHE-RSA-AES256-SHA256:DHE-DSS-AES256-SHA:DHE-RSA-AES256-SHA:AES128-GCM-SHA256:AES256-GCM-SHA384:AES128-SHA256:AES256-SHA256:AES128-SHA:AES256-SHA:AES:CAMELLIA:DES-CBC3-SHA:!aNULL:!eNULL:!EXPORT:!DES:!RC4:!MD5:!PSK:!aECDH:!EDH-DSS-DES-CBC3-SHA:!EDH-RSA-DES-CBC3-SHA:!KRB5-DES-CBC3-SHA';
    	ssl_session_timeout 1d;
    	ssl_session_cache shared:SSL:50m;
    	ssl_stapling on;
    	ssl_stapling_verify on;
    	add_header Strict-Transport-Security max-age=15768000;

    	default_type  application/octet-stream;

    	listen 443;
	server_name pma.techcoil.com;

        root /var/www/pma.techcoil.com;
        index index.php;

	location ~ /.well-known {
        	allow all;
    	}

        location / {
                try_files $uri $uri/ /index.php?$args;
        }

        location ~ \.php$ {
                include fastcgi.conf;
                fastcgi_pass unix:/run/php/php7.0-fpm.sock;
        }

}
After that, type Ctrl-X followed by Y to save the configuration file.
Once you had saved the configuration file, run the following command to restart Nginx:
sudo systemctl restart nginx.service
Remove entry from your hosts file
Since you will now be able to access your phpMyAdmin site from outside your home network, you will want to remove the entry from your hosts file on your work computer.
With that, go to your hosts file and remove the entry that you had created earlier:
192.168.1.109 pma.techcoil.com