How to setup a reverse proxy server with nginx, Raspian Jessie Lite and Raspberry Pi 3
If you plan to deploy multiple devices at home and made them publicly accessible from outside your home network, you may want to consider setting up a reverse proxy server that will route HTTP traffic from the internet to the respective devices residing in your home network.
Tagged with an affordable price tag with good specifications, the Raspberry Pi 3 is an ideal candidate for the hardware of a reverse proxy server at home. And since the nginx server is a powerful reverse proxy server that can run efficiently on commodity hardware, it is an ideal candidate for the software aspect of a reverse proxy server.
This post documents how to setup a reverse proxy server with nginx, Raspian Jessie Lite and Raspberry Pi 3.
Hardware recommendations for the reverse proxy server
I recommend the following hardware for the reverse proxy server:
- Official Raspberry Pi 3 Case - Red/White
- Raspberry PI 3 Model B A1.2GHz 64-bit quad-core ARMv8 CPU, 1GB RAM
- Kingston Digital 32GB microSDHC Class 10 UHS-I 45R Flash Card (SDC10G2/32GBSP)
- CanaKit 5V 2.5A Raspberry Pi 3 Power Supply / Adapter / Charger (UL Listed)
- AmazonBasics RJ45 Cat-6 Ethernet Patch Cable - 3 Feet (0.9 Meters)
If you had a spare micro USB charger that came along with your typical Android phone, you can use it to power your Raspberry Pi 3 instead of buying the CanaKit 5V 2.5A Raspberry Pi 3 Power Supply / Adapter / Charger (UL Listed).
Prerequisite hardware to install operating system onto the microSD
Raspberry Pi 3 board will load an operating system from a microSD card. Hence, we will need to have a computer with a SD card reader. If your computer does not come with a SD card reader, you have to get one.
If you have the standard SD card reader on your computer but do not have a SD card adapter, you may want to get the Kingston Digital 32 GB microSDHC Class 10 UHS-1 Memory Card 30MB/s with Adapter (SDC10/32GB) instead.
Getting a copy of Raspbian Lite
Once we had gotten the hardware, we can then proceed to download a copy of Raspbian Jessie Lite. The latest Raspbian operating system is available at https://www.raspberrypi.org/downloads/raspbian/. As of this writing, the one that was available was "RASPBIAN JESSIE LITE":
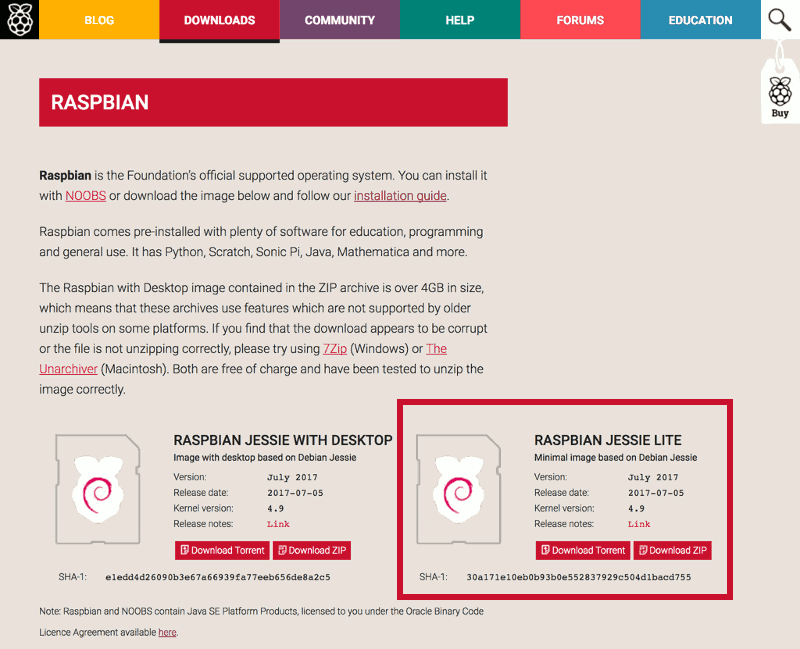
Click on the Download ZIP button and save the file onto your file system.
Installing Raspbian Lite on the microSD card
Once you had gotten the .zip file in your computer, extract the .img file from the .zip file. The .img file is the operating system image that we will use for installing Raspbian Jessie Lite onto the microSD card.
If you have a MacBook, you can use Etcher to install the operating system image onto your microSD card.
If you are using a windows machine, you can use Win32DiskImager to install the operating system for your Raspberry Pi 3.
If you are using a Linux desktop, you should be able to Etcher to install the operating system for your Raspberry Pi 3.
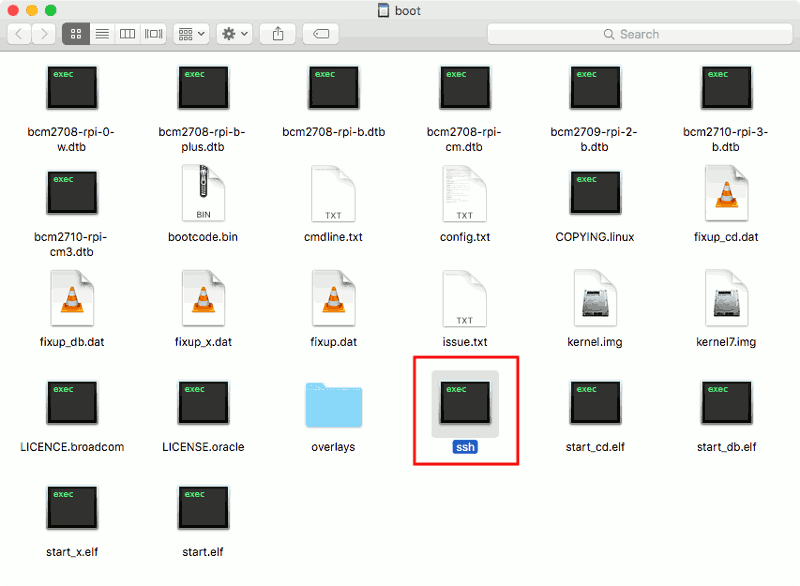
Enabling SSH server for accessing your Raspberry Pi 3 without connecting a keyboard and monitor to it
With an SSH server running on Raspbian Jessie Lite, we do not have to find a spare keyboard and monitor in order to configure Raspbian Jessie Lite after it had booted up for the first time. To ensure that we have the SSH server running after the first boot, we can create a file named "ssh” in the boot partition of the SD card:
Assembling the reverse proxy server hardware
Once you have installed Raspbian Jessie Lite onto your microSD card, remove your microSD card from your SD card reader and insert it to the SD card slot on the Raspberry Pi 3 board. After that, proceed to assemble the Raspberry Pi 3 board to the Official Raspberry Pi case.
Booting up your Raspbian Lite operating system
With the assembly of your Raspberry Pi 3 board and Official Raspberry Pi case, you need to connect one end of the RJ45 cable to the RJ45 port on your Raspberry Pi 3 board and the other end of the cable to one of the switch port of your home router. After that, plugin your micro USB cable and supply power to your Raspberry Pi 3 board.
Finding the IP address of your Raspberry Pi 3
When Raspbian Jessie Lite boots up, it will request an IP address from your router. We will need this IP address in order to SSH into the Raspberry Pi 3. Go to your router's address allocation table and find an entry with the name raspberrypi. Note that IP address for SSH access.
SSH into your Rasbian Jessie Lite with the default credentials
With the IP address, we can then SSH into our Raspberry Pi 3. Assuming that the router had given our Raspberry Pi 3 the IP address 192.168.0.123, we will then open up a terminal program and enter the following command:
ssh pi@192.168.0.123
The default password for the default user pi is raspberry. Enter raspberry when the ssh command prompts for a password and we will be able to get into our Raspbian Jessie Lite to perform other configurations.
After logging into your Raspbian Jessie Lite successfully, you will be able to see the following output:
The programs included with the Debian GNU/Linux system are free software;
the exact distribution terms for each program are described in the
individual files in /usr/share/doc/*/copyright.

Debian GNU/Linux comes with ABSOLUTELY NO WARRANTY, to the extent
permitted by applicable law.

SSH is enabled and the default password for the 'pi' user has not been changed.
This is a security risk - please login as the 'pi' user and type 'passwd' to set a new password.
Changing the default password for user pi
As hinted by the server output, we should change the default password for the pi user. To do so, we enter the following command into the terminal after we had logged into Raspbian Jessie Lite as the pi user:
passwd
At the prompt, type in raspberry for (current) UNIX password and your favourite password for the next two prompts.
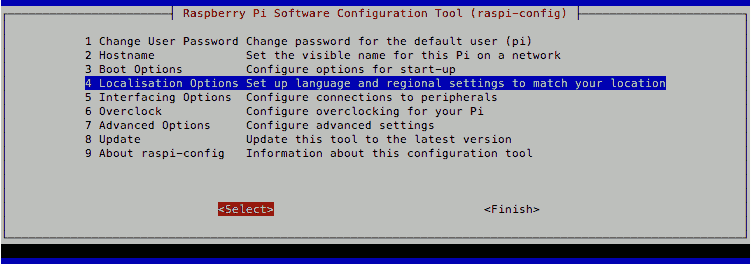
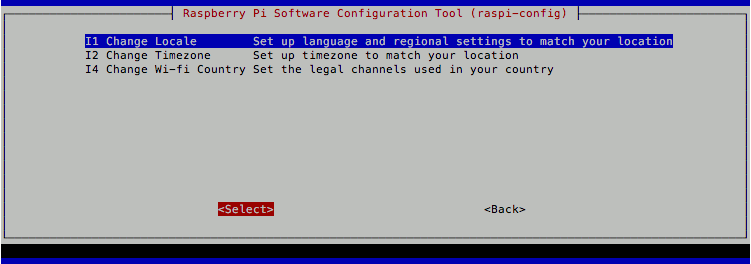
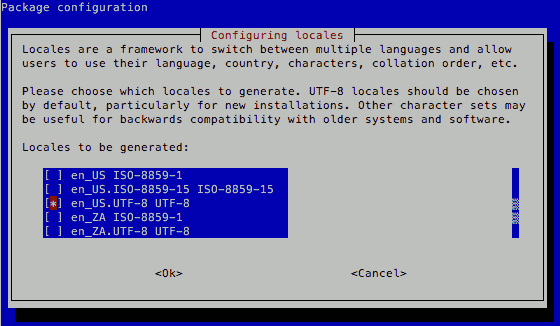
Configuring the locale settings
Once we have changed the password, we should configure the locale settings too.
To do so, we first run the Raspberry Pi Software Configuration Tool:
sudo raspi-config
And use it to generate the "en_US.UTF-8" locale and set it as the default locale for the system environment:
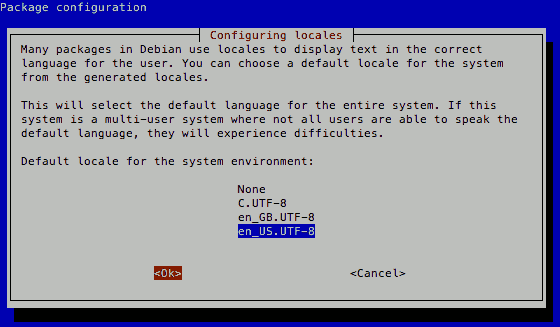
After doing so, open up /etc/default/locale with nano:
sudo nano /etc/default/locale
And updated the contents to look like the following:
LANG=en_US.UTF-8
LC_ALL=en_US.UTF-8
LANGUAGE=en_US.UTF-8
This will ensure that the locale setting persist through system reboots.
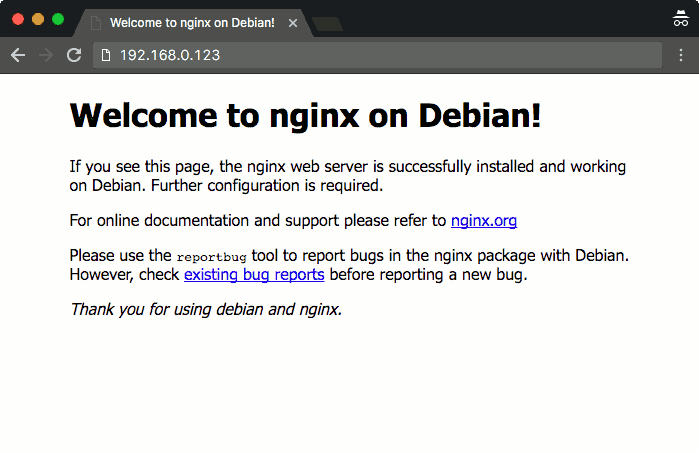
Installing nginx on your Raspbian Jessie Lite operating system
Once we had configured the locale settings, we can then proceed to install nginx. To install nginx on Raspbian, we can enter the following command:
sudo apt-get update
sudo apt-get install nginx -y --fix-missing
Once the command completed running, we will be able to use our browser to communicate with nginx:
Examples of using nginx as a reverse proxy server at home
Once we have nginx running on Raspbian Jessie Lite, we can use it as a reverse proxy server at home. The following is a list of articles which contain examples on how we can use nginx as a reverse proxy server at home:
- Setting up a LEMP web server on Raspberry Pi 3 with an Ubuntu Server 15.10.3 image to host a WordPress website
- How I built my Raspberry Pi 3 CCTV using a MotionEyeOS image for home surveillance
- How I setup Codiad web IDE on my Raspberry Pi 3
- How I setup a CCTV camera with Raspberry Pi Zero W and MotionEyeOS image for home surveillance
- How to enable secured remote management of D-Link DIR series router with Certbot, nginx, Raspbian Jessie Lite and Raspberry Pi 3
- Setting up ProjectSend on your Raspberry Pi 3 for sharing files – the LEMP way
Buying the recommended hardware list to setup your own reverse proxy server with nginx, Raspian Jessie Lite and Raspberry Pi 3
If you do not have the Raspberry Pi 3 hardware mentioned in this post yet, you may want to purchase them from Amazon. Simply click on the button below to add the Raspberry Pi 3 hardware to your cart. You may remove anything that you already have or replace some of the hardware with other hardware.