How to enable secured remote management of D-Link DIR series router with Certbot, nginx, Raspbian Jessie Lite and Raspberry Pi 3
If you have a Internet subscription at home, chances are you will have a router that helps to enable computers, big and small, to access the Internet concurrently. To enable my computers to access the Internet concurrently, my Internet service provider gave me a D-Link DIR-868L router which had been serving me well over 2 years.
One way for me to access the router when I was not at home is to enable remote management by checking the Enable Remote Management in the ADMINISTRATION section of the TOOLS tab.
However, this feature activate remote management through HTTP through a designated port. Since HTTP communication is not encrypted, it is not safe for me to use this remote management feature from an unfamiliar network.
Since I had created a reverse proxy server with nginx, Raspbian Jessie Lite and Raspberry Pi 3 and installed Certbot on it, I reckoned that I can enable remote management of my D-Link DIR series router to be performed in a secured manner.
This post documents how to enable secured remote management of D-Link DIR series router with Certbot, nginx, Raspbian Jessie Lite and Raspberry Pi 3.
Building your reverse proxy server with nginx, Raspbian Jessie Lite and Raspberry Pi 3
If you do not have a copy of Raspbian Jessie Lite on a Raspberry Pi 3, you may want to follow my previous article on how to build your reverse proxy server with nginx, Raspbian Jessie Lite and Raspberry Pi 3.
Installing Certbot on Raspbian Jessie Lite
We will need Certbot for deploying Let's Encrypt certificates on our reverse proxy server. You should install Certbot on your Raspbian Jessie Lite before continuing on with this post.
Making your Raspberry Pi 3 reverse proxy server accessible from outside my home network through HTTPS
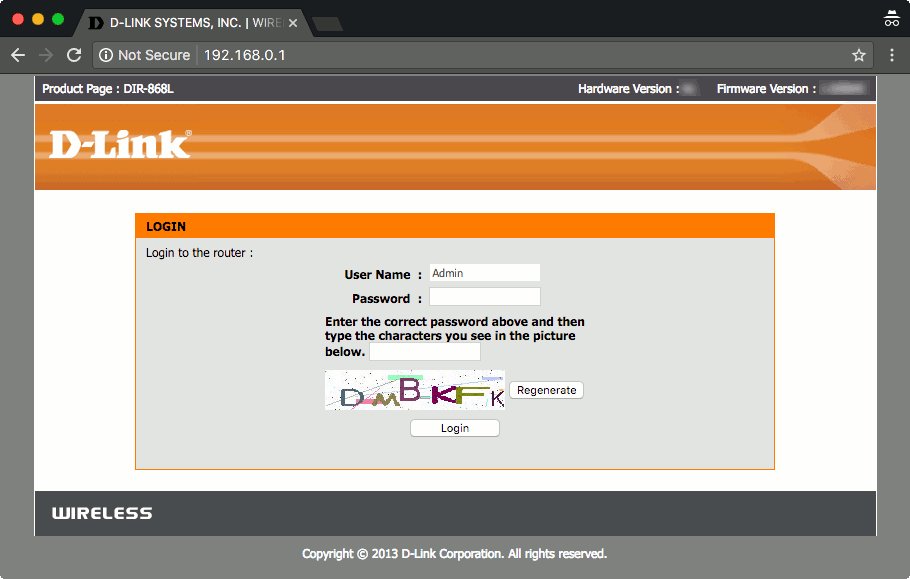
Once we have built our Raspberry Pi 3 reverse proxy server, the next step will be to direct all traffic made to port 80 and port 443 of the public IP address that our home router had acquired from our Internet Service Provider. To do so for D-Link DIR series routers, we will access the web management portal via http://192.168.0.1 from one of our computers that is connected to the private network of our router:
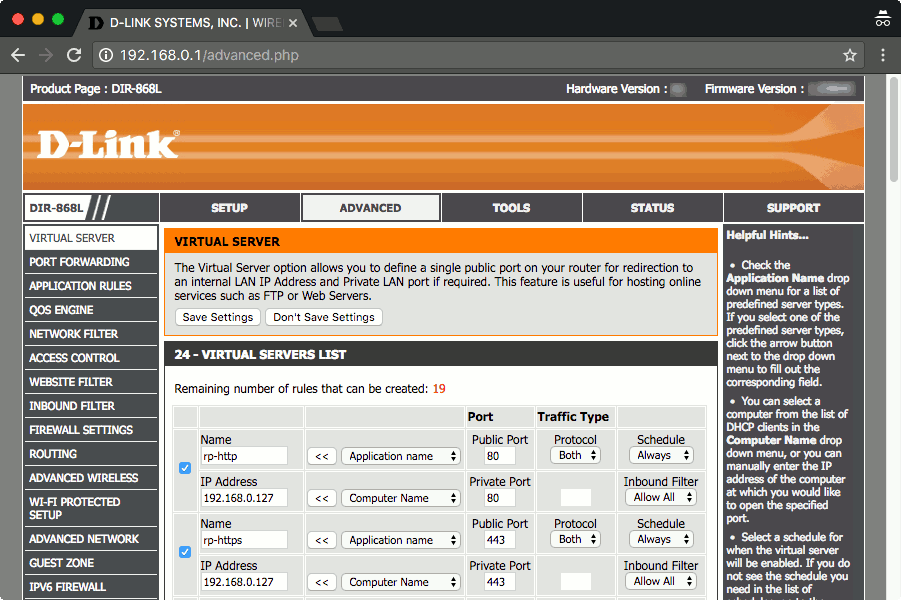
Assuming that the private IP Address of your reverse proxy server is 192.168.0.127, we can do so with the following steps:
- log into the router's management portal
- click on the ADVANCED tab
- click on the VIRTUAL SERVERS link
- map port 80 and port 443 of the public IP Address to port 80 and port 443 of the reverse proxy server IP Address (192.168.0.127)
- and click on the Save Settings button at the bottom of the page.
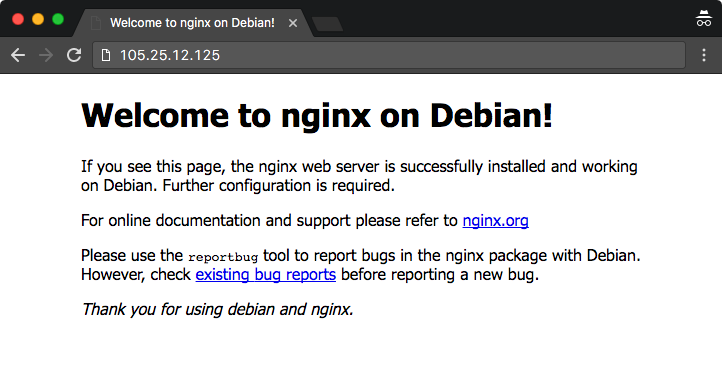
After you have saved your Network Address Translation rules, get the public IP Address that your router had retrieved from the WAN section after clicking on the STATUS tab. Suppose that the public IP Address is 105.25.12.125, I will then be able to access my reverse proxy server at http://105.25.12.125:
Creating a sub domain from a domain and point that sub domain to the public IP address of your home router
The IP Address is not as memorable as a domain name. For my case, since I had a couple of domain names, I could create a sub domain from one of the domain names. And since I am leveraging on DigitalOcean name servers to translate my domain names into IP addresses, I could create a sub domain via DigitalOcean's control panel and map that to my public IP Address at 105.25.12.125.
Configuring nginx to demonstrate control over our sub domain
The next step is to include some configurations at nginx to demonstrate control over our sub domain. The Let's Encrypt server will look for some random file written by the ACME client, Certbot, at the /.well-known uri path of our sub domain in order to be convinced that we owned the sub domain that we wish to secure with HTTPS.
Hence, we will need to configure nginx to serve files via the /.well-known uri. Assuming that I had mapped rms.existingdomain.com to my router's public IP address, I will create a nginx configuration file with the following content:
server {
    listen 80;
    server_name  rms.existingdomain.com;

    root /var/www/rms.existingdomain.com;

    location ~ /.well-known {
        allow all;
    }
}
and saved it as /etc/nginx/sites-enabled/rms.existingdomain.com.conf.
I will also create the /var/www/rms.existingdomain.com directory for Certbot to write to:
sudo mkdir /var/www/rms.existingdomain.com
I will then restart nginx to take the configurations:
sudo systemctl restart nginx.service
Using Certbot to get Let's Encrypt to issue the SSL certificate for the subdomain
After the nginx configurations is being applied, we are ready to use Certbot to get Let's Encrypt to issue the SSL certificate for our subdomain. To do so, I will enter the following command:
sudo certbot certonly --webroot -w /var/www/rms.existingdomain.com/ -d rms.existingdomain.com
When the command runs, it will ask for an email address to notify when the SSL certificate is going to expire and an agreement to Let's Encrypt Terms of Service.
Once we have given the necessary responses, CertBot will create the SSL artefacts inside the /etc/letsencrypt/live/rms.existingdomain.com folder. Inside /etc/letsencrypt/live/rms.existingdomain.com, we will also find cert.pem, chain.pem, fullchain.pem and privkey.pem. The files inside /etc/letsencrypt/live/rms.existingdomain.com folder are symbolic links for facilitating certificate renewal without changing our server side configurations.
Generating a strong Diffie-Hellman group
After the SSL certificate and the corresponding private key were created successfully, we should also precompute a strong Diffie-Hellman group for our reverse proxy server to use for exchanging cryptographic keys with its clients:
sudo openssl dhparam -out /etc/ssl/certs/dhparam.pem 2048
This process will take a very long time to complete but it will be worth the effort as it would make communicating with our server more secure.
Creating the nginx configurations for serving HTTPS on behalf of the router's management server
With the SSL artefacts created, we can then proceed to create the nginx configurations for serving HTTPS on behalf of the router's management server. To do so, we open up /etc/nginx/sites-enabled/rms.existingdomain.com.conf and change its content to the following:
# Redirect HTTP requests to HTTPS
server {
    listen 80;
    server_name  rms.existingdomain.com;
    return 301 https://$host$request_uri;
}

# For ssl
server {
    ssl on;
    ssl_certificate /etc/letsencrypt/live/rms.existingdomain.com/fullchain.pem;
    ssl_certificate_key /etc/letsencrypt/live/rms.existingdomain.com/privkey.pem;
    ssl_protocols TLSv1 TLSv1.1 TLSv1.2;
    ssl_prefer_server_ciphers on;
    ssl_dhparam /etc/ssl/certs/dhparam.pem;
    ssl_ciphers 'ECDHE-RSA-AES128-GCM-SHA256:ECDHE-ECDSA-AES128-GCM-SHA256:ECDHE-RSA-AES256-GCM-SHA384:ECDHE-ECDSA-AES256-GCM-SHA384:DHE-RSA-AES128-GCM-SHA256:DHE-DSS-AES128-GCM-SHA256:kEDH+AESGCM:ECDHE-RSA-AES128-SHA256:ECDHE-ECDSA-AES128-SHA256:ECDHE-RSA-AES128-SHA:ECDHE-ECDSA-AES128-SHA:ECDHE-RSA-AES256-SHA384:ECDHE-ECDSA-AES256-SHA384:ECDHE-RSA-AES256-SHA:ECDHE-ECDSA-AES256-SHA:DHE-RSA-AES128-SHA256:DHE-RSA-AES128-SHA:DHE-DSS-AES128-SHA256:DHE-RSA-AES256-SHA256:DHE-DSS-AES256-SHA:DHE-RSA-AES256-SHA:AES128-GCM-SHA256:AES256-GCM-SHA384:AES128-SHA256:AES256-SHA256:AES128-SHA:AES256-SHA:AES:CAMELLIA:DES-CBC3-SHA:!aNULL:!eNULL:!EXPORT:!DES:!RC4:!MD5:!PSK:!aECDH:!EDH-DSS-DES-CBC3-SHA:!EDH-RSA-DES-CBC3-SHA:!KRB5-DES-CBC3-SHA';
    ssl_session_timeout 1d;
    ssl_session_cache shared:SSL:50m;
    ssl_stapling on;
    ssl_stapling_verify on;
    add_header Strict-Transport-Security max-age=15768000;

    default_type  application/octet-stream;

    listen 443;
    server_name  rms.existingdomain.com;

    root /var/www/rms.existingdomain.com;

    location ~ /.well-known {
        allow all;
    }

    location / {
        proxy_pass http://192.168.0.1;
    }
}
After saving the configuration changes, I restarted nginx by entering the following command:
sudo systemctl restart nginx.service
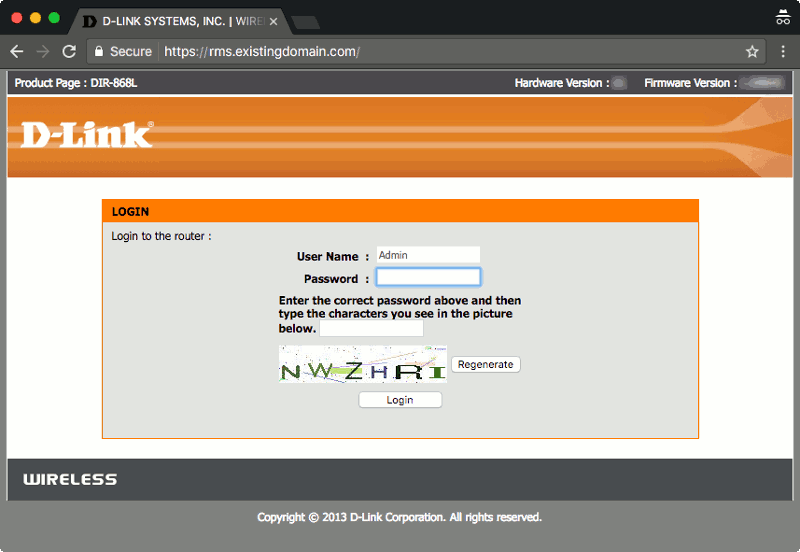
With that, I will be able to manage my D-Link router via HTTPS: