How to read soil moisture level with Raspberry Pi and a YL-69/FC-28 moisture sensor
When I did a Raspberry Pi 4 Model B review, I got myself a Raspberry Pi 4 Model B. Therefore, the current Raspberry Pi 3 Model B+ that I have been using for validating Raspberry Pi ideas became available for another IoT project in the house.
So what should I do with my Raspberry Pi?
Since I have always wanted to build my own indoor herb garden, I plan to use it to help my plants grow well.
When I bought the LED Grow Lights, I am able to give my plants consistent lighting. Given that consistent lighting is solved, I can use my Raspberry Pi 3 to monitor soil moisture so that I can provide water my plants better.
Given these points, this is a proof of concept that I did to read soil moisture level with my Raspberry Pi and a YL-69/FC-28 moisture sensor.
Parts used in the soil moisture monitoring prototype
Since I had already setup Raspbian Buster to run my Raspberry Pi 4 Model B, I built this soil monitoring proof of concept with the following parts:
- Raspberry Pi 4 Model B
- SanDisk 128GB Ultra microSDXC UHS-I Memory Card
- Solderless Prototype Breadboard
- Breadboard Jumper Wires
- MCP3008 I/P ADC chip
What we will be covering in this article should work for a version of Raspberry Pi with 40 GPIO pins, including my free Raspberry Pi 3 Model B+ or a Raspberry Pi Zero W.
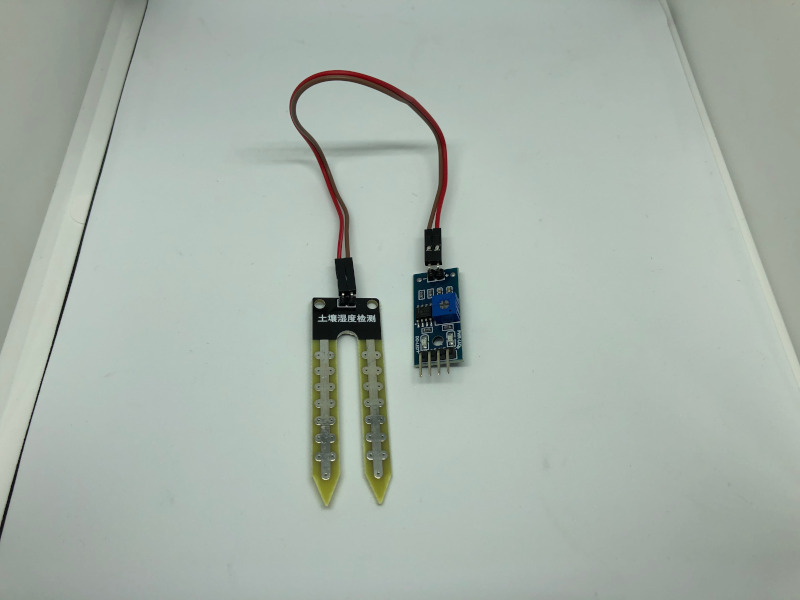
Taking a closer look at the YL-69/FC-28 moisture sensor
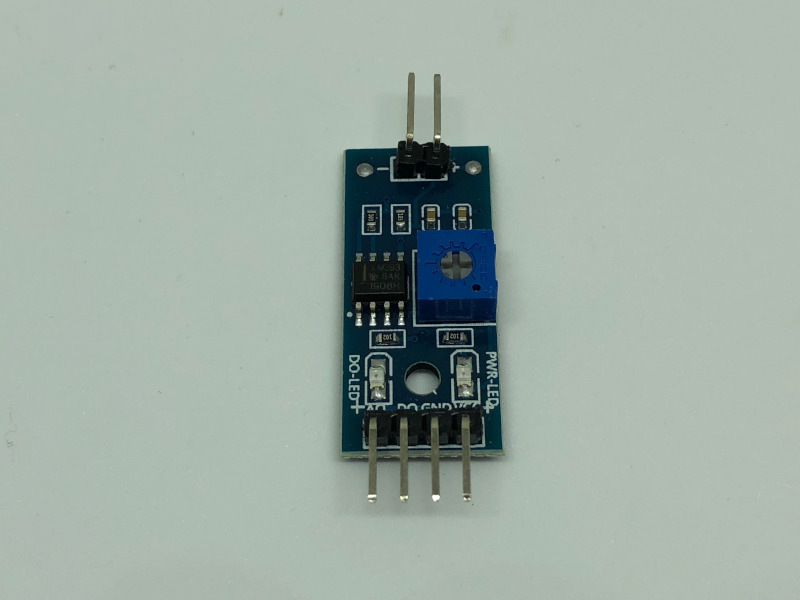
If you look at the M393 Comparator Module that comes with your moisture sensor, you will find 2 pins at the top and 4 pins at the bottom:
We will connect the 2 pins at the top to the soil moisture sensor:
The 4 pins at the bottom will be connected either, directly or indirectly, to the Raspberry Pi.
- AO
- DO
- GND
- VCC
The VCC and GND pins
The VCC pin will need to be connected to a power source of 3.3V while the GND pin to the ground.
Values that can be read from the DO pin
The DO pin can be connected to one of Raspberry Pi GPIO pins directly. However, the value that can be read is either a 0 or a 1. In addition to that, the sensitivity for this pin to output a 0 can be manipulated by turning the screw on the blue potentiometer.
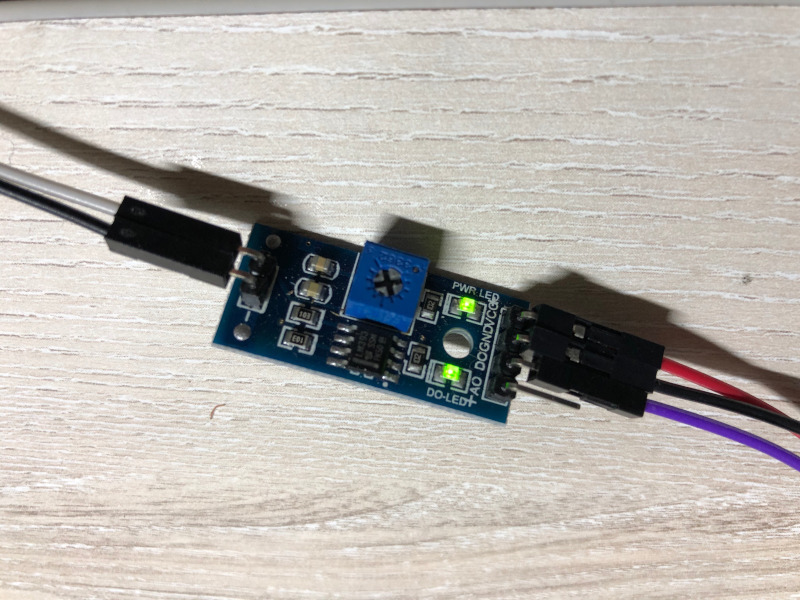
For example, when you turn the screw clock-wise to its limit, the pin will always return a 0. This is what will be returned when the soil moisture sensor is immersed in a glass of water. In addition to that, the LED labeled DO-LED will light up:
Values that can be read from the AO pin
In order for our Raspberry Pi to read from the AO pin, we need to use an analog to digital converter like the MCP3008 chip. When connected to an analog to digital converter, our Raspberry Pi can get a wider range of values from the AO pin. Therefore, readings from this pin are more useful as compared to readings from the DO pin.
Reading from the DO pin of the soil moisture sensor with the Raspberry Pi
If you only want to be notified when your soil moisture had reached a threshold that you had set with the potentiometer, then you can read the DO pin directly from your Raspberry Pi.
Connecting the DO pin of the soil moisture sensor directly to your Raspberry Pi
The following diagram depicts how you can wire your soil moisture sensor directly to your Raspberry Pi:
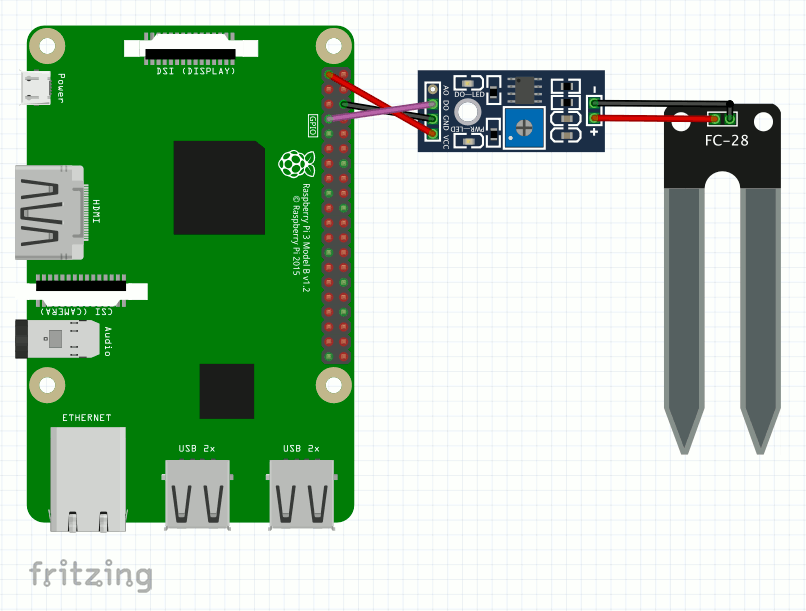
In this example, we had connected the DO pin to GPIO4 pin of our Raspberry Pi.
Therefore, we can use a Python 3 virtual environment (with RPi.GPIO and gpiozero dependencies installed) to run the following Python script to probe if we need to water the soil:
from gpiozero import DigitalInputDevice
import time

d0_input = DigitalInputDevice(4)

while True:
if (not d0_input.value):
    print('Moisture threshold reached!!!')
else:
    print('You need to water your plant')
    time.sleep(2)
Reading the soil moisture sensor through a MCP3008 chip
Since the AO pin can give a wider spectrum of readings, we will be able get a percentage of how wet our soil is.
Connecting the soil moisture sensor to the Raspberry Pi through a MCP3008 chip
As I had mentioned earlier, we will need a Analog to Digital convertor like the MCP3008 chip to read the analog pin (AO) of our soil moisture sensor.
Given that, this is how we can connecting the soil moisture sensor to the Raspberry Pi through a MCP3008 chip:
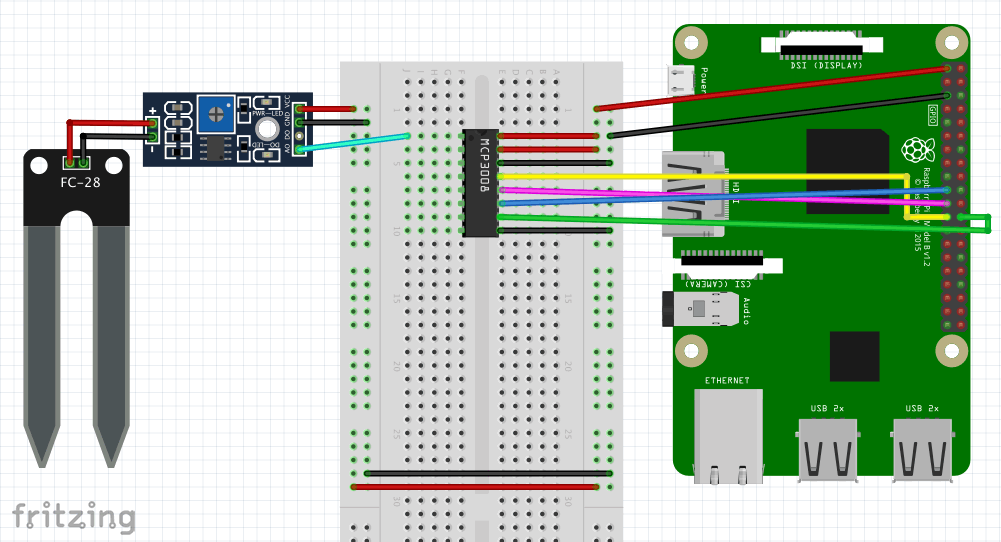
In this setup, we had connected AO pin of our soil moisture sensor to the CH0 pin of the MCP3008 pin.
Therefore, we can use the same Python script that from how to use the MCP3008-I/P chip to help your Raspberry Pi read digital data from analog sensors to probe the soil moisture sensor periodically:
import busio
import digitalio
import board
import time
import adafruit_mcp3xxx.mcp3008 as MCP
from adafruit_mcp3xxx.analog_in import AnalogIn

# create the spi bus
spi = busio.SPI(clock=board.SCK, MISO=board.MISO, MOSI=board.MOSI)

# create the cs (chip select)
cs = digitalio.DigitalInOut(board.CE0)

# create the mcp object
mcp = MCP.MCP3008(spi, cs)

# create an analog input channel on pin 0
chan = AnalogIn(mcp, MCP.P0)

while True:
    print('Raw ADC Value: ', chan.value)
    print('ADC Voltage: ' + str(chan.voltage) + 'V')
    time.sleep(2)
How to interpret the voltage level as level of moisture in your soil
When I ran the Python script without immersing the soil moisture sensor into a cup of water, I got a voltage reading of close to 3.3V. On the other hand, when I immersed the soil moisture sensor into a cup of water, I got a voltage reading of around 1.3V.
Given these points, we can conclude that the voltage reading from the soil moisture sensor will be lower for higher moisture levels. Therefore when we detect a value of close to 3.3V, we better be giving our plant some water.
Summary
By building this proof of concept, I was able to verify that:
- A digital output can be read directly with a Raspberry Pi. However, possible values is either a 0 or 1. When a value of 0 was read from the DO pin, we know that the moisture threshold had been met. Such a threshold can be adjusted by turning the screw on the blue potentiometer.
- An analog output can be read with a Raspberry Pi via an analog to digital converter like the MCP3008 chip. Since the range of values is wider, we will have a sense of how wet the soil is. When the AO pin return a higher value, we will know that the soil moisture level is low.
- When we use a MCP3008 chip in our Raspberry Pi, the Adafruit CircuitPython library for MCP300x SPI ADC can be used to read the analog data from the YL-69/FC-28 soil moisture sensor.
Given these points, I had gathered what I need for building a soil monitoring system for my indoor herb garden.