The steps that I took to build my Raspberry Pi 2 TV box via the OpenELEC Mediacenter image
After I got my new Raspberry Pi 3 to incubate my new WordPress website, I freed up my Raspberry Pi 2 for other things. Since my wife had been yearning for a TV box to watch her favourite videos on our TV, I decided to convert my Raspberry Pi 2 into a TV box.
This post documents the steps that I took to build my Raspberry Pi 2 TV Box with an OpenELEC Mediacenter image.
Getting the hardware that I need for my Raspberry Pi 2 TV Box
I used the following hardware to realise my Raspberry Pi 2 TV Box:
- A Raspberry Pi 2 motherboard
- A Raspberry Pi Model B+ Case Enclosure (Clear)
- A Samsung 16GB Class 6 Micro SDHC up to 24MB/s with Adapter
- A Asus USB-N10 Nano USB Adapter
- A GE 3' High Speed HD 3D 4k 1080p HDMI Cable
Getting a copy of the OpenELEC Mediacenter image
After I got the hardware ready on my desk, I proceeded to download a copy of the OpenELEC Mediacenter image for my Raspberry Pi 2. To do so, I visited the OpenELEC Mediacenter download page for Raspberry Pi 2 builds. From that page, I downloaded OpenELEC-RPi2.arm-6.0.3.img.gz onto my Windows 7 machine.
From OpenELEC-RPi2.arm-6.0.3.img.gz, I extracted out OpenELEC-RPi2.arm-6.0.3.img with 7-zip. I then used Win32 Disk Imager to write OpenELEC-RPi2.arm-6.0.3.img into the Samsung Micro SDHC card via the SD card drive on my laptop.
Booting into OpenELEC 6.0.3 on my Raspberry Pi 2
After the Win32 Disk Imager completed writing the OpenELEC 6.0.3 image onto my Samsung Micro SDHC card, I pushed the Samsung Micro SDHC card into the microSD card slot on my Raspberry Pi 2.
I then connected my Raspberry Pi 2 to my Panasonic VIERA TV via the HDMI cable, and the Asus USB-N10 Nano USB Adapter into one of the USB ports on my Raspberry Pi 2.
I first turned on my Panasonic TV and configured it to get the video input from the HDMI port that my Raspberry Pi 2 was connected to. After that, I turned on my Raspberry Pi 2.
Getting past the initial configurations
When the OpenELEC Mediacenter image started running for the first time, it performed a repartition to use all the available disk space on the microSD card.
It then rebooted itself and showed a configuration wizard where it asked my input for:
- A custom hostname
- My wireless network settings
- Whether to turn on SSH and Samba server, which I chose to do so
Updating OpenELEC image with the update file
After running the initial configurations, I would have a SSH server running on my Raspberry Pi 2 TV box to receive files from my MacBook.
Since there was an update file at the OpenELEC download page for Raspberry Pi 2 builds, I went ahead to update the OpenELEC image with that update file. I downloaded OpenELEC-RPi2.arm-6.0.3.tar onto my MacBook.
Earlier at the configuration screen on the wireless network settings, I was shown the IP address that my router had given my Raspberry Pi 2. I noted the IP address as 192.168.0.110
To perform the update, I would need to send OpenELEC-RPi2.arm-6.0.3.tar into my Raspberry Pi 2 /storage/.update directory. To do so, I entered the following command in my MacBook terminal:
scp /Download/OpenELEC-RPi2.arm-6.0.3.tar root@192.168.0.110:/storage/.update
When prompted for the password, I entered openelec.
Once the transfer had completed, I rebooted my Raspberry Pi 2 TV Box to get it to perform the update.
Calibrating the video display on my Panasonic VIERA TV
Somehow, my Panasonic VIREA TV was not able to show OpenELEC screen correctly; a large margin was being cropped out of the display area.
Thankfully, OpenELEC gives me the option to calibrate my display dimensions.
I navigated to SYSTEM -> Settings -> System -> Video output -> Video calibration...:
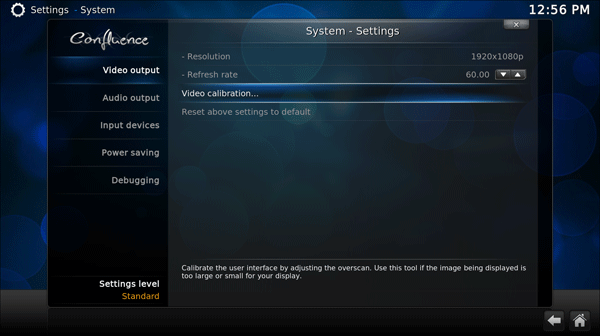
After choosing the Video calibration... option, I followed through the video calibration wizard to fix my cropped display:
I pressed the down and right arrow buttons on my TV remote until the top-left blue marks appear
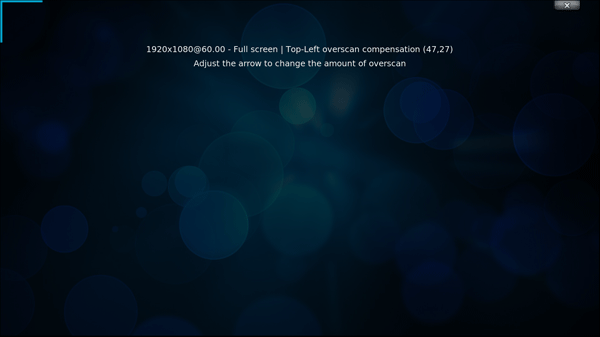
I pressed the up and left arrow buttons on my TV remote until the bottom-left blue marks appear
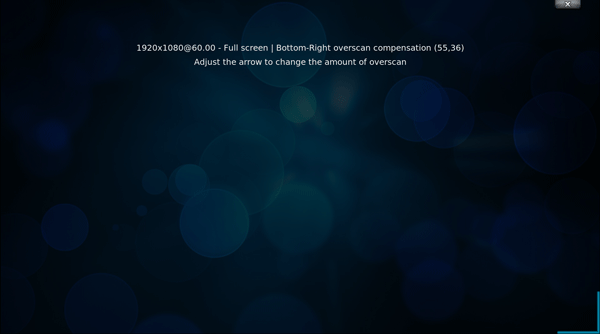
I pressed the up arrow button on my TV remote to move the blue bar to my desired position
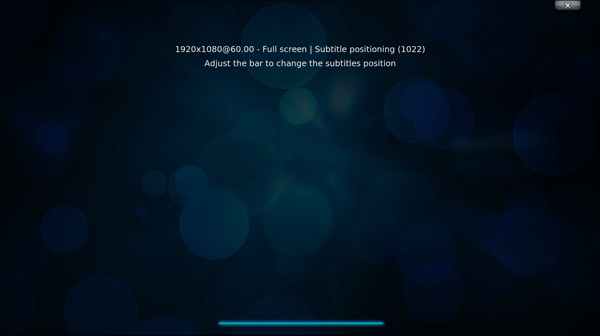
I pressed the up, down, left and right buttons until the blue box became squarish
![]()
With these video calibration settings, I was able to fix the cropped display on my TV screen.
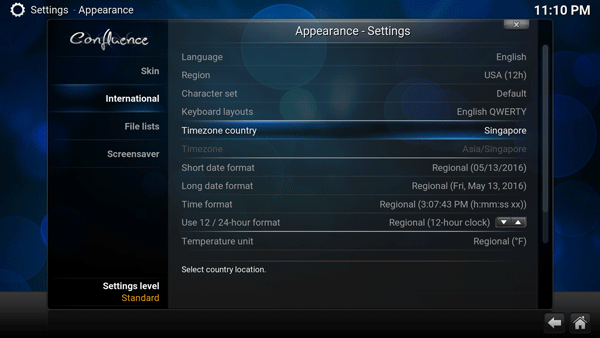
Setting the correct timezone on the OpenELEC image running on my Raspberry Pi 2 TV Box
Since I lived in Singapore, the default timezone for my Raspberry Pi 2 TV Box was not applicable to me.
To correct the timezone for my Raspberry Pi 2 TV Box, I navigated to the Appearance Settings screen via SYSTEM -> Settings -> Appearance -> International. I then set the Timezone country to Singapore:
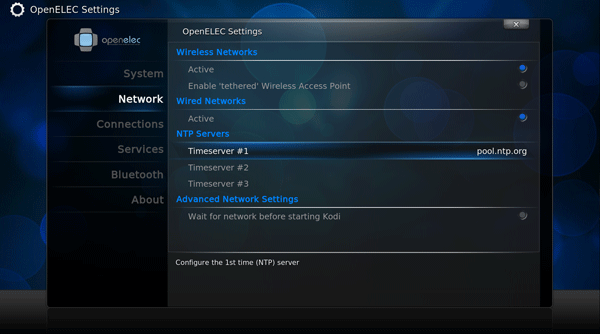
I also navigated to the Network settings screen via System -> OpenELEC settings -> Network. From that screen, I clicked on Timeserver #1 and entered pool.ntp.org:
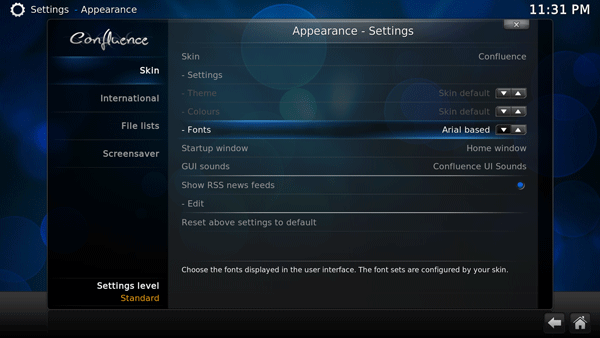
Choosing a font which will display Chinese characters correctly
The default font would caused Chinese characters to appear as square boxes. To ensure that the OpenELEC image display Chinese characters correctly, I navigated to SYSTEM -> Settings -> Appearance -> Skin and changed the Fonts configuration to Arial based:
Installing some video plugins
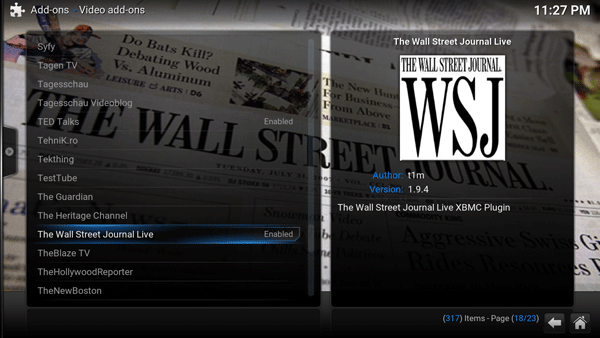
After I had applied the timezone related settings, I went on to install a few video plugins so that my wife could watch her favourite shows. I navigated to the Video add-ons screen via Videos -> Add-ons -> Get more... to do so.
I was then shown a selection list for me to install some video plugins, for example The Wall Street Journal Live:
Fixing Youtube plugin Bad Request errors
The default Youtube plugin was failing me with Bad Request errors. To solve the Youtube plugin problem, I downloaded a copy of the Youtube OpenELEC video plugin fix from RaspberryRabbit's GitHub repository onto my MacBook's file system, saving it as plugin.video.youtube-master.zip.
I then sent plugin.video.youtube-master.zip into the /storage directory on my Raspberry Pi 2 TV Box via the scp command:
scp /Downloads/plugin.video.youtube-master.zip root@192.168.0.110:/storage
After the scp command had completed, I used ssh to get into my Raspberry Pi 2:
ssh root@192.168.0.110
entering openelec as the password.
Once I was inside my Raspberry Pi 2 TV box, I went on to delete the old Youtube plugin:
rm -R /storage/.kodi/addons/plugin.video.youtube
I then rebooted my Raspberry Pi 2 TV box:
reboot
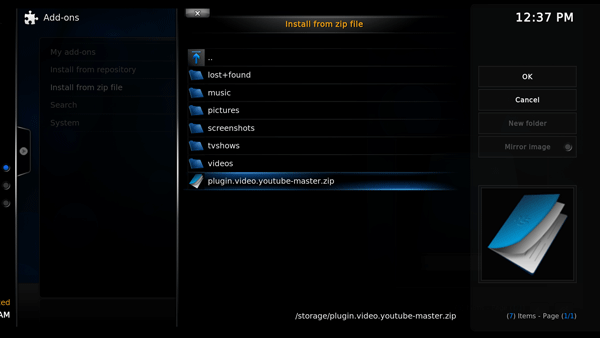
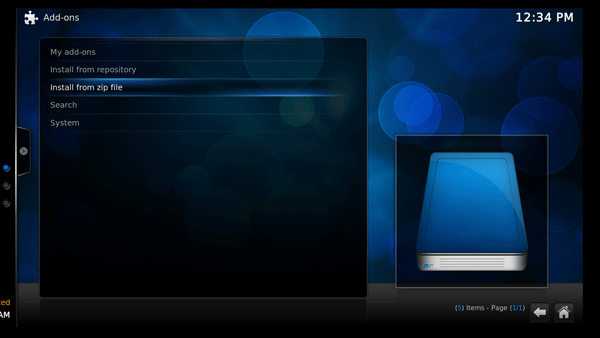
When my Raspberry Pi 2 TV box successfully rebooted, I navigated to SYSTEM -> Settings -> Add-ons -> Install from zip file:
I then clicked on Home folder
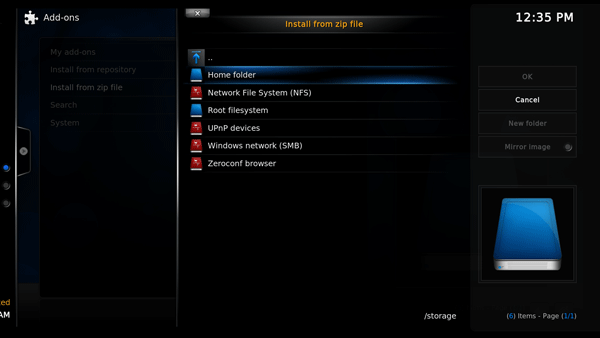
and selected plugin.video.youtube-master.zip: