How to setup a Raspberry Pi LEMP server with Raspbian Buster Lite for running PHP applications
Many useful applications are written in PHP backed by MariaDB/MySQL for data persistency.
When you wondering what you can use a Raspberry Pi for, one way is to turn it into a LEMP server for hosting PHP applications.
With this in mind, let us look at how we can setup a Raspberry Pi LEMP server with Raspbian Buster Lite for running PHP applications.
Recommended parts
In order for you to follow this tutorial, it is recommended that you have a version of Raspberry Pi with either WiFi or RJ45 network connection.
For example, you can get the following items to follow this tutorial:
- CanaKit Raspberry Pi 4 Basic Kit 4GB
- SanDisk 128GB Extreme microSDXC UHS-I Memory Card with Adapter
- ZkeeShop Magnetic Installation Acrylic Case for Raspberry Pi 4 Model B
- Gigabit Ethernet Cable
In addition to the list of recommended hardware, you will need a computer with an SD card writer.
Setting up the LEMP stack on your Raspberry Pi
Once you had gathered the parts to build your server, you can setup the LEMP stack on your Raspberry Pi.
Setup Raspbian Buster Lite for server projects
First, setup Raspbian Buster Lite for Raspberry Pi server projects.
After you had done so, you will be able to use SSH to administrate your Raspbian Buster Lite from your computer.
In order to keep it simple, let's assume that you had ran the following command in a terminal program:
ssh pi@192.168.1.114
and logged into your Raspbian Buster Lite successfully.
Installing Nginx web server on Raspbian Buster Lite
Once you had setup the operating system to run your Raspberry Pi, install Nginx by running the following command:
sudo apt-get update
sudo apt install nginx -y
When the commands had completed, you can run the following command to check if Nginx is successfully installed on your Raspberry Pi:
systemctl status nginx.service
If Nginx is successfully installed, then you should see output similar to the following:
● nginx.service - A high performance web server and a reverse proxy server
Loaded: loaded (/lib/systemd/system/nginx.service; enabled; vendor preset: enabled)
Active: active (running) since Sun 2019-10-22 15:04:28 +08; 2min 03s ago
Docs: man:nginx(8)
Main PID: 2962 (nginx)
Tasks: 5 (limit: 4915)
Memory: 7.6M
CGroup: /system.slice/nginx.service
├─2962 nginx: master process /usr/sbin/nginx -g daemon on; master_process on;
├─2963 nginx: worker process
├─2964 nginx: worker process
├─2965 nginx: worker process
└─2966 nginx: worker process

Oct 22 15:04:28 raspberrypi systemd[1]: Starting A high performance web server and a reverse proxy server...
Oct 22 15:04:28 raspberrypi systemd[1]: Started A high performance web server and a reverse proxy server.
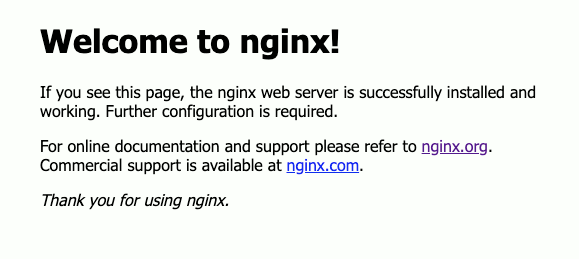
Another way to verify your Nginx installation is by accessing http://<your_raspberry_pi_ip_address> from your web browser. When Nginx is up and running, the default Nginx configurations will render the following page:
Installing MariaDB server and command line client on Raspbian Buster Lite
Once you had installed the Nginx web server, install MariaDB server and command line client with the following command:
sudo apt install mariadb-server mariadb-client -y
After the command had completed, you can verify your installation by running the following command:
sudo mariadb
When you do so, you are using the MariaDB command line client to interact with the server. If these two components are installed properly, you should get an interactive command line session like the following:
Welcome to the MariaDB monitor. Commands end with ; or \g.
Your MariaDB connection id is 47
Server version: 10.3.17-MariaDB-0+deb10u1 Raspbian 10

Copyright (c) 2000, 2018, Oracle, MariaDB Corporation Ab and others.

Type 'help;' or '\h' for help. Type '\c' to clear the current input statement.

MariaDB [(none)]>
When you wish to setup the database instance for your PHP application later, this tool is what you will use.
In order to continue with the rest of the setup, type exit and then Enter to quit the command line client.
Installing PHP and PHP FPM on Raspbian Buster Lite
After you had fulfilled the database part of the LEMP equation, install PHP, PHP FPM and the necessary libraries with the following command:
sudo apt install php php-fpm php-mysql -y
Once the command had completed, check your PHP FPM installation with the following command:
systemctl status php7*
If PHP FPM was installed properly, then you should see output similar to the following:
● php7.3-fpm.service - The PHP 7.3 FastCGI Process Manager
Loaded: loaded (/lib/systemd/system/php7.3-fpm.service; enabled; vendor preset: enabled)
Active: active (running) since Sun 2019-10-22 15:08:15 +08; 1min 14s ago
Docs: man:php-fpm7.3(8)
Main PID: 16080 (php-fpm7.3)
Status: "Processes active: 0, idle: 2, Requests: 0, slow: 0, Traffic: 0req/sec"
Tasks: 3 (limit: 4915)
Memory: 5.0M
CGroup: /system.slice/php7.3-fpm.service
├─16080 php-fpm: master process (/etc/php/7.3/fpm/php-fpm.conf)
├─16081 php-fpm: pool www
└─16082 php-fpm: pool www

Oct 22 15:08:15 raspberrypi systemd[1]: Starting The PHP 7.3 FastCGI Process Manager...
Oct 22 15:08:15 raspberrypi systemd[1]: Started The PHP 7.3 FastCGI Process Manager.
So what had we installed? In case you are wondering, we had installed:
- PHP hypertext processor,
- a HTTP server that will pick up PHP codes and run them to serve HTTP requests and
- the PHP library to interact with the MariaDB server.
Configuring your Raspberry Pi LEMP stack for running your PHP application
Once you had installed the components that make up your Raspberry Pi LEMP stack, you can then configure the stack to run your PHP application.
Configuring Nginx to serve requests for your PHP application by default
Since Nginx is the first to process HTTP requests in a LEMP stack, we need to configure Nginx to serve requests for your PHP application.
As I had mentioned in understanding default Nginx virtual host configurations, there is a set of configurations that make Nginx respond to any HTTP requests directed at port 80 of the host computer.
If you just want to serve HTTP requests directed at the .php scripts from your PHP application, you can uncomment some configurations in the default Nginx configurations.
Given that, open up the default Nginx configuration file with the following command:
sudo nano /etc/nginx/sites-available/default
Once nano loads the file, change:
# Add index.php to the list if you are using PHP
index index.html index.htm index.nginx-debian.html;
to
# Add index.php to the list if you are using PHP
index index.html index.htm index.php index.nginx-debian.html;
And change:
    # pass PHP scripts to FastCGI server
    #
    #location ~ \.php$ {
    #   include snippets/fastcgi-php.conf;
    #
    #   # With php-fpm (or other unix sockets):
    #   fastcgi_pass unix:/run/php/php7.3-fpm.sock;
    #   # With php-cgi (or other tcp sockets):
    #   fastcgi_pass 127.0.0.1:9000;
    #}
to:
# pass PHP scripts to FastCGI server
#
location ~ \.php$ {
    include snippets/fastcgi-php.conf;

    # With php-fpm (or other unix sockets):
    fastcgi_pass unix:/run/php/php7.3-fpm.sock;
}
When you are done with the changes, press Ctrl-X, Y and Enter to save the changes.
Once you are done with the changes, restart Nginx with the following command:
sudo systemctl restart nginx.service
If you want to test whether your Nginx configurations can run PHP application, then you can create a PHP script at /var/www/html/index.php:
sudo nano /var/www/html/index.php
Once nano starts, you can write the following codes into the editor:
<?php
phpinfo();
When you are done with the changes, press Ctrl-X, Y and Enter to save the changes.
At this point in time, you can then use your browser to access http://<your_raspberry_pi_ip_address> to verify your Nginx configurations for running your PHP application.
Since you had marked index.php with the index module in the Nginx configuration, you should be able to see the following web page:
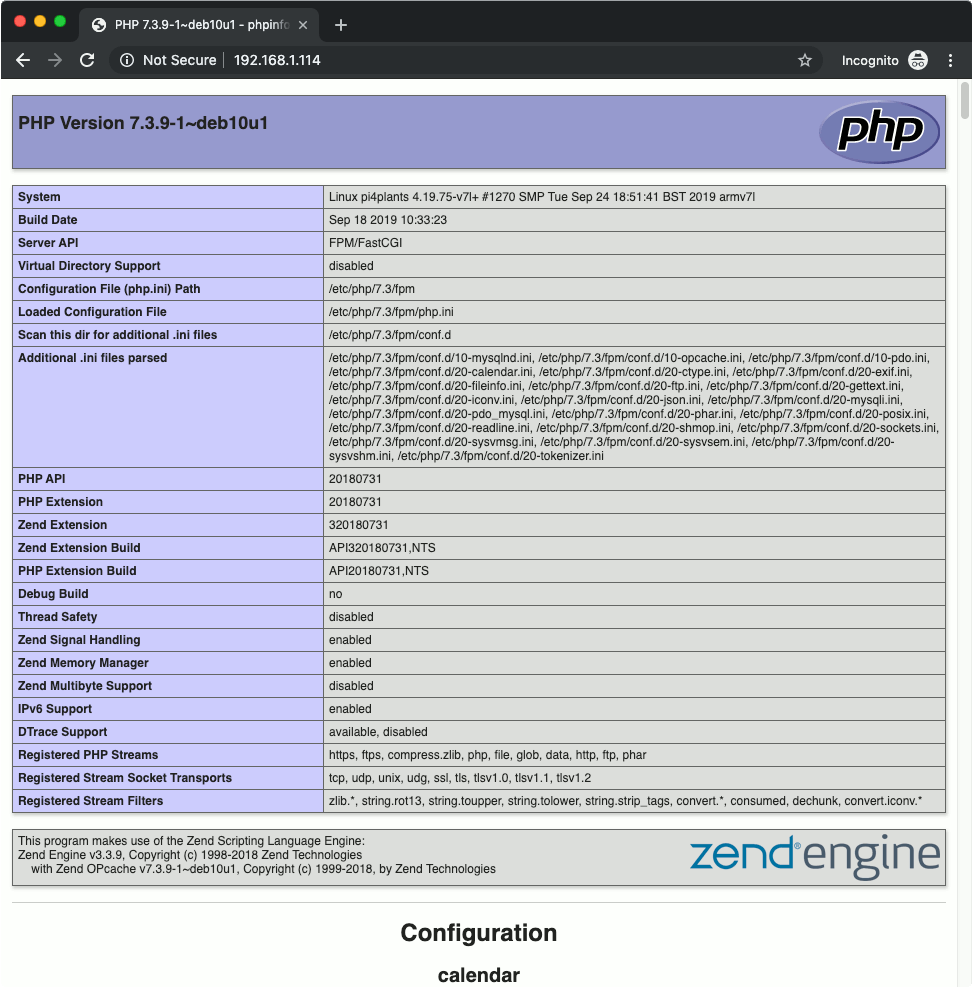
When you see this page, you can be sure that your Nginx web server is able to pass HTTP requests over to PHP FPM server to run PHP scripts from your PHP application.
So what does this set of Nginx configurations do?
In case you are wondering, we had introduced two kinds of configuration changes.
First, by including index.php with the index module, Nginx will append index.php to the end of request URLs directed at directories. For example, requests made to http://192.168.1.114 will be redirected to http://192.168.1.114/index.php.
Second, by uncommenting the location block, Nginx will pass HTTP requests that are directed at requests ending with .php over to the PHP FPM server.
After instructions in /etc/nginx/snippets/fastcgi-php.conf has been processed, Nginx is then instructed to use fastcgi_pass to hand over the HTTP request to our PHP FPM server. The PHP FPM server is reachable via the unix socket at /run/php/php7.3-fpm.sock.
Configuring Nginx to serve requests for your PHP application for a domain name
The earlier section makes Nginx respond to HTTP requests that are directed at any domain name or IP address.
If you want to serve your PHP application for a domain name, then you will need to configure your Nginx differently.
Suppose that we want to serve requests for your PHP application for abcd1234.com.
Given that requirement, we will first run the following command to create a separate Nginx configuration file:
sudo nano /etc/nginx/sites-enabled/abcd1234.com.conf
Once nano starts up, we then write the following content into the editor:
server {
        listen   80;
        ## Your website name goes here.
        server_name abcd1234.com  www.abcd1234.com;
        root /var/www/abcd1234.com;
        ## This should be in your http block and if it is, it's not needed here.
        index index.php;

        location / {
                try_files $uri $uri/ /index.php?$args;
        }

        location ~ \.php$ {
                include fastcgi.conf;
                fastcgi_intercept_errors on;
                fastcgi_pass unix:/run/php/php7.3-fpm.sock;
                fastcgi_buffers 16 16k;
                fastcgi_buffer_size 32k;
        }
}
Once you are done with the changes, press Ctrl-X, Y and Enter to save the changes.
Your Nginx server will take this set of configurations after you had restarted it with the following command:
sudo systemctl restart nginx.service
So what does this set of Nginx configurations do?
For the astute reader, you will have noticed that this set of configurations is quite different to the earlier version.
First, we use server_name to tell Nginx that this set of configurations will apply to HTTP requests made to abcd1234.com and www.abcd1234.com.
After that, we tell Nginx to look into /var/www/abcd1234.com for resources to serve incoming HTTP requests.
In addition, we tell Nginx to append index.php to the end of URLs directed at directories.
If a HTTP request is made to a URL ending with .php, we use try_files to attempt to serve the HTTP request with a file inside the root directory. In case Nginx is unable to find a file to return as a HTTP response, it will serve the HTTP request by running /var/www/abcd1234.com/index.php through the PHP FPM server.
In such a situation, we will be able to include our request dispatcher logic inside /var/www/abcd1234.com/index.php.
Creating the MariaDB user and database instance that your PHP application uses
In order for your application to save data into the MariaDB, you will first need to create a MariaDB user. Therefore, start the MariaDB command line client again with the following command:
sudo mariadb
Creating a MariaDB User
Once you have started the command line client, you can create a user (anewuser) with the following command:
CREATE USER 'anewuser'@'localhost' IDENTIFIED BY 'password';
Creating a MariaDB instance
When you want to create a database instance (adatabase), you can then run the following command:
CREATE DATABASE adatabase;
Once you have the database user and instance, you can then grant privileges for your user to access that instance:
Granting privileges for a MariaDB user to access a MariaDB instance
GRANT ALL ON adatabase.* TO 'anewuser'@'localhost';
Let's Encrypt your PHP application with a browser-trusted SSL/TLS certificate
At this point in time, you will be able to reach your PHP application running on your Raspberry Pi with a browser within the same local network.
So what if you want to access your PHP application from outside your home network via HTTPS?
If your local ISP provides your home router with a public IP address and allows you to host server applications with that IP address, then you will be able to expose your PHP application to the internet.
Along with Let's Encrypt, you will be able to serve your PHP application with a browser-trusted SSL/TLS certificate.
Since Google encourages securing website with HTTPS for better user experience and Let's Encrypt gives us free browser-trusted SSL/TLS certificates, let's see how we can secure your Raspberry Pi PHP application.
Forwarding port 80 and 443 of your router's public IP address to your Pi's private IP address
Before your Pi can receive HTTP requests from the internet, you will need to forward port 80 and 443 of your router's public IP address to your Pi's private IP address.
Most routers should have such a feature. For example if you use a Linksys router, you should be able to forward network traffic made to port 80 and 443 to the web server running on your Raspberry Pi.
Installing Certbot on Raspbian Buster Lite for obtaining Let’s Encrypt’s browser-trusted certificates
In order to use Let's Encrypt facilities, we will need a ACME client to help us get the SSL artefacts from Let's Encrypt. Therefore, install Certbot on Raspbian Buster Lite for obtaining Let’s Encrypt’s browser-trusted certificates.
Configuring Nginx to facilitate Certbot in acquiring the SSL certificate for your domain
Once you have installed Certbot on Raspbian Buster Lite, configure Nginx to facilitate Certbot in acquiring the SSL certificate for your domain.
Given that, open up abcd1234.com.conf again:
sudo nano /etc/nginx/sites-enabled/abcd1234.com.conf
Once nano loads up your configuration file, add in the following location block:
location ~ /.well-known {
        allow all;
}
inside the server block. After you do so, your configuration file should look like this:
server {
        listen   80;
        ## Your website name goes here.
        server_name abcd1234.com  www.abcd1234.com;
        root /var/www/abcd1234.com;
        ## This should be in your http block and if it is, it's not needed here.
        index index.php;

        location ~ /.well-known {
                allow all;
        }

        location / {
                try_files $uri $uri/ /index.php?$args;
        }

        location ~ \.php$ {
                include fastcgi.conf;
                fastcgi_intercept_errors on;
                fastcgi_pass unix:/run/php/php7.3-fpm.sock;
                fastcgi_buffers 16 16k;
                fastcgi_buffer_size 32k;
        }
}
Once you are done with the changes, press Ctrl-X, Y and Enter to save the changes. This set of changes allow Nginx to respond to HTTP requests made by Let's Encrypt servers to confirm that your Certbot is running on the server that serves content for your domain.
Restart your Nginx server so that it takes the new configuration changes:
sudo systemctl restart nginx.service
Using Certbot to get Let's Encrypt to issue browser-trusted SSL certificate for your domain
After Nginx is ready to facilitate Certbot in acquiring the SSL certificate artefacts, run the following command to acquire them:
sudo certbot certonly -a webroot --webroot-path=/var/www/abcd1234.com -d abcd1234.com -d www.abcd1234.com
Generating a strong Diffie-Hellman group for your website
Once Certbot had fetched the SSL certificate artefacts for your domain, generate a Diffie-Hellman group for Nginx to use for exchanging cryptographic keys with its clients:
sudo openssl dhparam -out /etc/ssl/certs/dhparam.pem 2048
Updating the Nginx configurations for serving HTTPS for your PHP application
At this point in time, you will have the necessary artefacts for Nginx to serve your PHP application over HTTPS. Therefore, update the Nginx configurations to use those artefacts for serving your WordPress site over HTTPS.
Given that, open up abcd1234.com.conf again:
server {
    listen 80;
    server_name  abcd1234.com www.abcd1234.com;
    return 301 https://$host$request_uri;
}

server {
        ssl on;
        ssl_certificate /etc/letsencrypt/live/abcd1234.com/fullchain.pem;
        ssl_certificate_key /etc/letsencrypt/live/abcd1234.com/privkey.pem;
        ssl_protocols TLSv1 TLSv1.1 TLSv1.2;
        ssl_prefer_server_ciphers on;
        ssl_dhparam /etc/ssl/certs/dhparam.pem;
        ssl_ciphers 'ECDHE-RSA-AES128-GCM-SHA256:ECDHE-ECDSA-AES128-GCM-SHA256:ECDHE-RSA-AES256-GCM-SHA384:ECDHE-ECDSA-AES256-GCM-SHA384:DHE-RSA-AES128-GCM-SHA256:DHE-DSS-AES128-GCM-SHA256:kEDH+AESGCM:ECDHE-RSA-AES128-SHA256:ECDHE-ECDSA-AES128-SHA256:ECDHE-RSA-AES128-SHA:ECDHE-ECDSA-AES128-SHA:ECDHE-RSA-AES256-SHA384:ECDHE-ECDSA-AES256-SHA384:ECDHE-RSA-AES256-SHA:ECDHE-ECDSA-AES256-SHA:DHE-RSA-AES128-SHA256:DHE-RSA-AES128-SHA:DHE-DSS-AES128-SHA256:DHE-RSA-AES256-SHA256:DHE-DSS-AES256-SHA:DHE-RSA-AES256-SHA:AES128-GCM-SHA256:AES256-GCM-SHA384:AES128-SHA256:AES256-SHA256:AES128-SHA:AES256-SHA:AES:CAMELLIA:DES-CBC3-SHA:!aNULL:!eNULL:!EXPORT:!DES:!RC4:!MD5:!PSK:!aECDH:!EDH-DSS-DES-CBC3-SHA:!EDH-RSA-DES-CBC3-SHA:!KRB5-DES-CBC3-SHA';
        ssl_session_timeout 1d;
        ssl_session_cache shared:SSL:50m;
        ssl_stapling on;
        ssl_stapling_verify on;
        add_header Strict-Transport-Security max-age=15768000;

        listen   443;

        server_name abcd1234.com  www.abcd1234.com;
        root /var/www/abcd1234.com;
        ## This should be in your http block and if it is, it's not needed here.
        index index.php;

        location ~ /.well-known {
                allow all;
        }

        location / {
                try_files $uri $uri/ /index.php?$args;
        }

        location ~ \.php$ {
                include fastcgi.conf;
                fastcgi_intercept_errors on;
                fastcgi_pass local_php;
                fastcgi_buffers 16 16k;
                fastcgi_buffer_size 32k;
        }

}
Once you had done so, press Ctrl-X, Y and Enter to save the changes.
Restart your Nginx server to take the new configurations:
sudo systemctl restart nginx.service
Once your Nginx server had restarted, it will then serve your PHP application with a browser-trusted certificate.
