How to use NSSM to run a Python 3 application as a Windows Service in its own Python 3 virtual environment
If you want to run a Python 3 application as a Windows Service, then you are going to love NSSM. Since NSSM handles the life cycle of a Windows Service for our Python 3 application, we can keep it platform agnostic.
Previously, we saw how we can use a Python 3 virtual environment in Windows 10. Given that, let's see how we can use NSSM to run a Python 3 application as a Windows Service in its own Python 3 virtual environment.
Creating a sample Python 3 application
In order to simplify this tutorial, let's attempt to run the Python 3 Flask application with an API endpoint that generates a QR Code image as a Windows Service.
In addition to that, let us place requirements.txt and run_app.py into the %systemdrive%%homepath%\Documents\qr-code-app folder.
Contents of requirements.txt
flask-restplus==0.12.1
Pillow==6.0.0
qrcode==6.1
Contents of run_app.py
from flask import Flask, Blueprint, request, send_file
from flask_restplus import Api, Namespace, Resource, fields
# import library to help us with file IO
from io import BytesIO

import os, qrcode

# Create Flask app
app = Flask(__name__)

# Associate Api with Blueprint
api_blueprint = Blueprint('API', __name__)
api = Api(api_blueprint,
    title='Api for QR code app',
    version='1.0',
    description='This is an API for QR code app',
    # All API metadatas
)

# Create namespace for containing Qr Code related operations
qrcode_namespace = Namespace('QrCode', description='Qr code related operations')
# Specify uri of qrcode namespace as /qrcode
api.add_namespace(qrcode_namespace, path='/qrcode')
# Specify uri of api blueprint as /api
app.register_blueprint(api_blueprint, url_prefix='/api')

# Define input model
qrcode_creation_input = qrcode_namespace.model('QRCode creation Input', {
    'value': fields.String(required=True, description='The value that is supposed to be encoded into qrcode'),
})


# Define API endpoint for creating Qr Code image
@qrcode_namespace.route('/')
@qrcode_namespace.doc('Creates a QRCode image based on a string value.')
class QrCodeRoot(Resource):

    @qrcode_namespace.expect(qrcode_creation_input)
    @qrcode_namespace.produces(['image/png'])
    @qrcode_namespace.response(200, description='Return QR Code png image file.')
    @qrcode_namespace.response(400, description='Invalid input provided.')
    def post(self):

        # Get value to encode into QR Code
        json_input = request.get_json()
        value_to_turn_into_qrcode = json_input['value']

        # Create qr code image and return it as HTTP response
        pil_img = qrcode.make(value_to_turn_into_qrcode)
        img_io = BytesIO()
        pil_img.save(img_io, 'PNG')
        img_io.seek(0)
        return send_file(img_io, mimetype='image/png')


if __name__ == '__main__':
    port = int(os.getenv("PORT", "5678"))
    app.run(host='0.0.0.0', port=port)
Preparing the virtual environment to run our Python 3 application
Before continuing on, be sure to go through the tutorial on how to use a Python 3 virtual environment in Windows 10. After you had gone through the tutorial, you would have installed Python 3 on your Windows machine. In addition to that, you will understand how to create, activate and install dependencies into a virtual environment.
Creating the virtual environment to run our Python 3 application
Given these points, let us first create the virtual environment to run our Python 3 application. In order to do so, start a command prompt window and type in the following command:
python -m venv "%systemdrive%%homepath%\Documents\qr-code-app-env"
After the command completes, you will find the Python 3 virtual environment within the %systemdrive%%homepath%\Documents\qr-code-app-env folder.
Installing the application dependencies into the virtual environment
Next, activate your Python 3 virtual environment by running the following command:
"%systemdrive%%homepath%\Documents\qr-code-app-env\Scripts\activate.bat"
After your Python 3 virtual environment got activated, run the following command to install the Python dependencies for the application:
pip install -r "%systemdrive%%homepath%\Documents\qr-code-app\requirements.txt"
When the dependencies are installed, you will be able to run your Python application within the virtual environment.
Creating the .bat file to run our Python 3 application in its own virtual environment
At this point in time, you are ready to create a .bat file to start your application within the virtual environment. Given that, create a run_app.bat in the %systemdrive%%homepath%\Documents\qr-code-app folder with the following content:
call ..\qr-code-app-env\Scripts\activate.bat
call python run_app.py
Downloading a copy of NSSM
After you had created the windows batch file to run the your Python application within the virtual environment, proceed to download NSSM. Save the .zip file and extract its content. After extracting the content, you will find a nssm.exe file inside the win32 and win64 folder.
Depending on whether your Windows is 32 bit or 64 bit, you will use the corresponding nssm.exe file to install your Python application as a Windows Service.
For the purpose of this tutorial, let's assume that we want to use the nssm.exe in the C:\nssm-2.24\win64 folder.
Run a command prompt instance as administrator
In order to avoid being prompted for administrator access for subsequent calls to C:\nssm-2.24\win64, let's run a command prompt instance as administrator.
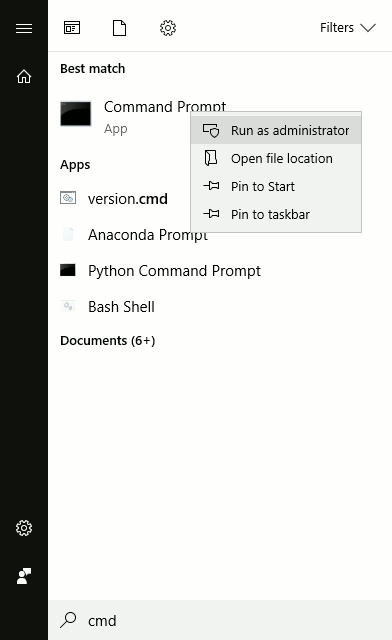
We will run the subsequent commands in this command prompt instance.
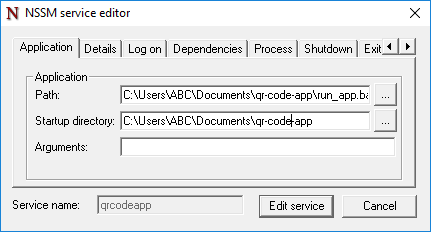
Installing your Python application as a Windows Service with nssm.exe
Given that our nssm.exe is located in C:\nssm-2.24\win64, we can then use the following command to install our Python application as a Windows Service:
C:\nssm-2.24\win64\nssm install qrcodeapp "%systemdrive%%homepath%\Documents\qr-code-app\run_app.bat"
When you run the command, NSSM will install your Python 3 application as a Windows Service.
At this point in time, your Windows Service is not yet started.
Enabling log files for your Python 3 application
When you start your Windows Service at this point in time, it will not generate any log files when it runs.
Therefore, let's configure it to channel application output to log files.
In order to do so, first start NSSM service editor with the following command:
C:\nssm-2.24\win64\nssm edit qrcodeapp
After the command run, NSSM service editor will appear for enabling log files for your Python 3 application.
Given that, click on the I/O tab and enter the paths that you want the log files to appear:
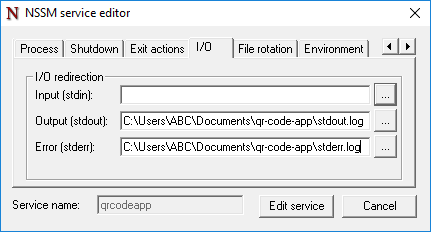
Once you are done with that, click Edit service.
Starting your Python application as a Windows Service
In order to start the Windows Service for your Python application, run the following command:
C:\nssm-2.24\win64\nssm start qrcodeapp
Since Startup Type for the Windows Service is set to Automatic, our Python 3 Flask application will run automatically when we had started our Windows machine.
Further usages of NSSM
At this point in time, we will have fulfilled our goal of using NSSM to run a Python 3 application as a Windows Service in its own Python 3 virtual environment.
In addition to what I had covered, the nssm.exe contains several other functionalities.
In case you need to use other functionalities of NSSM, you can refer to NSSM usage page for more information.