How to setup Raspbian Buster Lite for Raspberry Pi server projects
Last updated: 8th February 2020
When I did a review for Raspberry Pi 4 Model B, the idea of using the Pi 4 for server applications is clear.
Since Raspbian Buster Lite was released alongside the Pi 4, we can use it for new Raspberry Pi server projects.
If you are thinking of building Raspberry Pi server projects, then you may want to follow through this article to help you get started.
Recommended hardware build for your Raspberry Pi server project
In case you have not got your Pi yet, you may want to consider buying the following hardware:
- CanaKit Raspberry Pi 4 Basic Kit 4GB
- SanDisk 128GB Extreme microSDXC UHS-I Memory Card with Adapter
- Raspberry Pi 4B aluminium heatsink armor case with dual fans or one of the Raspberry Pi 4B cases with cooling mechanisms
- Gigabit Ethernet Cable (If you want to connect your Pi to an Ethernet network)
In addition to the list of recommended hardware, you will need a computer with an SD card writer.
Downloading a copy of Raspbian Buster Lite onto your computer
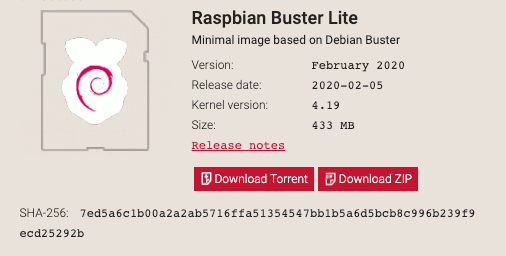
When you have the hardware for your Raspberry Pi server, proceed to Raspbian download page to download Raspbian Buster Lite:
Installing Raspbian Buster Lite image onto your microSD card
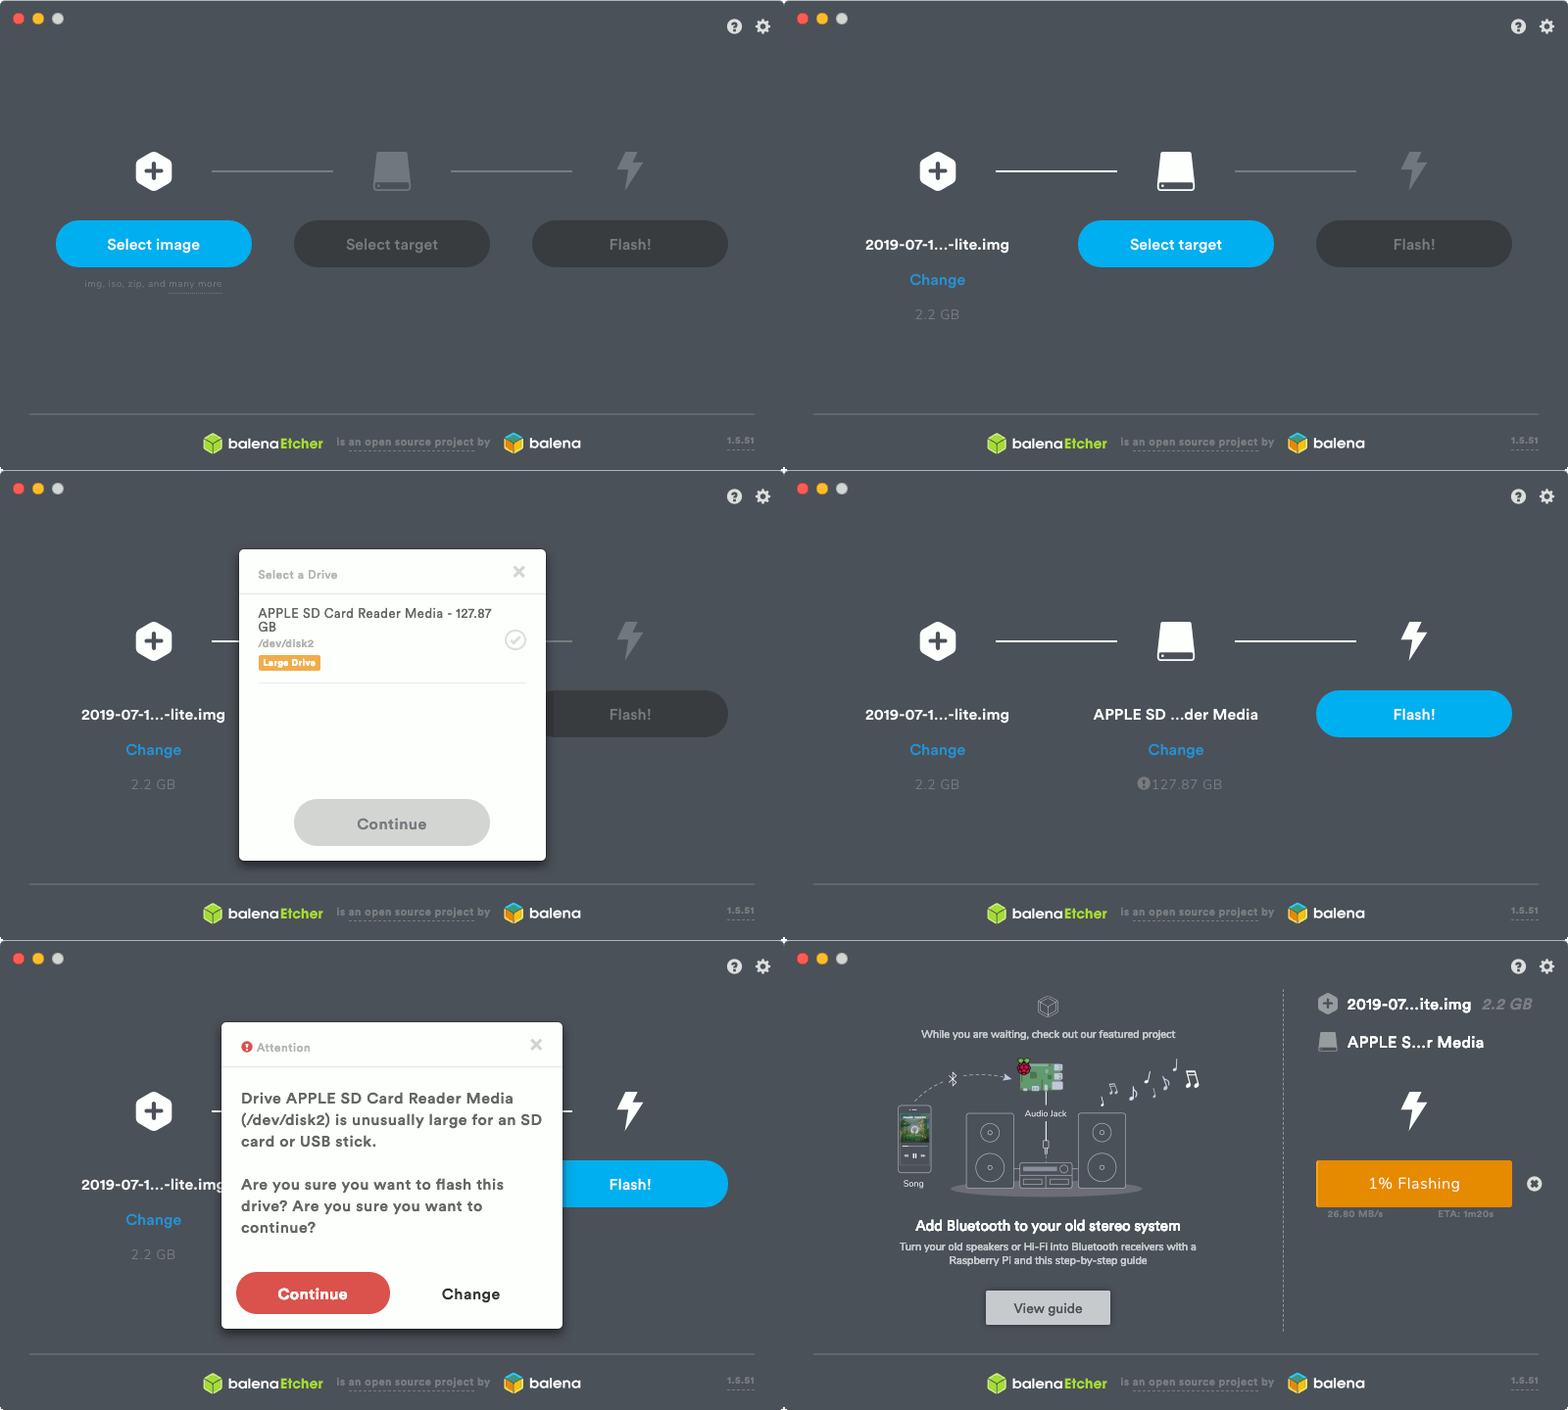
After you had downloaded Raspbian Buster Lite, insert your microSD card into the SD card writer of your computer.
Once you had done so, start balenaEtcher and use it to flash the contents of the .zip file onto your microSD card:
Enabling SSH server when Raspbian Buster Lite boots for the first time
In order to remotely administer your Raspberry Pi server, you will need to enable the SSH server.
So how do you enable SSH server when Raspbian Buster Lite boots for the first time?
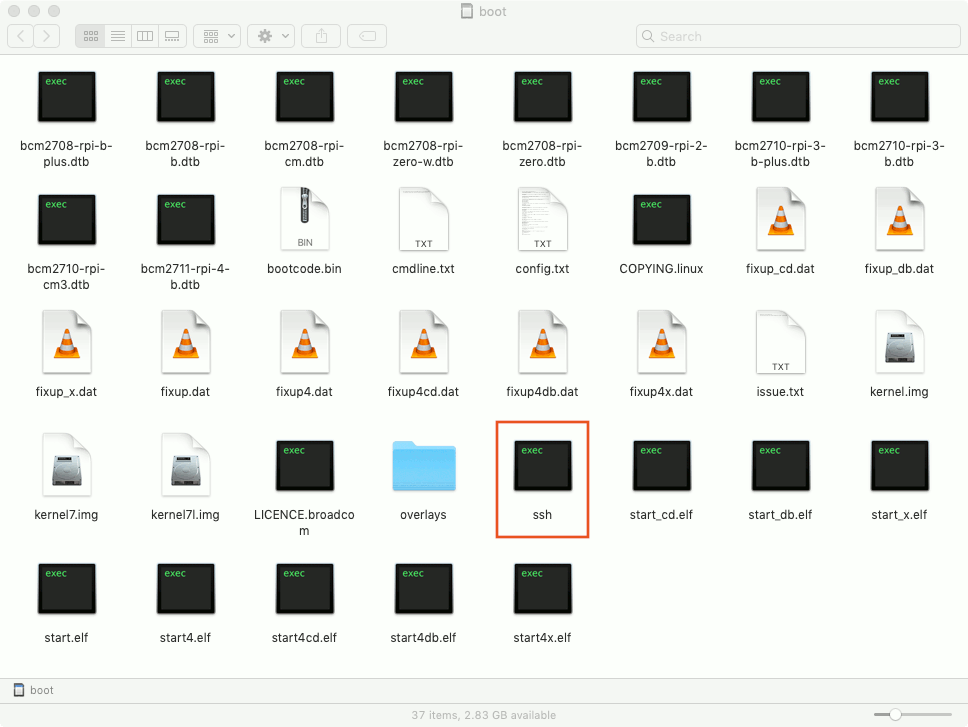
First, reinsert your microSD card to your computer. When your computer loads up your microSD card, simply copy a blank file named as ssh into the root directory of your microSD card:
Connecting Raspbian Buster Lite to your WiFi network on first boot
If you had decided that your Raspberry Pi server will connect wirelessly to your home network, then you may want it to do so on first boot.
When that happens, you will be able to remotely administer your Raspberry Pi server over wireless connection. This is especially useful if you are setting up a Raspberry Pi Zero W or Raspberry Pi Model 3A+ as the server.
So how do you get your Raspberry Pi to connect to your WiFi network on first boot?
In order to do so, prepare a file named wpa_supplicant.conf with content similar to the following:
country=SG
ctrl_interface=DIR=/var/run/wpa_supplicant GROUP=netdev
update_config=1

network={
scan_ssid=1
ssid="the_wireless-network"
psk="the_wireless-network_password"
proto=WPA
key_mgmt=WPA-PSK
}
The name of your wireless network is represented by "ssid".
The password to connect to your wireless network is represented by "psk".
The communication protocol used by your router is represented by "proto". Some acceptable values are WPA and RSN.
The key management protocol used by your router is represented by "key_mgmt". Some acceptable values are "WPA-PSK" and "WPA-EAP".
The values for "proto" and "key_mgmt" are commonly set to WPA and WPA-PSK.
Once you had created your own version of wpa_supplicant.conf for your network, copy it to the root directory of your microSD card:
Booting your Raspbian Buster Lite on your Raspberry Pi
At this point in time, you are ready to boot up your Raspbian Buster Lite on your Raspberry Pi.
First, remove the microSD card from your computer and put it into the SD card slot on your your Raspberry Pi.
After that, attach the power adapter to your Raspberry Pi. If you are using the Ethernet cable, connect it to your Raspberry Pi too. Once you had connected the peripherals to your Pi, supply power to the power adapter.
Finding the IP address of your Raspberry Pi
When your Raspberry Pi boots up, it should be able to get an IP address from your home router.
Since multicast DNS is supported out-of-the-box by the Avahi service on Raspbian, you can ping raspberrypi.local to get your freshly minted Raspbian box to respond with its IP address.
Given that, start a terminal program on a computer that is connected to the same network as your Raspberry Pi. After that, run the following command in the terminal program:
ping raspberrypi.local
When your Raspberry Pi has an IP address, it should respond with the content similar to the following:
PING raspberrypi.local (192.168.1.114): 56 data bytes
64 bytes from 192.168.1.114: icmp_seq=0 ttl=64 time=8.226 ms
Given that input, you can deduce that your Raspberry Pi had gotten 192.168.1.114 as the IP address.
Even if your Raspberry Pi does not respond with the IP address, you can access your home router's control panel to find the IP address of your Raspberry Pi. If you do not find an entry with raspberrypi as the hostname, you may want to double-check your network configurations.
Connecting to your Raspbian Buster Lite via SSH
Once you got the IP address of your Raspberry Pi, you can configure your Raspberry Pi via SSH.
Since, the default user is pi and the default password is raspberry, we will be able to get into our Raspberry Pi with the following command:
ssh pi@192.168.1.114
After you had run the command, enter raspberry as the password to login to Raspbian Buster Lite.
Changing the default password of the user
When you login to Raspbian Buster Lite for the first time, it will prompt you to change the default password password:
Linux raspberrypi 4.19.57-v7l+ #1244 SMP Thu Jul 4 18:48:07 BST 2019 armv7l

The programs included with the Debian GNU/Linux system are free software;
the exact distribution terms for each program are described in the
individual files in /usr/share/doc/*/copyright.

Debian GNU/Linux comes with ABSOLUTELY NO WARRANTY, to the extent
permitted by applicable law.
Last login: Fri Sep 13 15:36:02 2019 from 192.168.1.147

SSH is enabled and the default password for the 'pi' user has not been changed.
This is a security risk - please login as the 'pi' user and type 'passwd' to set a new password.
If you want to take that advice, you can change the password of the pi user by entering the following command:
passwd
After entering raspberry as the current password and your new password twice, you will be able to change the password of the pi user.
Configuring the locale settings
Next, configure the locale settings for your Raspbian Buster Lite. To do so, start the Raspberry Pi Software Configuration Tool with the following command:
sudo raspi-config
When the Raspberry Pi Software Configuration Tool starts, follow through the screens to install your locale settings:
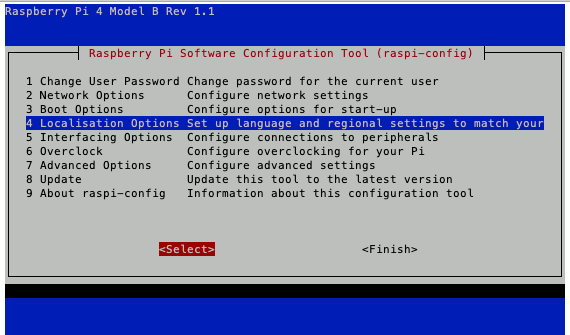
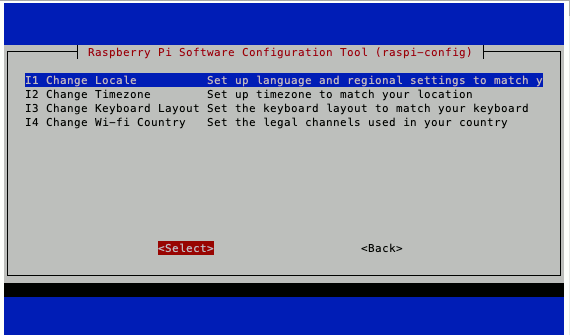

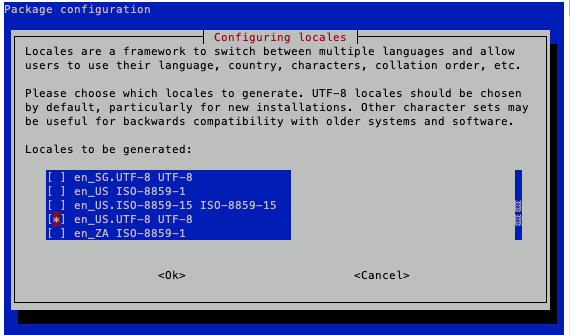

(Press space to select the locale to install and enter to move to next screen)
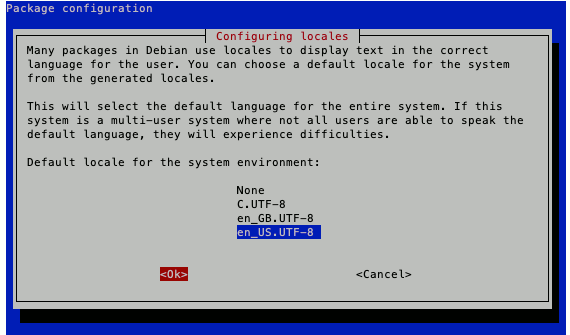

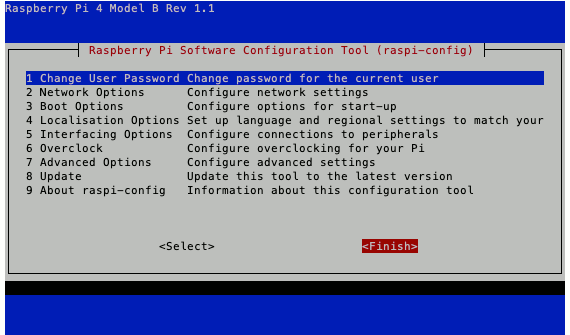


After exiting raspi-config, open up /etc/default/locale with nano:
sudo nano /etc/default/locale
Once nano loads up /etc/default/locale, change its content to the following:
LANG=en_US.UTF-8
LC_ALL=en_US.UTF-8
LANGUAGE=en_US.UTF-8
Once you are done with the changes, press Ctrl-X, Y and Enter to save the changes.
When you do so, the locale settings for Raspbian Buster Lite will persist through system reboots.
Changing Timezone
If your Raspberry Pi does not reside in the British Summer Time timezone, then you may want to change the timezone of your Raspberry Pi.
In order to do so, start the Raspberry Pi Software Configuration Tool again:
sudo raspi-config
When raspi-config starts, you can change the Timezone of your Raspberry Pi. For example, if I want to change my Timezone to Singapore's timezone, I will go through the following screens:


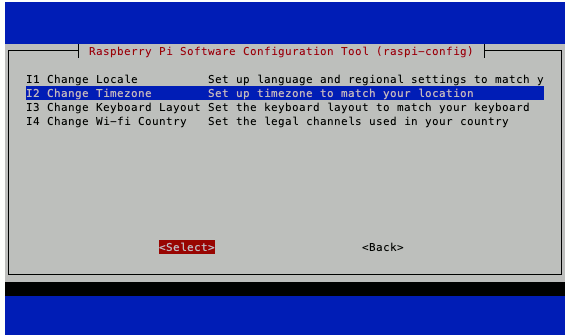

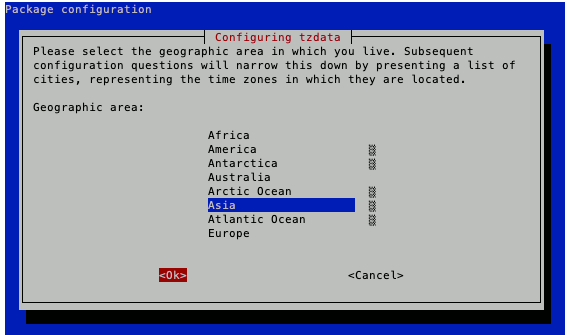

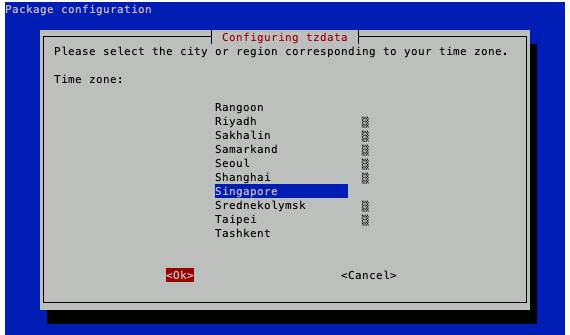


Once you had configured the Timezone, restart Raspbian Buster Lite with the following command:
sudo shutdown -r now
When your Raspbian Buster Lite comes back again, it will take your locale configurations.
Changing the hostname
If you intend to deploy several Raspberry Pis in your home, you may want to give each of them a unique hostname.
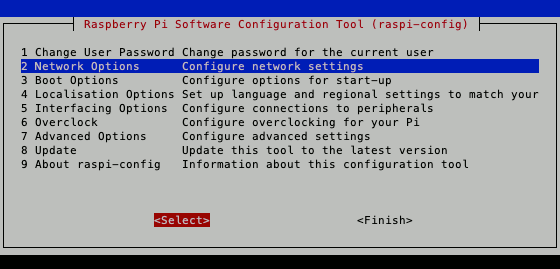
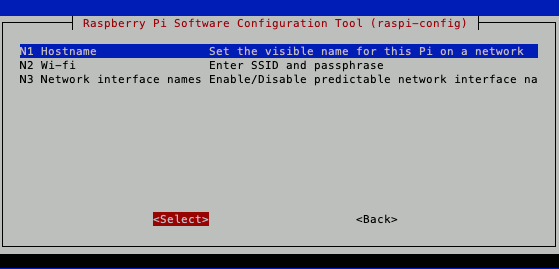
When you want to change the hostname of your Raspberry Pi, you can use the Raspberry Pi Software Configuration Tool.
After you have logged into your Raspbian Buster Lite, run the following command to start the Raspberry Pi Software Configuration Tool again:
sudo raspi-config
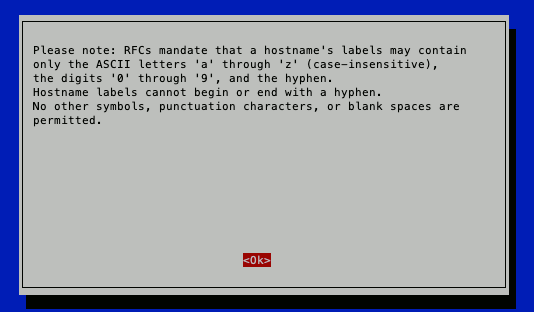
When raspi-config starts, follow through the following screens to change the hostname of your Raspberry Pi:
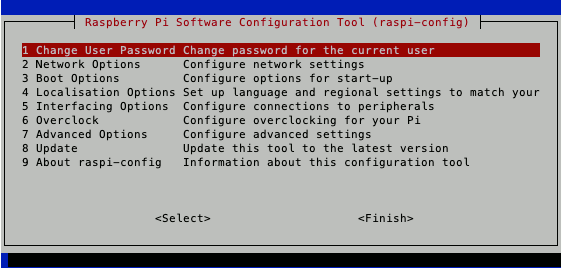




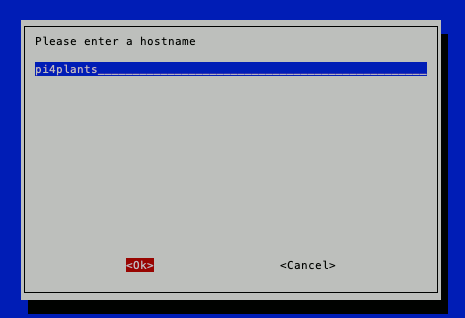

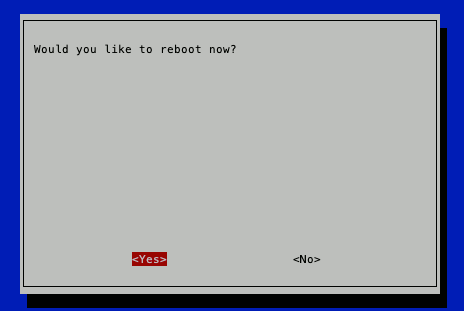

After your Raspberry Pi had restarted, it will take the new hostname that you had provided.